

Product Updates
see our latest updates and developments here.
White Labelling of the App Interface
What has changed:
The app interface now supports white labeling, allowing businesses to customize their appearance with their branding and color scheme. This feature enables a more personalized and professional presentation for end users.
How it affects you:
This customization option provides an opportunity to enhance brand visibility and user experience by directly integrating your unique brand identity into the app interface.
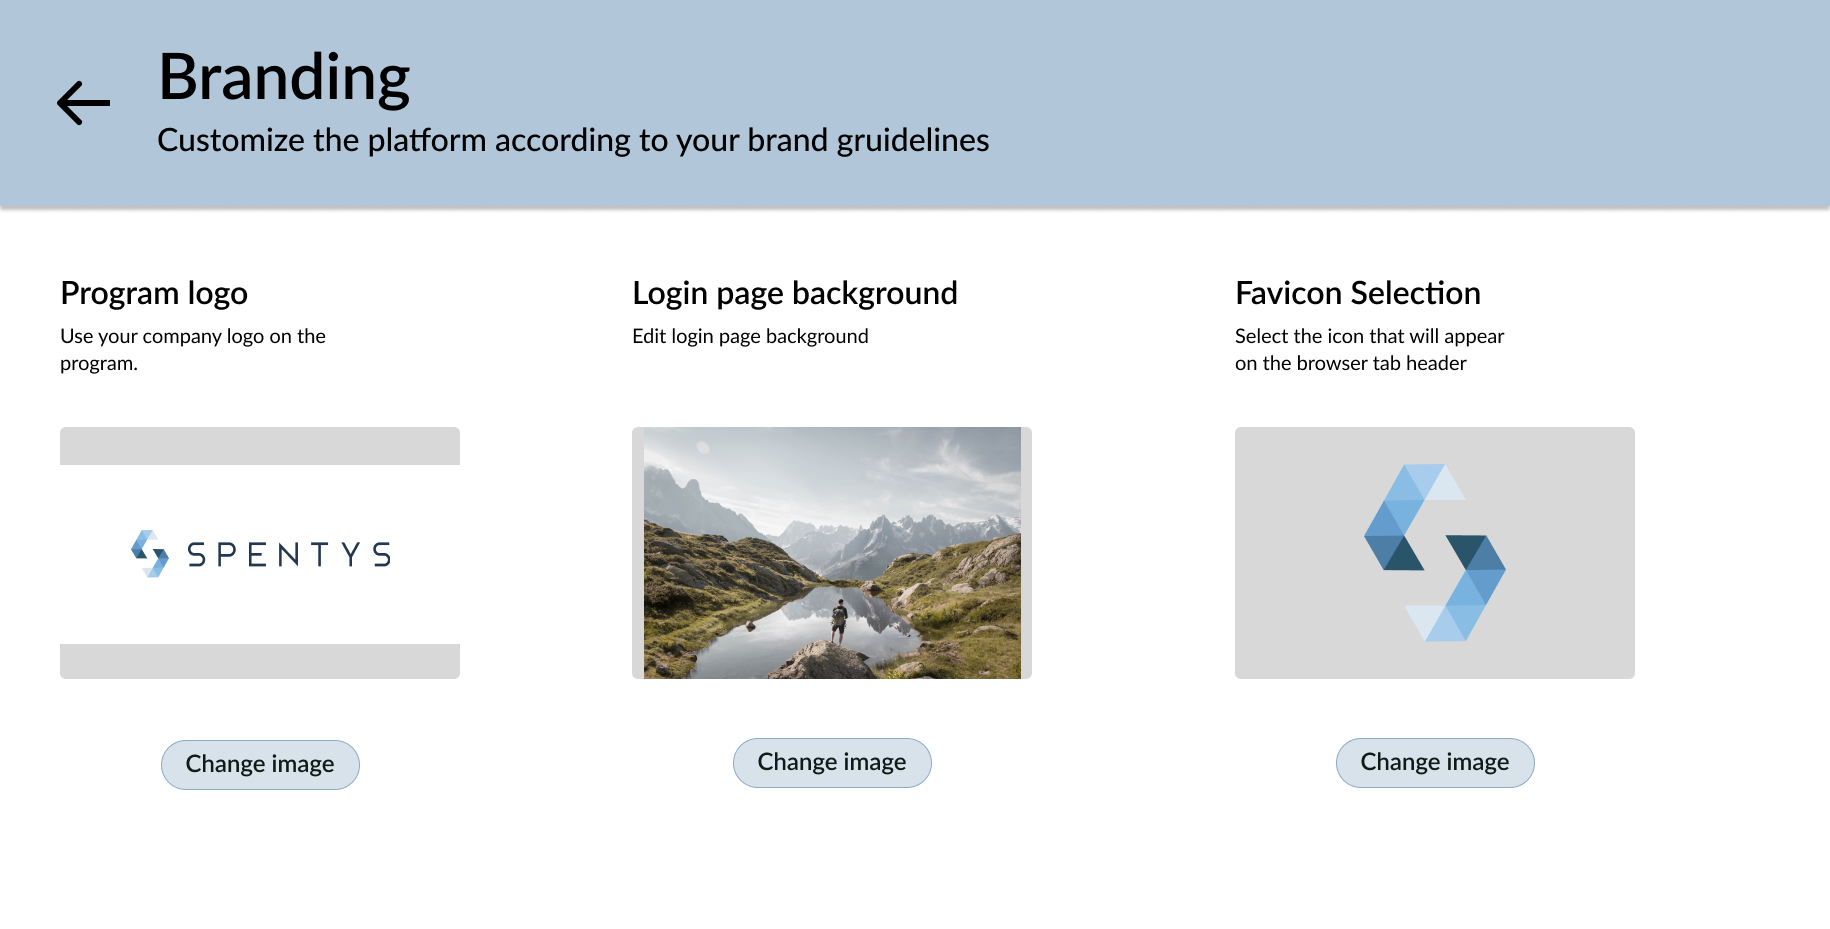
How to use it:
Contact your Spentys representative for more information.
Vapor Smoothing Option for MJF Products
Vapor smoothing, a method often referred to as chemical vapor smoothing, is a post-processing technique where printed parts are exposed to vaporized solvents. This process transforms parts with a 'sugar cube' finish or visible layer lines into objects with smooth, glossy surfaces.
What Has Changed:Previously, vapor smoothing wasn't an available choice. However, now you have the flexibility to select the degree of post-processing finish you desire for your products.
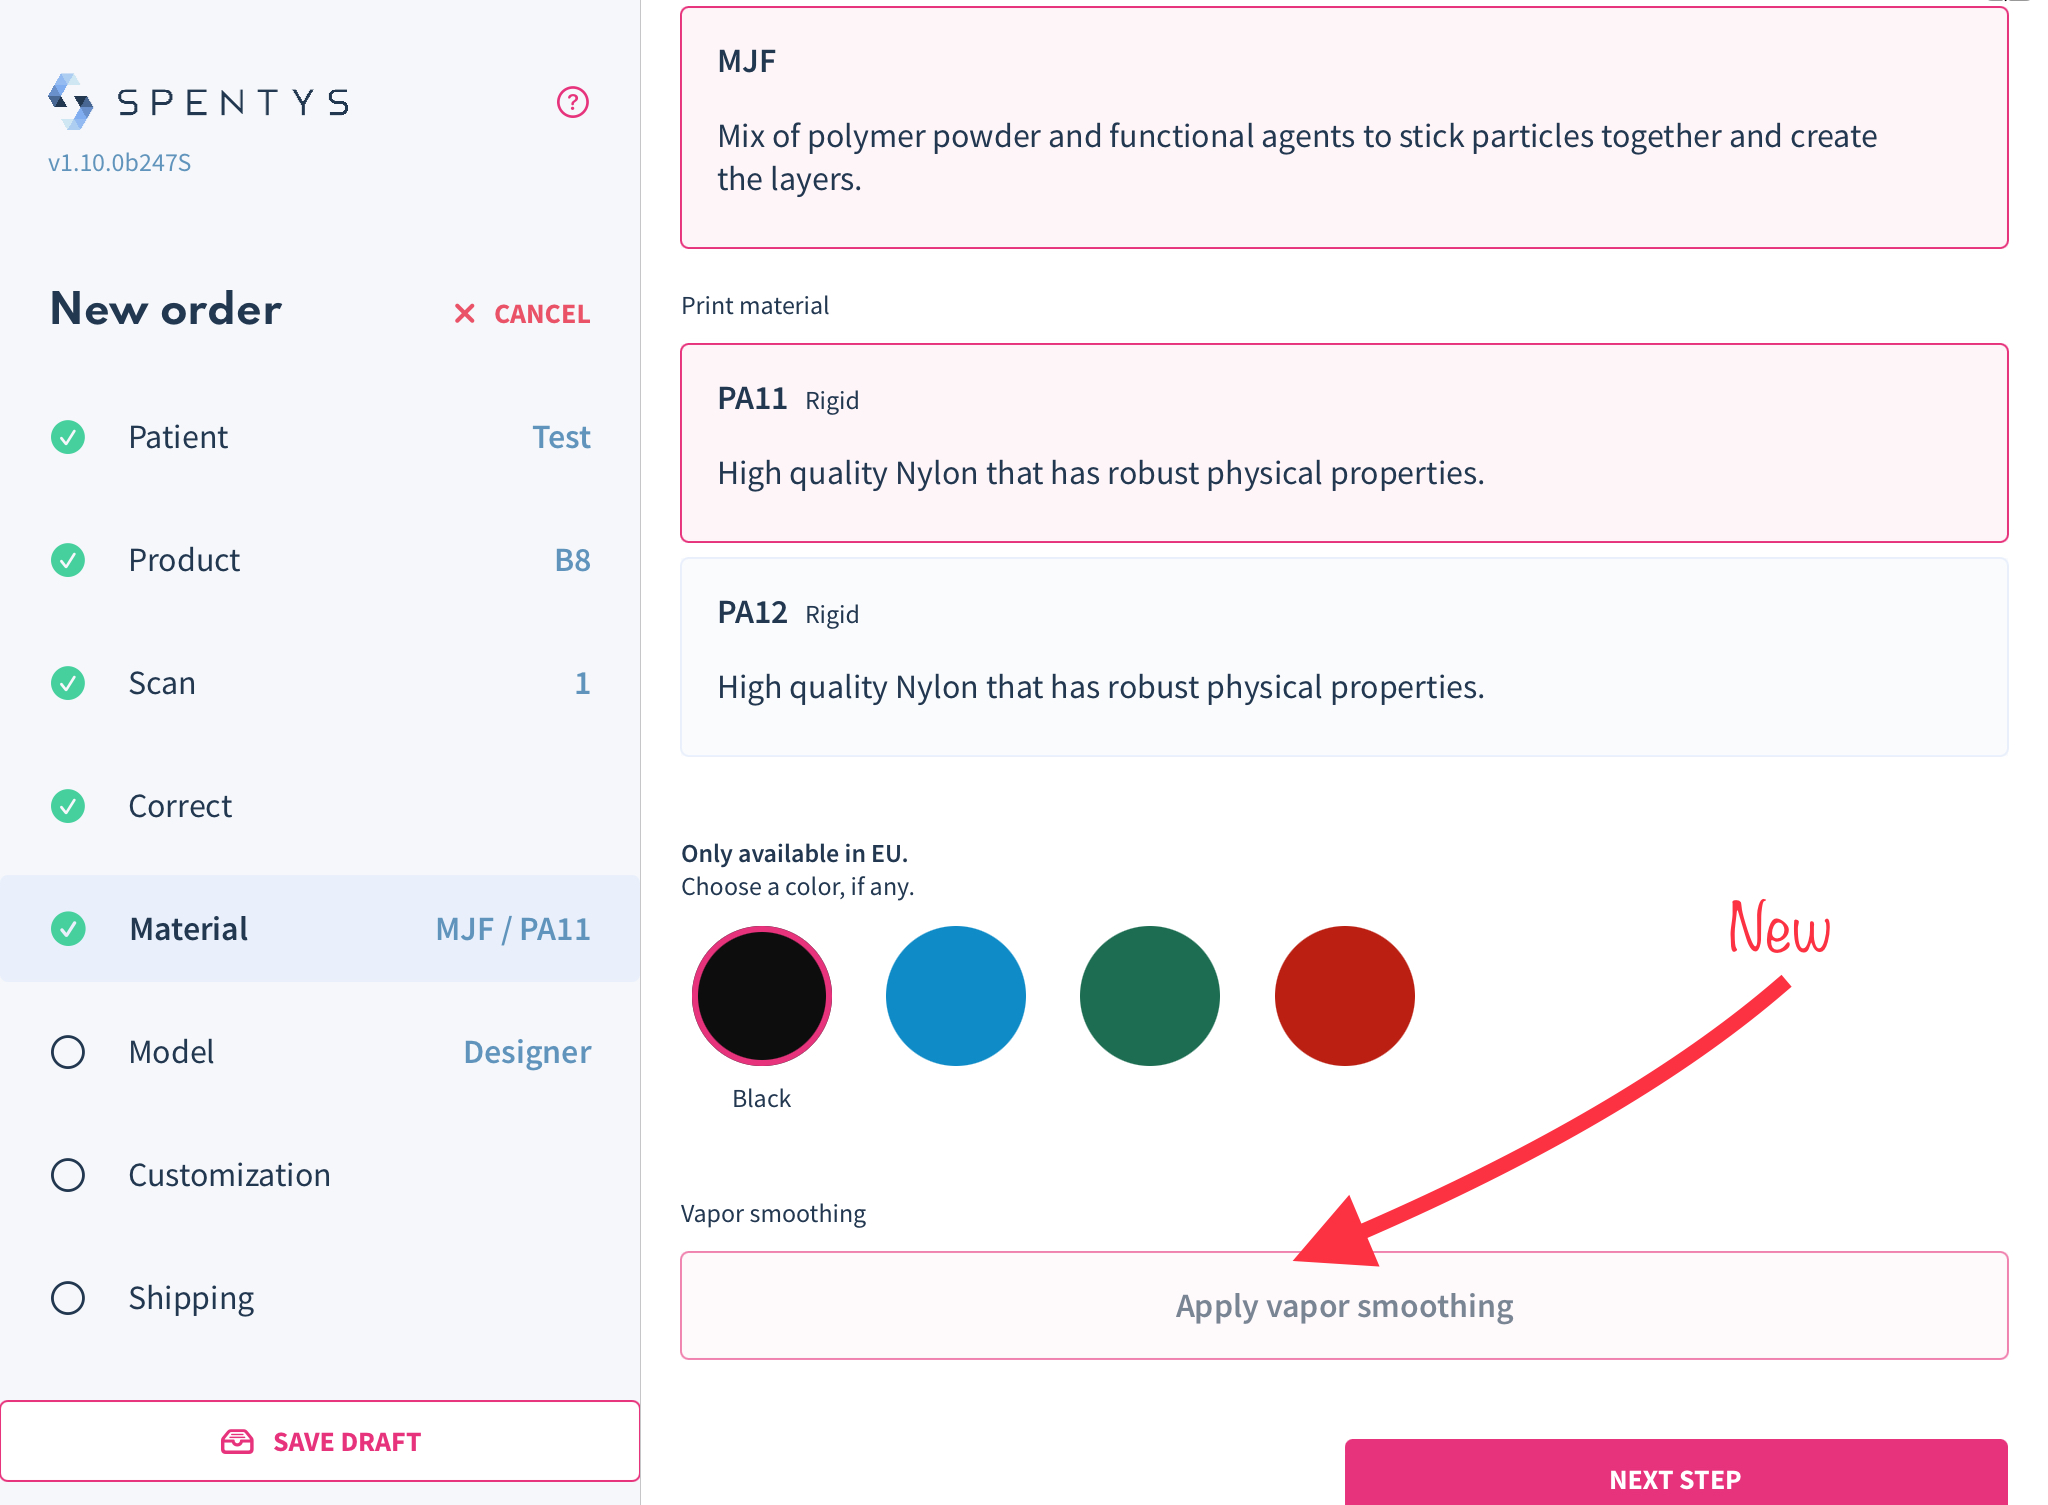
How It Affects You: Incorporating vapor smoothing into the production process can extend the lead time of your orders. Despite this, it ensures that your final printed items possess a significantly finer and more polished finish.
How to Use It: When you choose MJF (Multi Jet Fusion) printing as your preferred technology through Spentys, you'll now have the opportunity to select not only the material and color but also whether you want vapor smoothing applied to your print.
Web Platform Redesigned for Improved Usability
What we’ve changed
In this latest update, we have completely redesigned our customer platform to improve usability and consistency. Our team has worked hard to eliminate inconsistencies and streamline the platform for a smoother experience. Additionally, we have updated the branding to align with the iOS application, resulting in a more cohesive and unified visual identity.
How it affects you
As a user of our customer platform, this update will greatly enhance your experience. The redesigned platform will be easier to navigate and use, allowing you to more efficiently access the features you need. Additionally, the updated branding will provide a consistent visual experience across all of our applications, making it easier for you to recognise and interact with our brand.
How to use it
To access the redesigned platform, simply log in as you normally would. You will immediately notice the improvements in usability and consistency, providing a more streamlined and efficient experience. The updated branding will also be apparent, reflecting our commitment to providing a cohesive visual identity across all of our applications.
Vapor Smoothing Option
What has changed:
A vapor smoothing option has been added.
How it affects you:
Offers a higher quality finish but requires planning for the additional production time.

How to use it:
Select the vapor smoothing option during the design phase if the improved finish is desired, keeping the extended delivery time in mind (2 days extended delivery time).
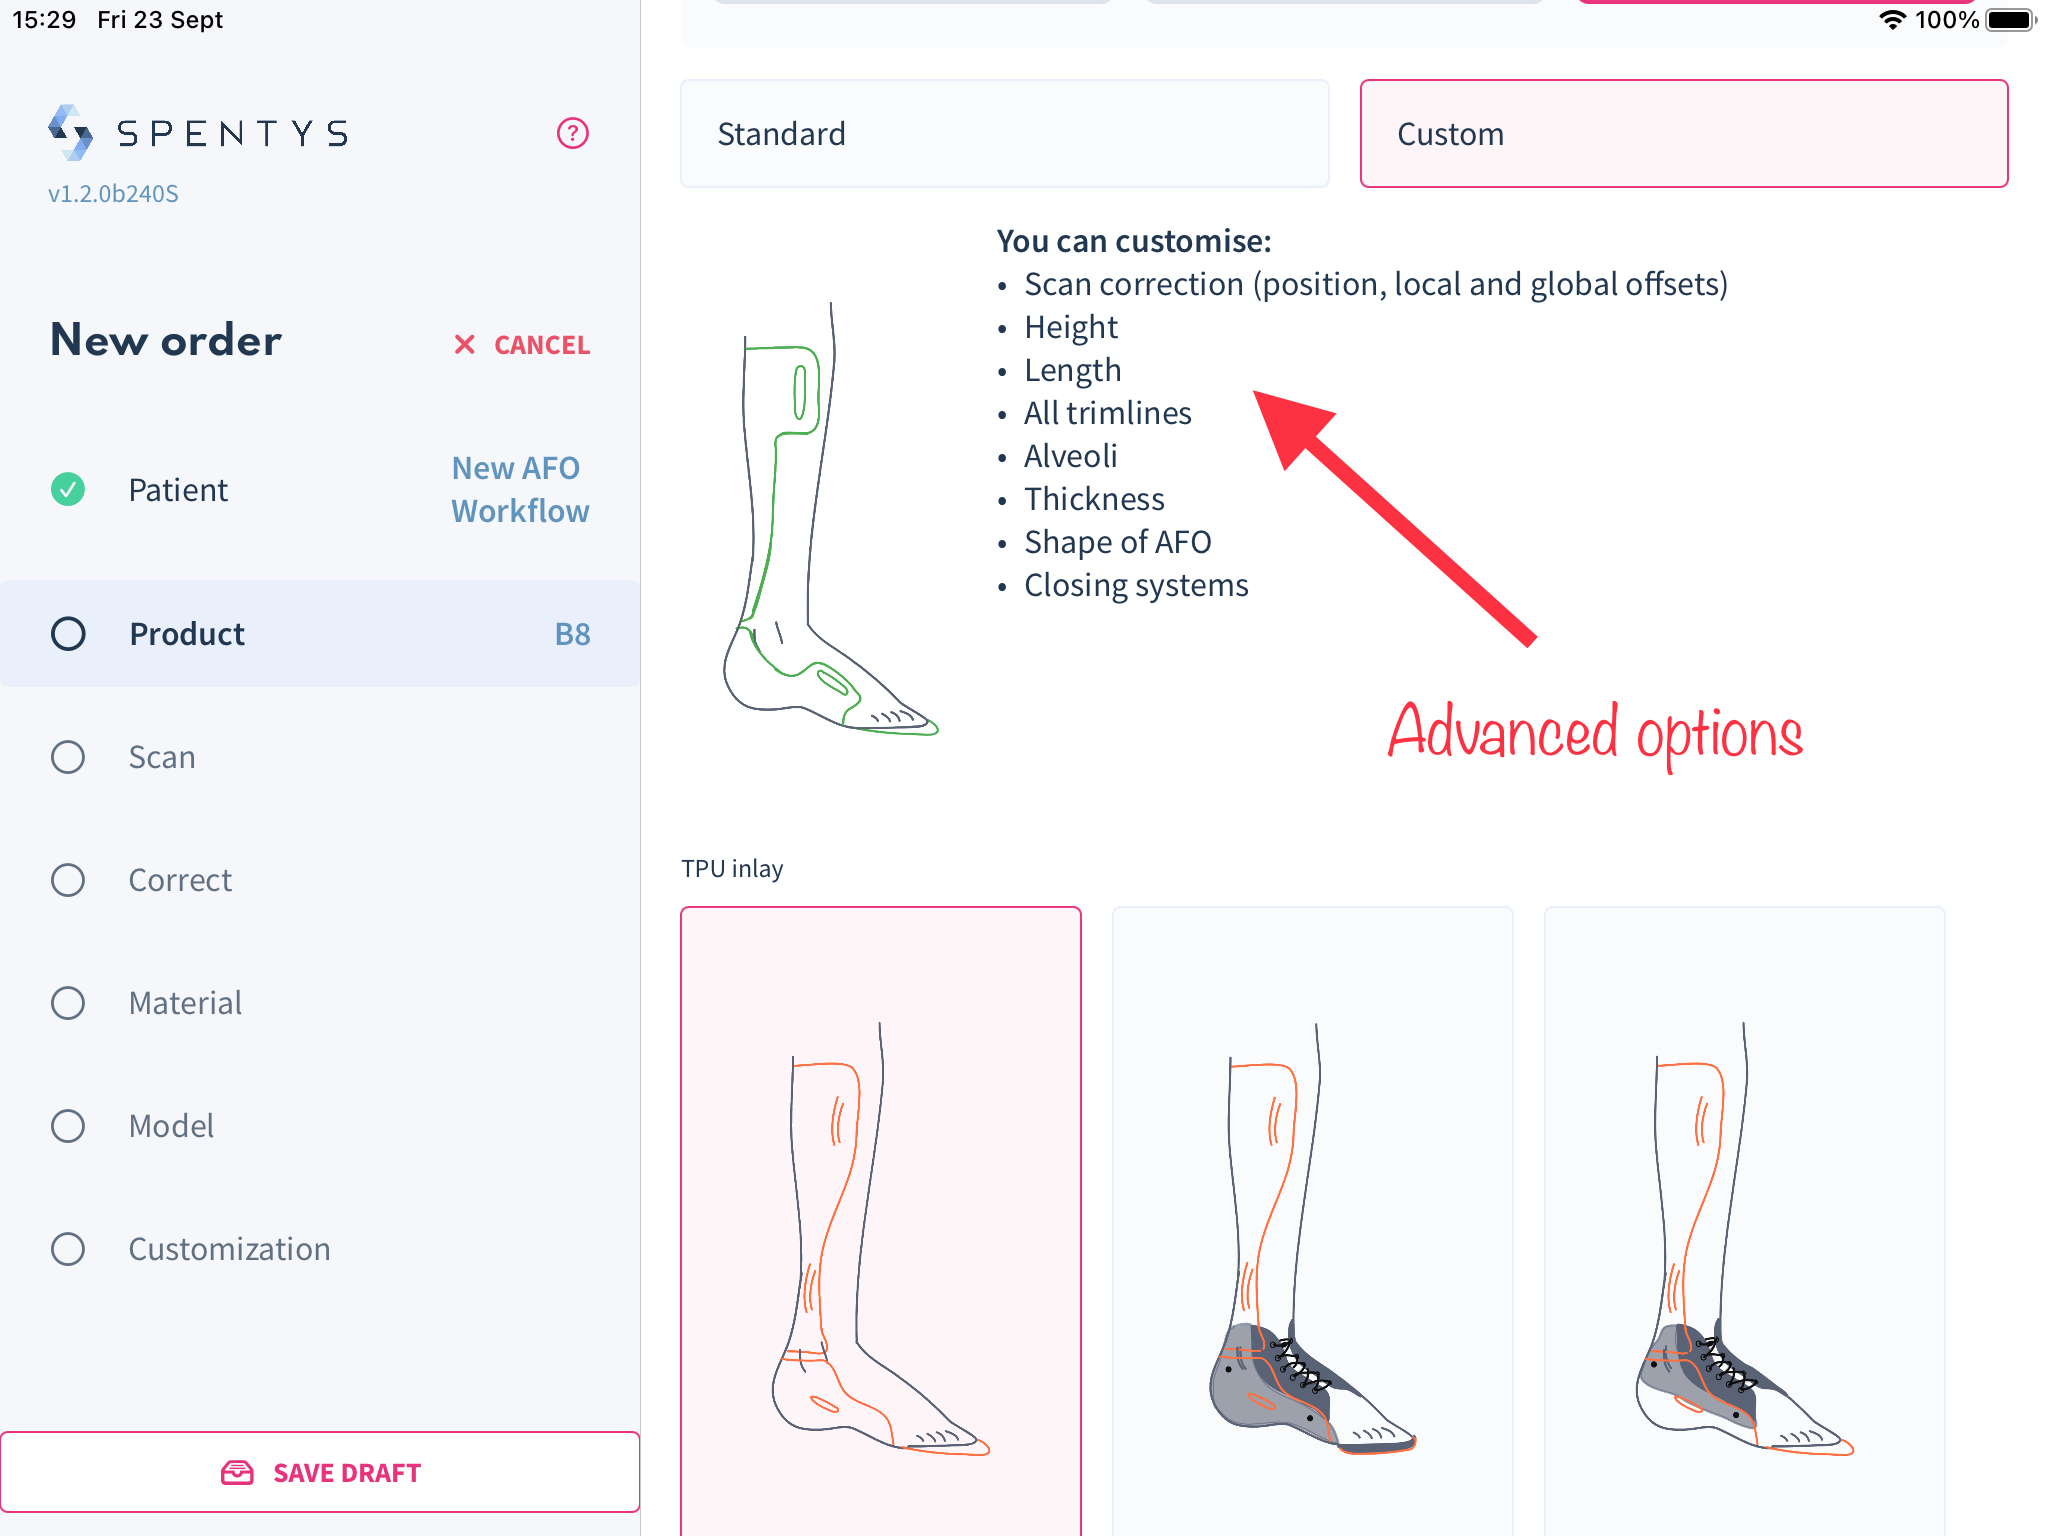
Updated Modeling option for AFOs
The new "customization" option within the AFO workflow allows you to choose between;
- Standard (Spentys' standard design)
- Custom (designed based on inputted values)
- Sketch ( Use an interactive forma tool to sketch your design)
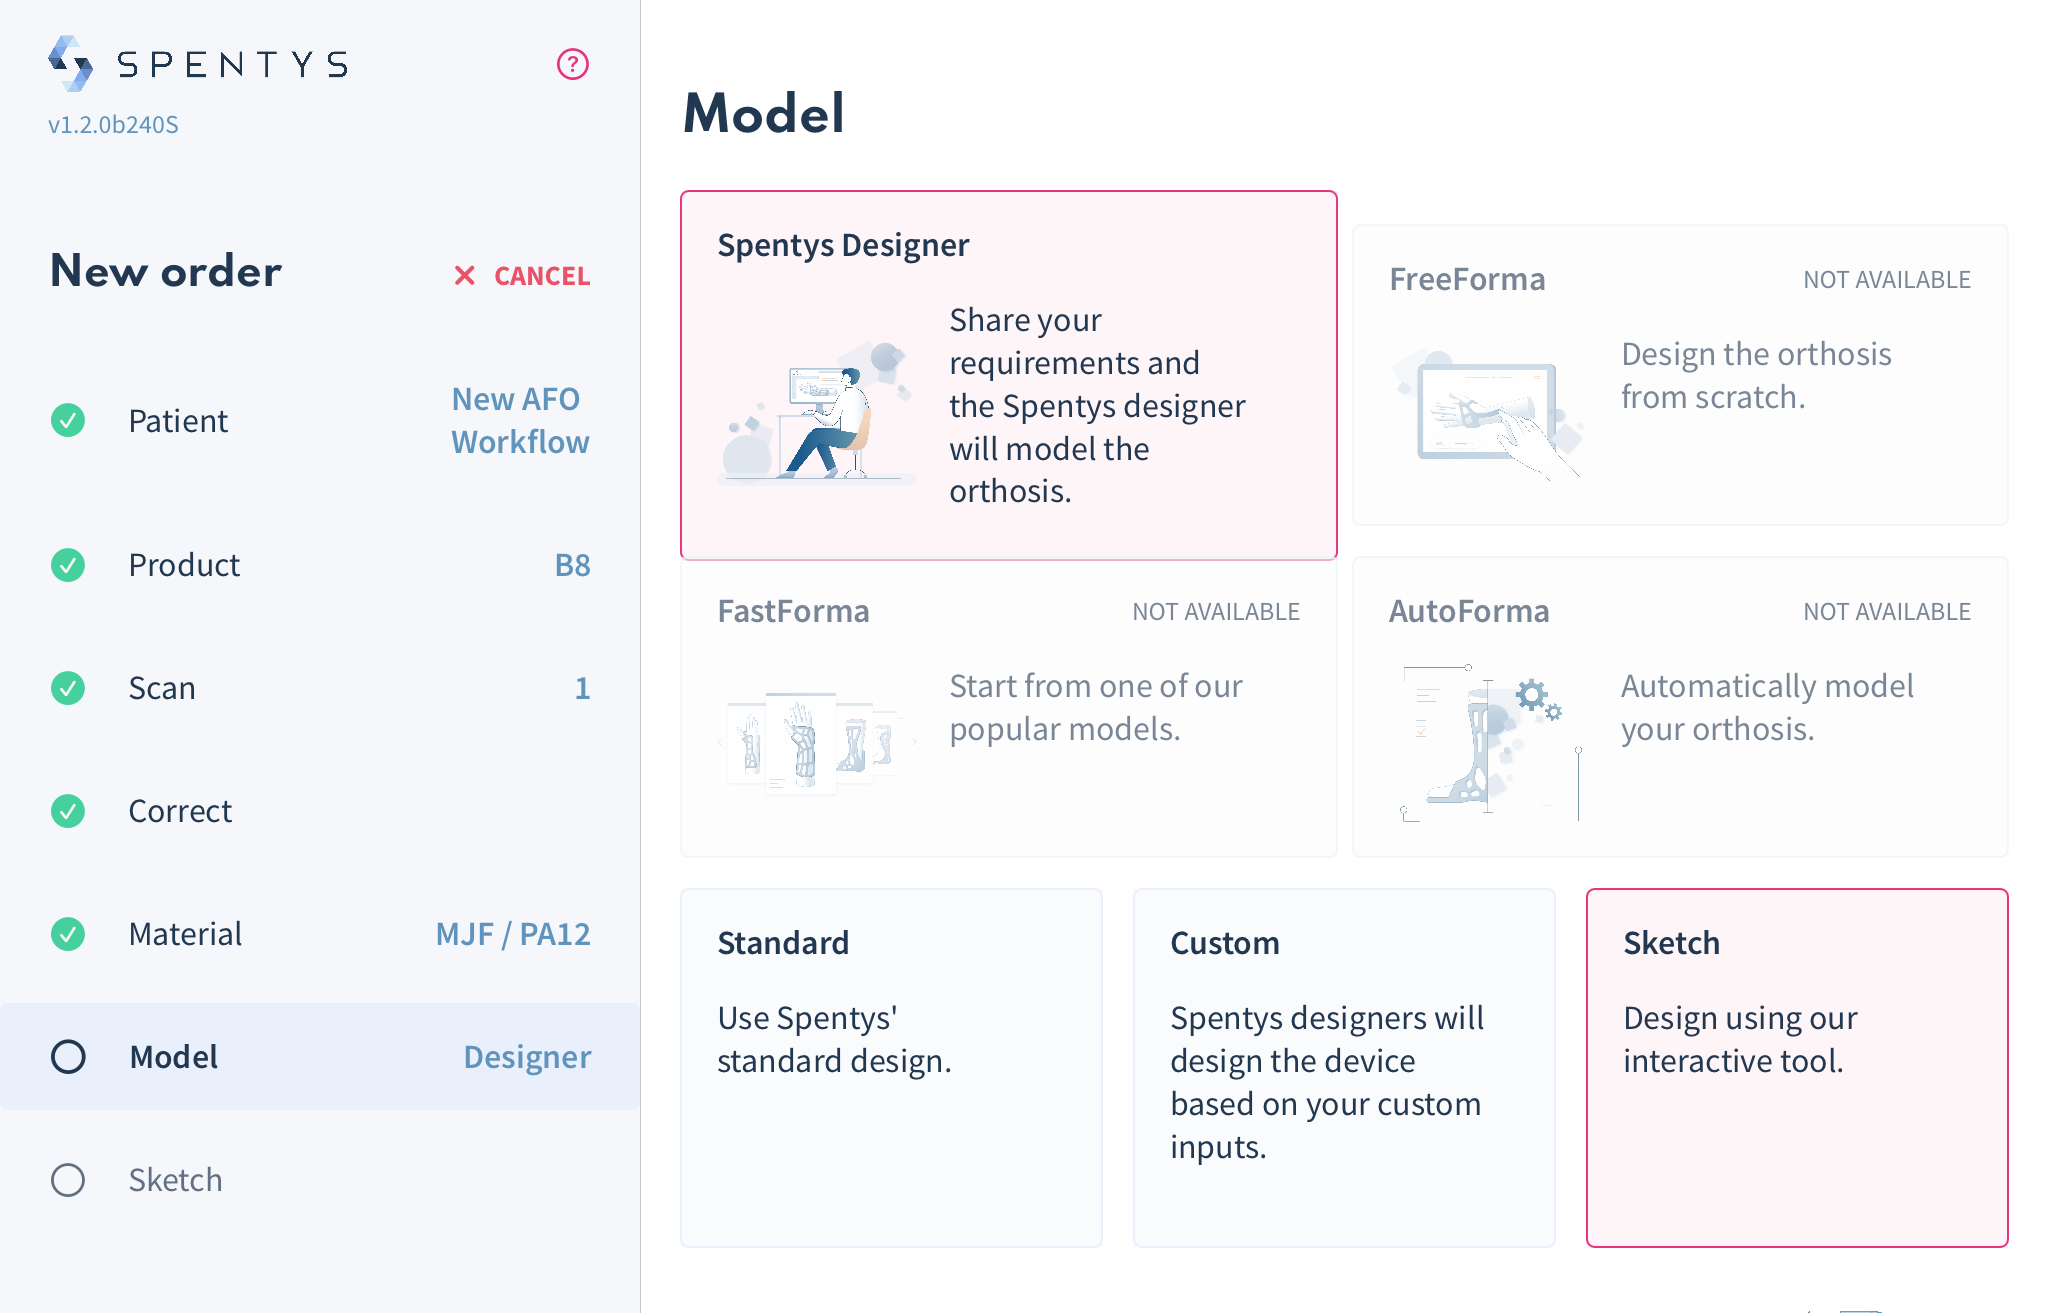
A. The standard option has set values that once chosen applies to all requirements for your AFO.
B. The custom option allows you to add;
- The height of the AFO
- Length of the foot plate
- Select hole in the heel
- Alveoli size
- Shape of the AFO
- Thickness
- Closing system
C. The sketch option offers you all the options of the custom option but allows you to sketch your own trimline
New feature: Transform foot scans into foot molds
In order to even out the footplate and achieve a balanced AFO, the foot told tool will add the required build-up. You can scan the patient’s foot directly and make all modifications to the scan in less than 5 minutes. And if you ever need to reference the original scan and make corrections, you can.
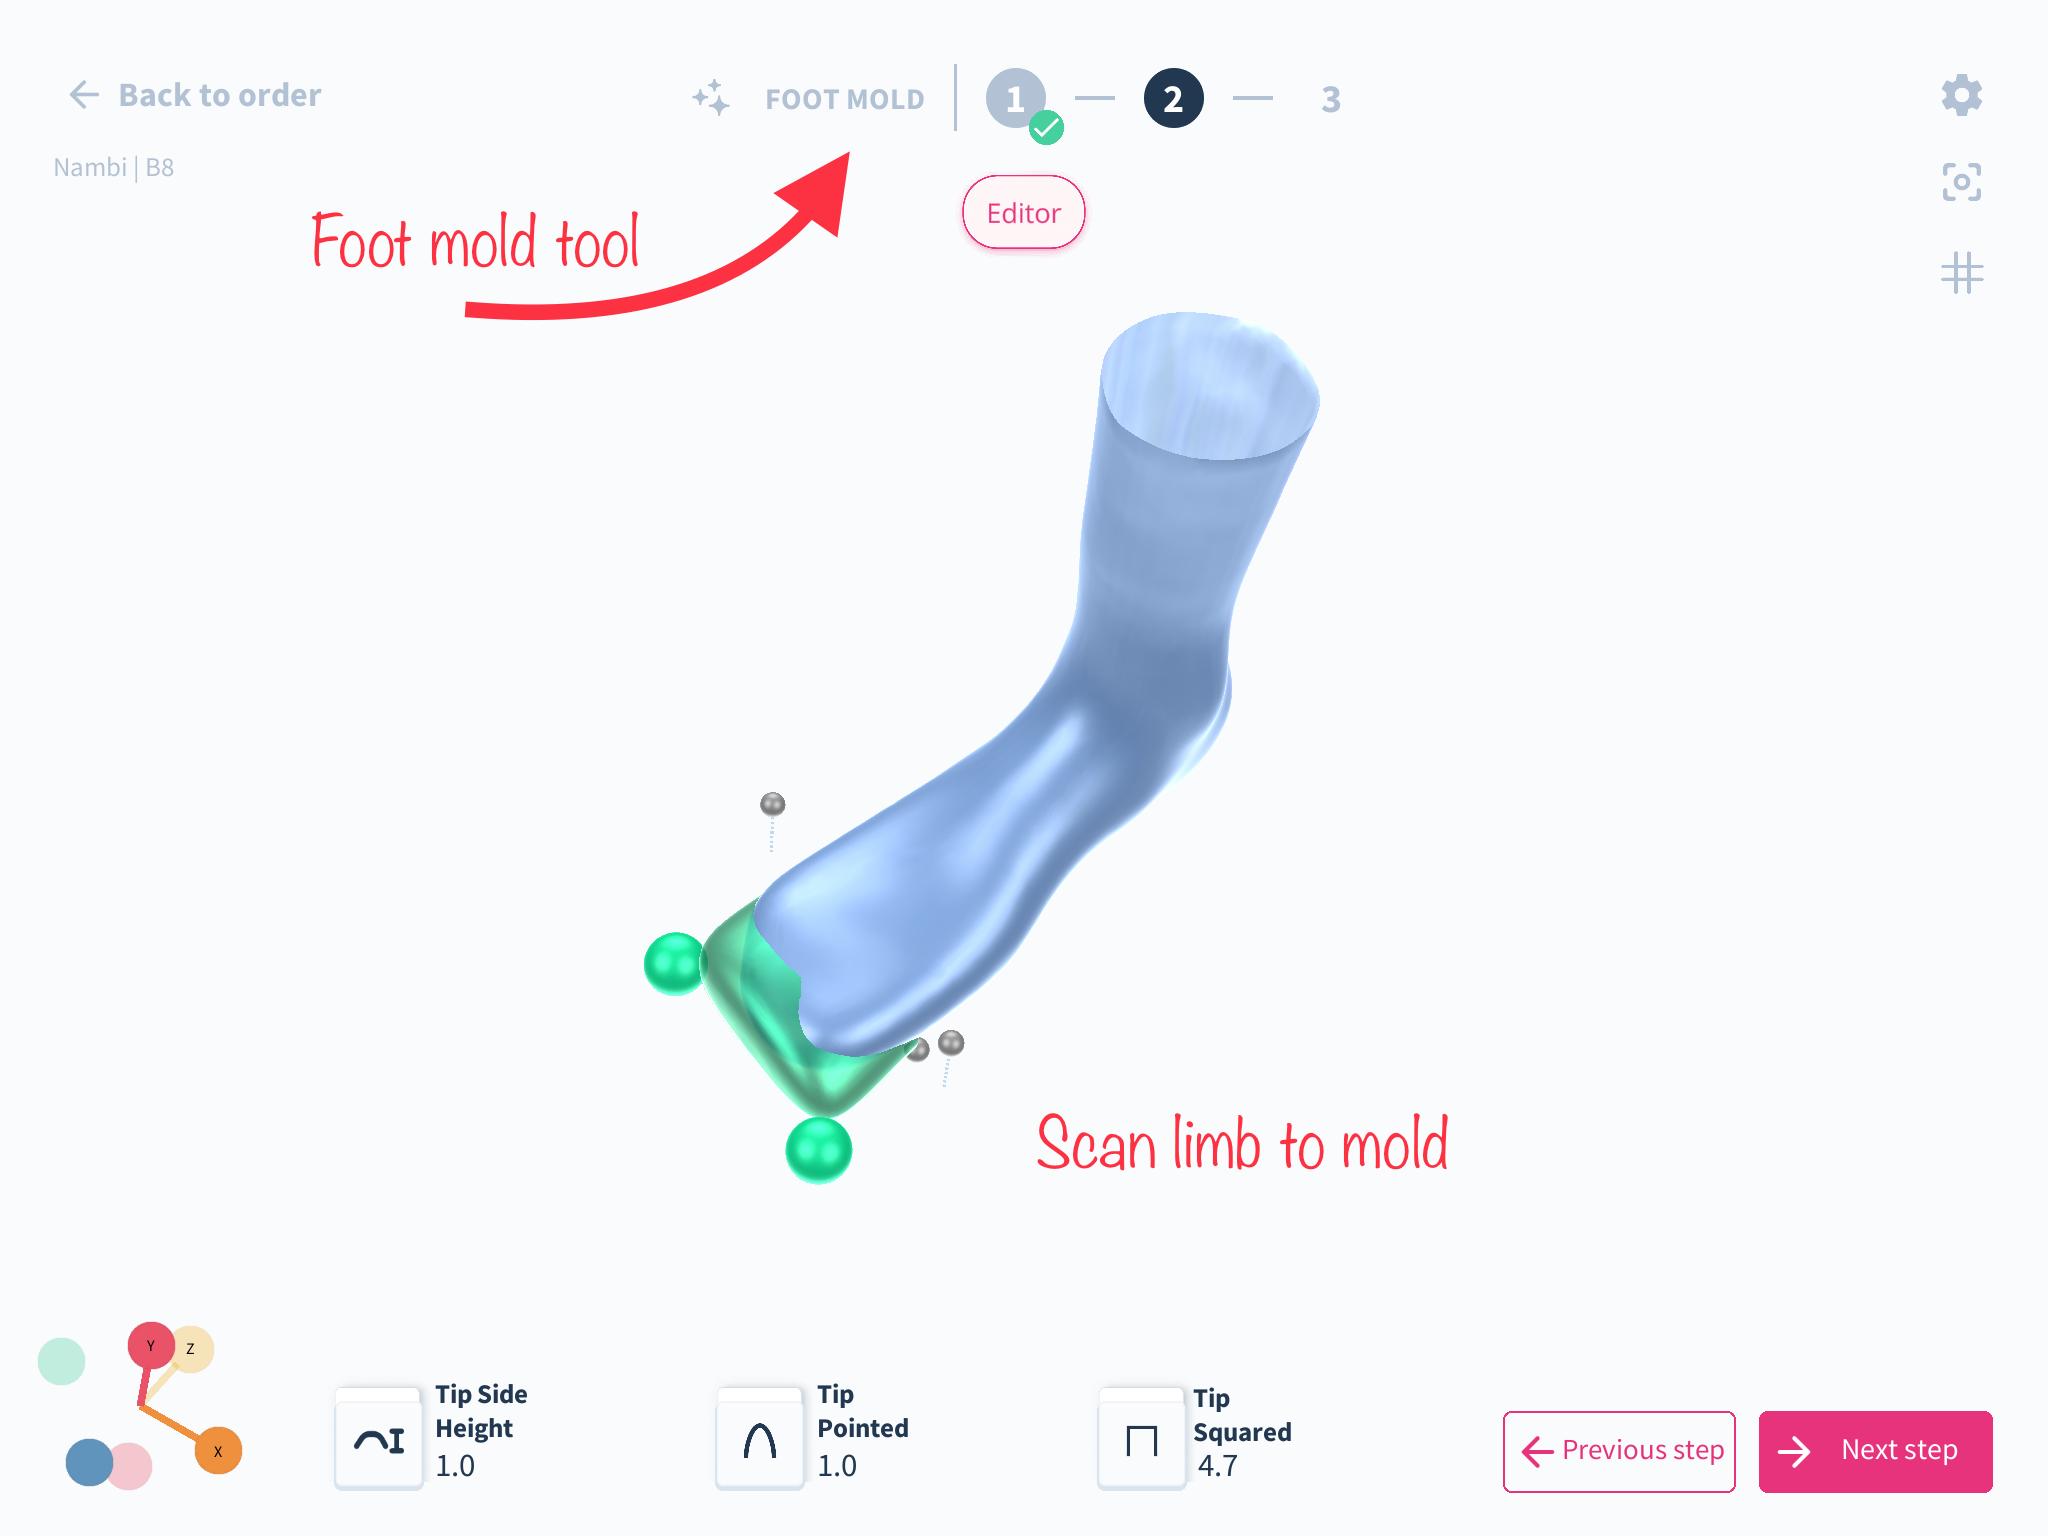
How to use the feature: a step-by-step guide
- Select the Forma correction step within the AFO workflow
- Clean up the scan by selecting the parts you would like to keep
- Proceed to either correct the pose, sculpt tool or foot mod
- Select the foot mold tool and select the landmarks as shown
- You can increase the tip side height with the slider
- You can also change the shape of the tip to be pointed or square
Updated scan correction options for AFO
You now have two options to select from depending on the product option you choose. If you select the standard option in the product step, you will have two options:
- No correction: This essentially means you have corrected your scan outside the spentys app, scanned an already modified model or do not wish to make any changes to your scan.
- Standard correction: With this option, the spentys designer in charge of your order will correct the scan to a 90 degree angle in neutral position. A 5mm offset on the malleoli will be applied with the hindfoot and forefoot in neutral.

If you choose the custom option at the product step, you will have four options;
- No correction: Like the standard option, no correction is needed.
- Standard correction: All the options from the standard options are available here
- Custom correction: : This gives you the ability to add your defined values for the heel height, malleoli offset, the varus and valgus angles etc, and add any notes that will help the designer understand what you want.
- Forma correction: This is the same with our normal scan correction step with tools to help you achieve your desired correction.
This will help you save time and skip the extra step of inputting extra measurements.
Updated users' management capabilities
We have updated the management system on the web platform to enable managers to edit orders and view order history in Kanban view.
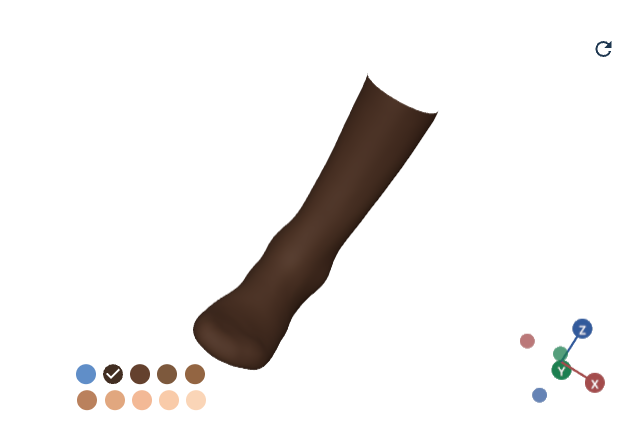
Thumb Reconstruction Level Improvement
What has changed: The Thumb Reconstruction Level has been enhanced with the introduction of two new options for cylinder length, along with smoother transitions between the geometric cylinder and the scan. This is designed to more accurately mirror the dimensions of the thumb in your scan.
How it affects you: These improvements provide you with greater flexibility in choosing cylinder lengths, and ensure smoother transitions in the thumb reconstruction, contributing to a more accurate and refined outcome.
How to use it: This enhancement is available for devices that immobilize the thumb and necessitate a thumb section. It is an essential step within the scan level. When you reach the Thumb Reconstruction Level, you will have the options to select the cylinder length that best suits your requirements and experience the smoother transitions for a more accurate thumb representation.

Thumb circumference visualizer updates when stepping back
What has changed?
A bug affecting the thumb circumference visualizer has been fixed.
How it affects you
The thumb circumference will now update correctly when stepping back in modeling.
How to use it?
Continue using the thumb immobilization modeling as usual; the visualizer will update correctly.
Thicknesses Defined by Effect
What has changed:
The way thicknesses are defined in the AFO design process has been updated. Instead of specifying thickness in millimeters, options are now described in terms of their effect (e.g., "flexible" or "extra rigid").
How it affects you:
This change simplifies the AFO design process by allowing you to select materials based on the desired outcome rather than precise measurements. It helps in making more intuitive decisions regarding the functionality and flexibility of the finished product.
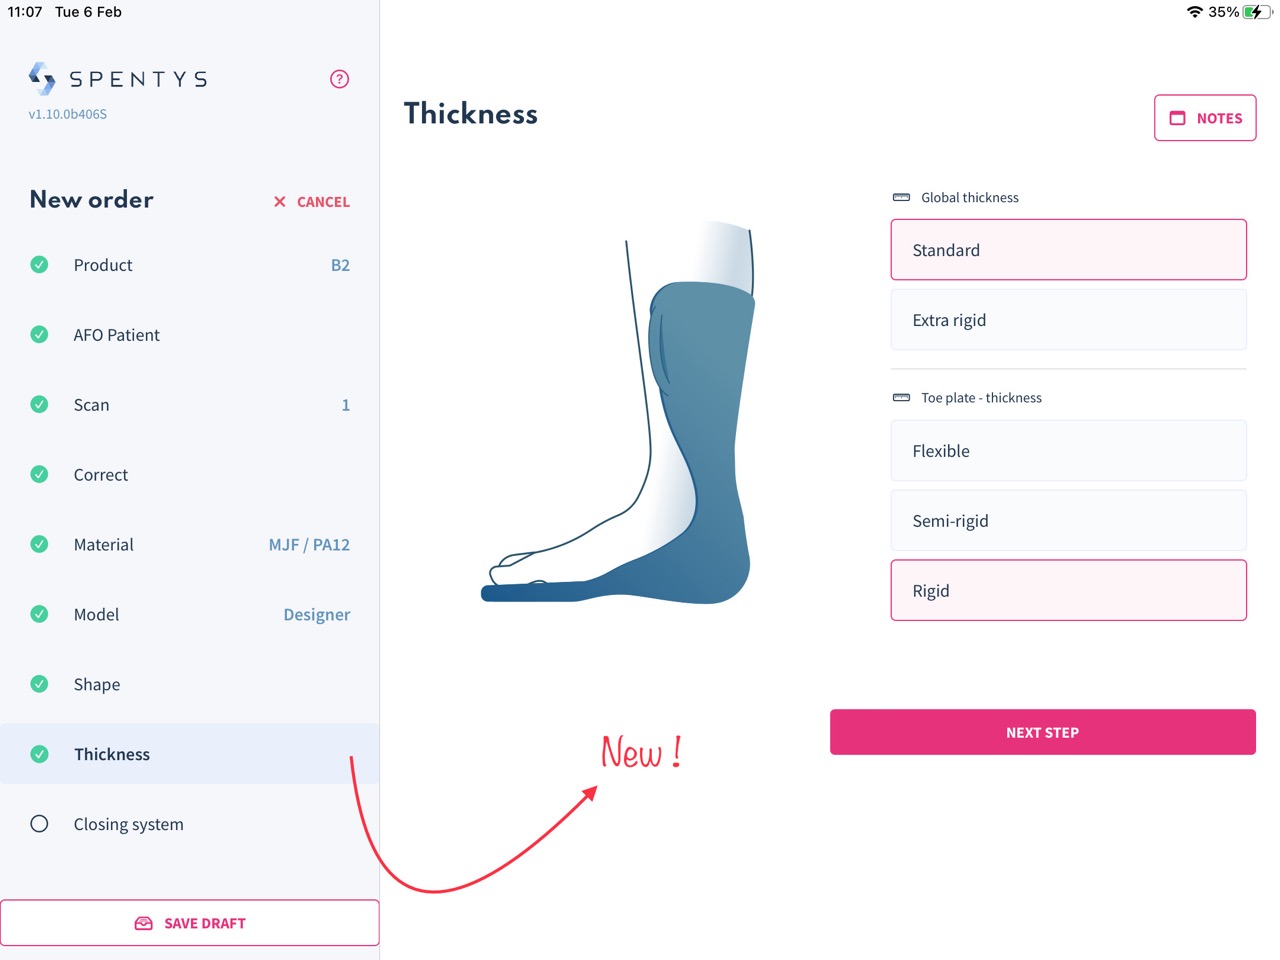
How to use it:
Only available if you select the "Spentys designer" option. When adjusting thicknesses in your design, look for the new options categorized by effect. Choose the descriptor that best matches the intended use and performance of the AFO, such as "flexible" for devices requiring more adaptability or "extra rigid" for those needing greater support.
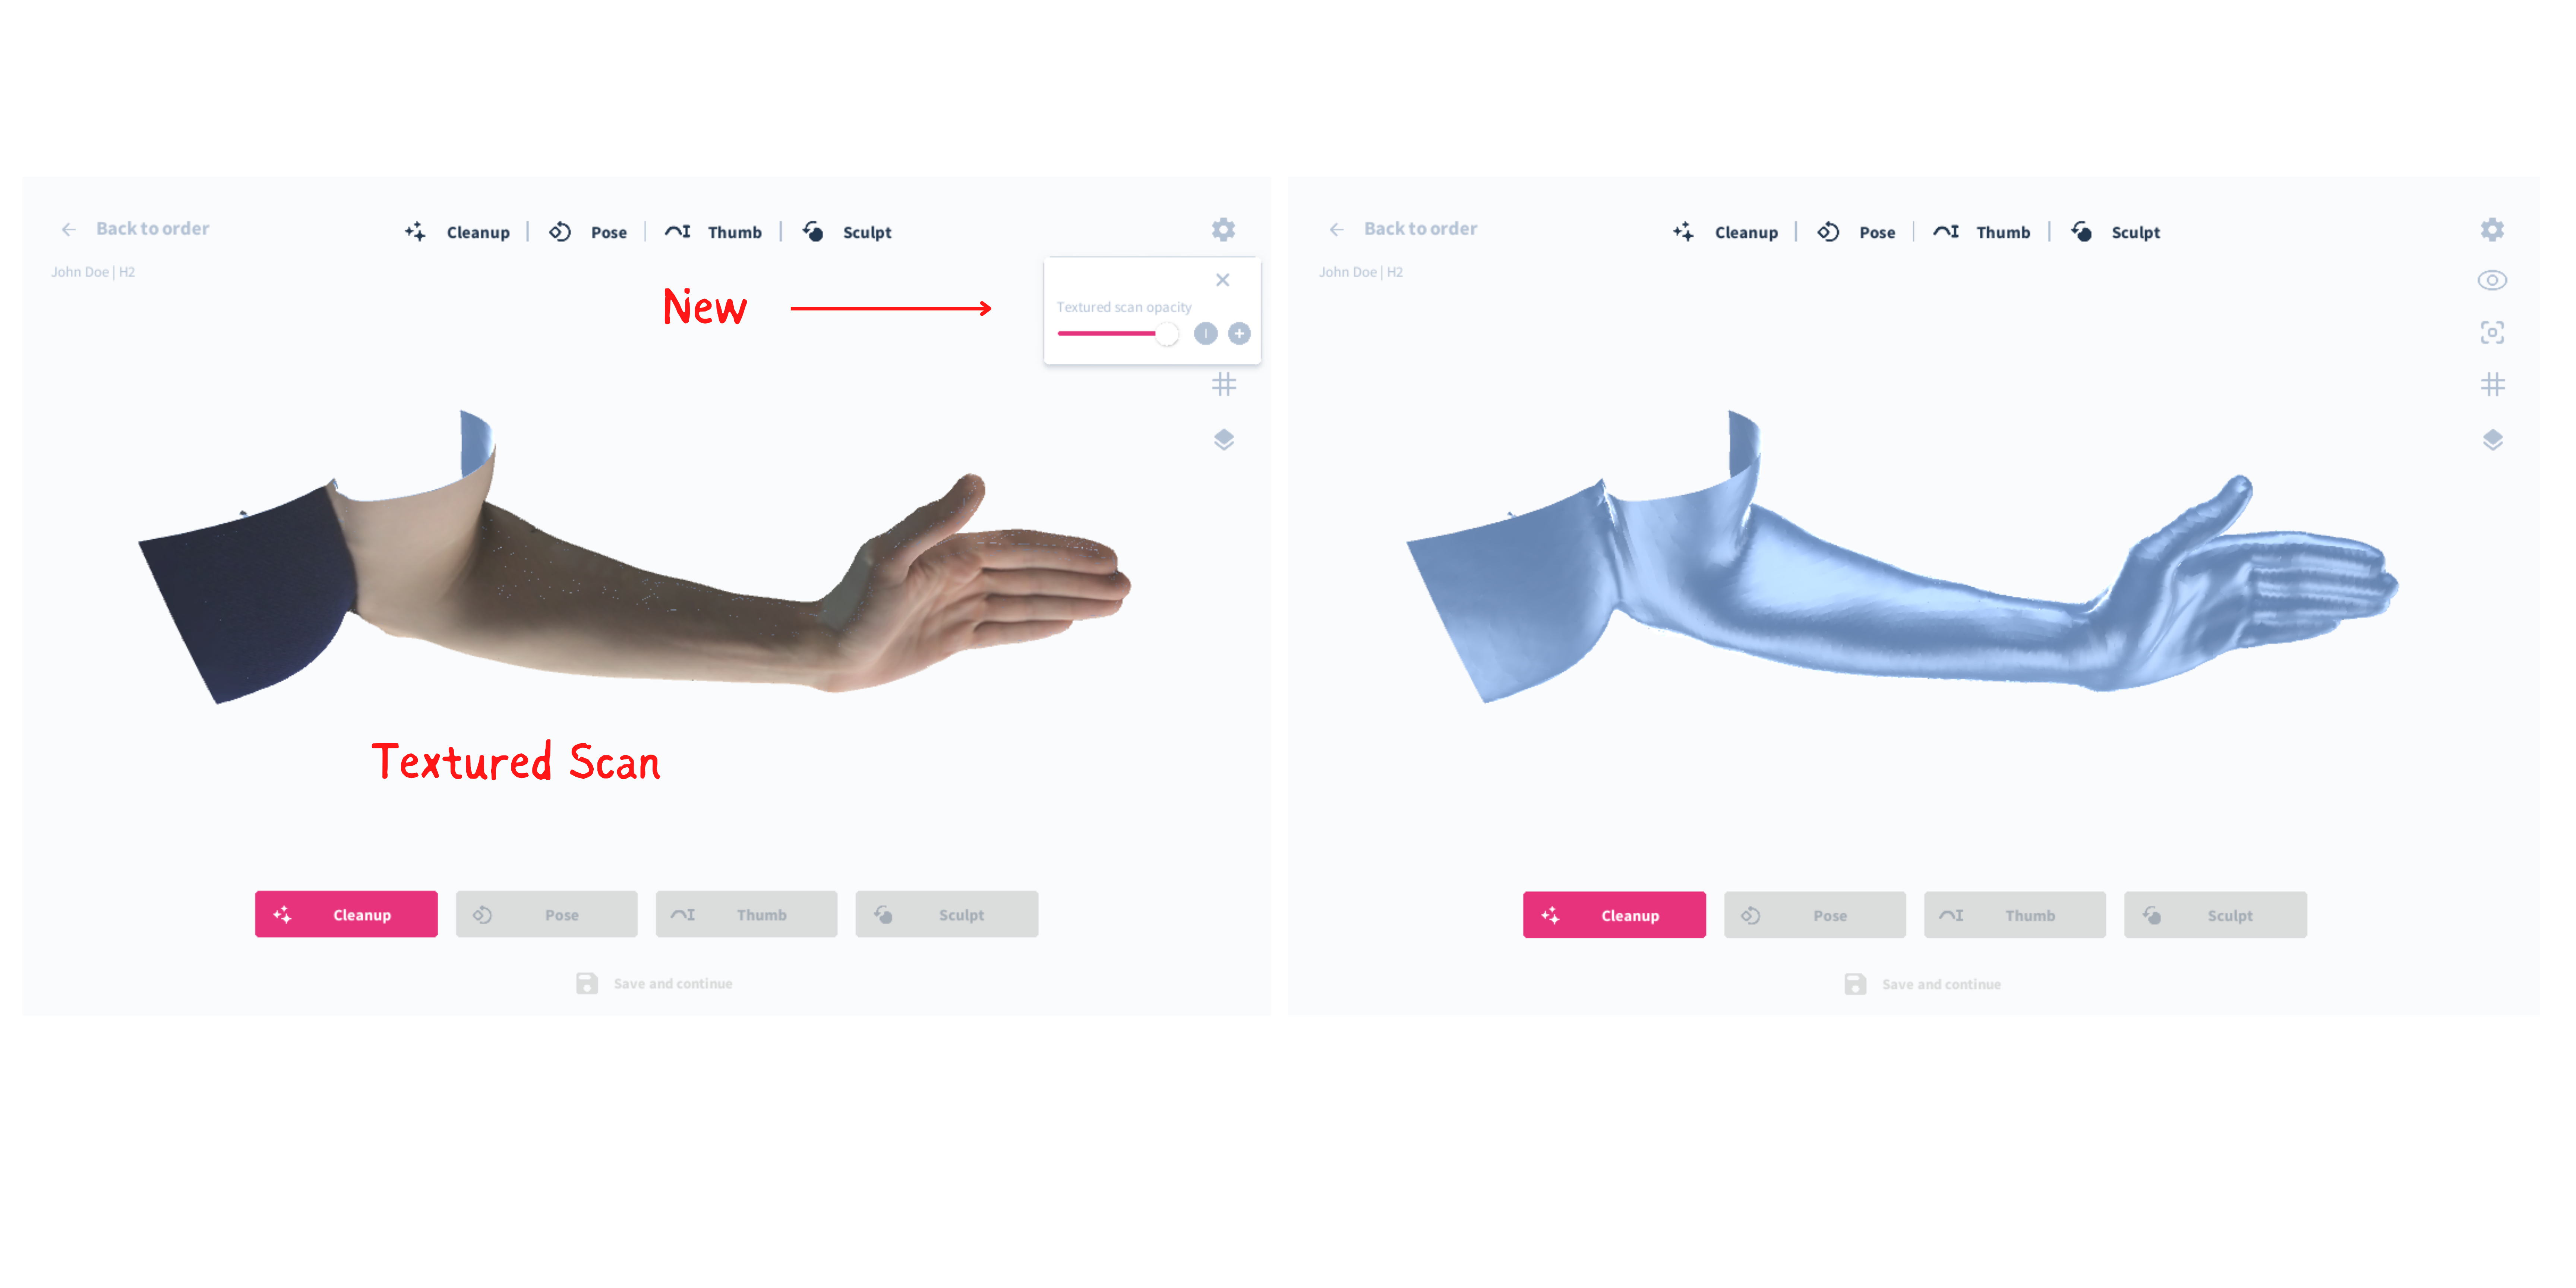
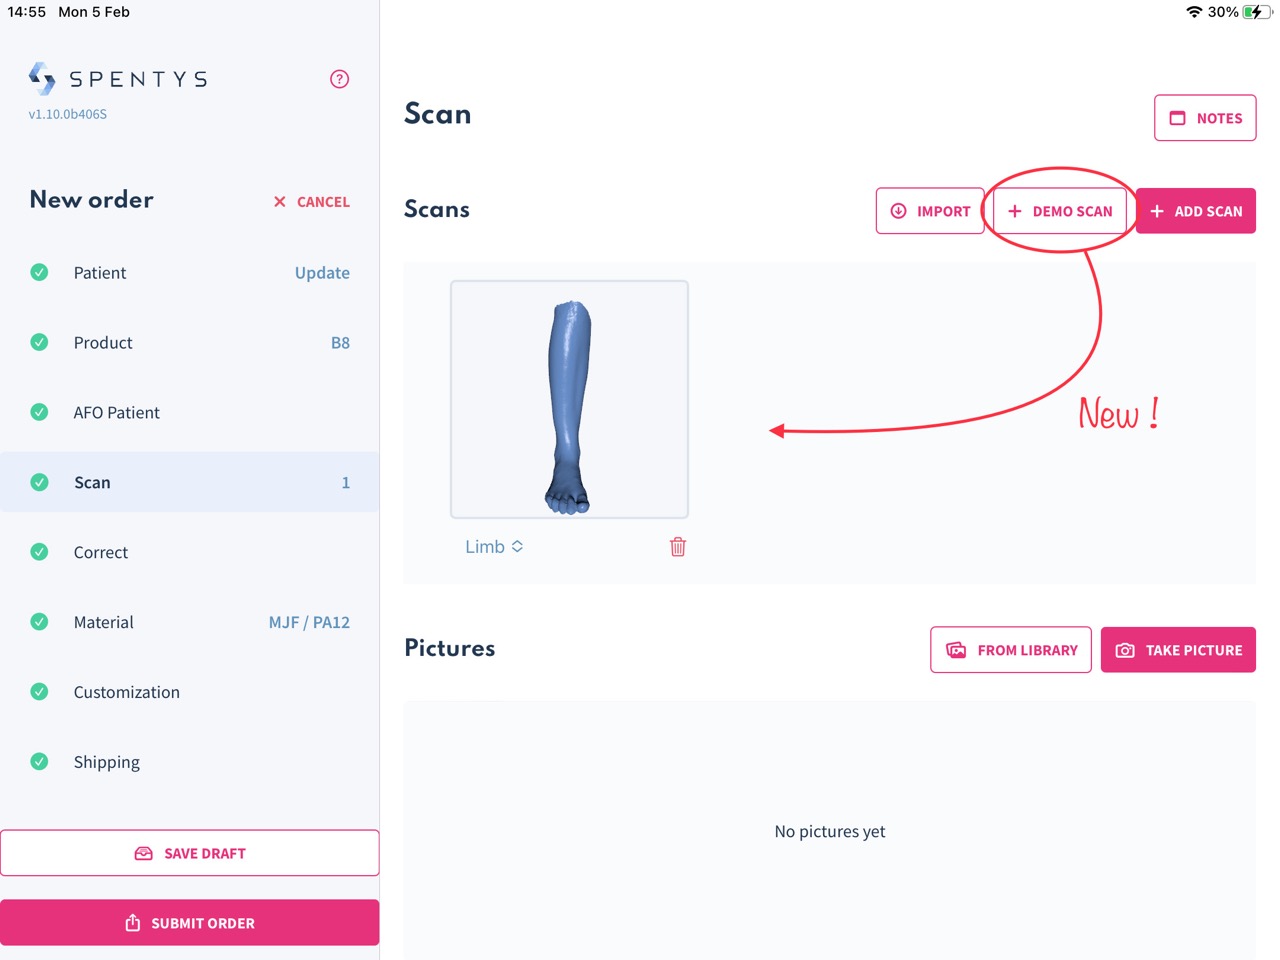
Textured Demo Scan is now available on app
You can now use a textured demo scan while testing out the Spentys workflow. In previous updates, we introduced "the textured scan" feature, which allows you to scan your patients and get the actual texture and markings in 3D. Now, we have a demo scan with this feature to help you familiarize yourself with the tools and capabilities without using an actual patient's scan. However, this demo scan is currently only available for upper limb scans.
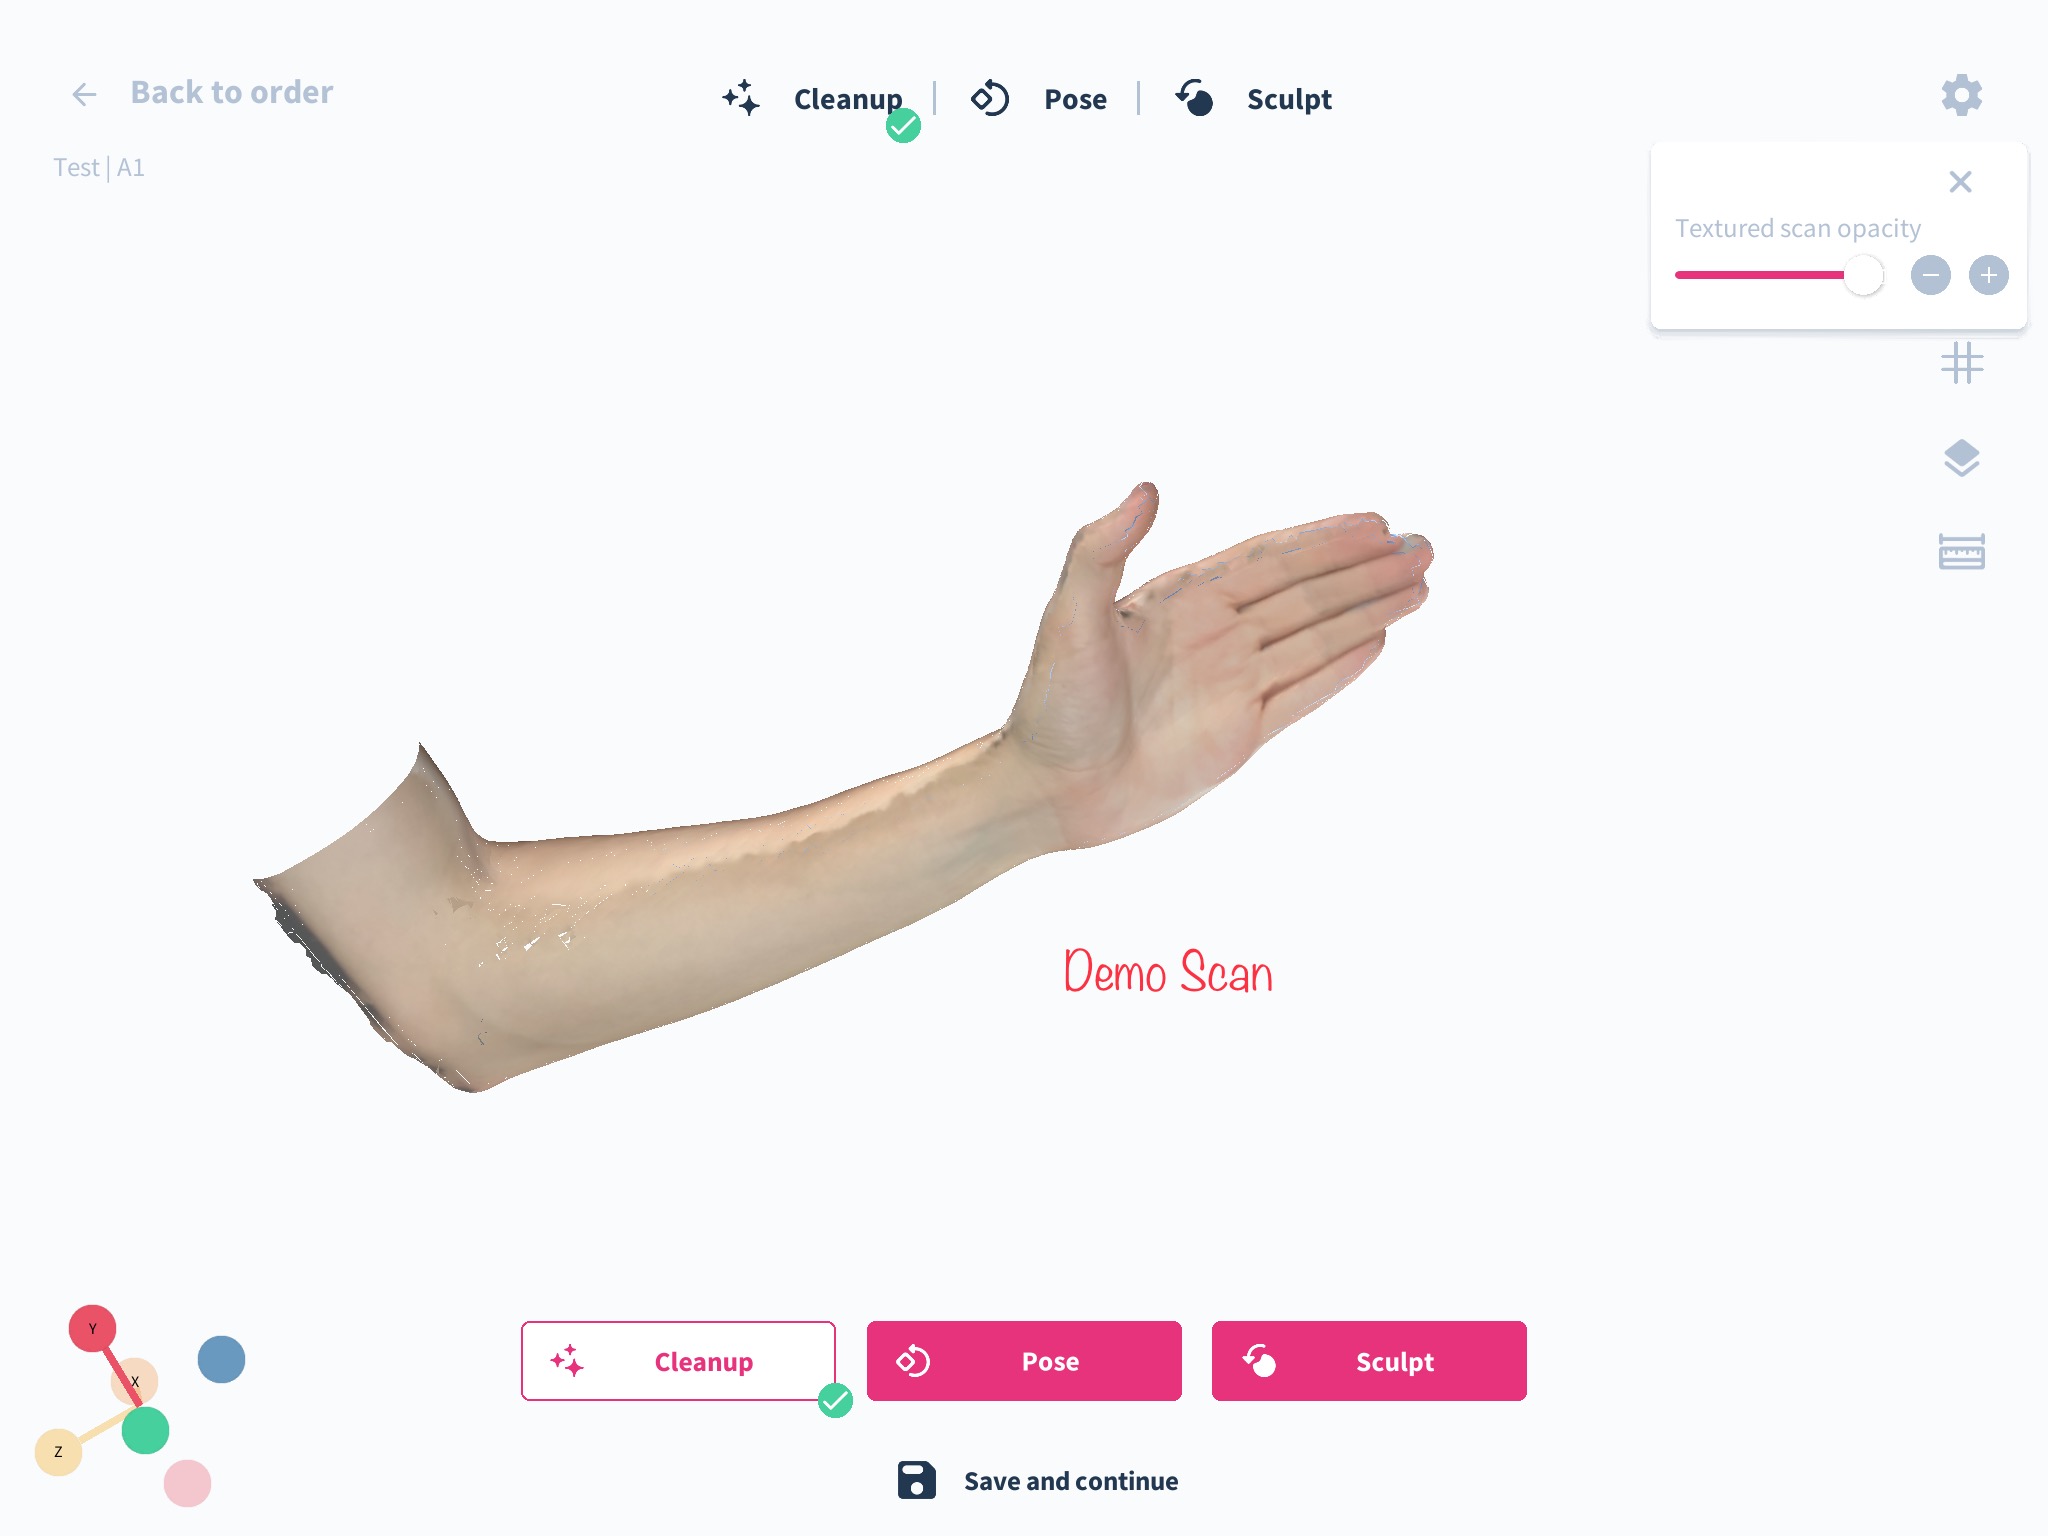
How do you use this feature? Step-by-step guide
1. Once you have selected the limb you want to immobilize and the desired product to be modeled, click next to move to the scan step.
2. In the scan step, select (+Demo scan) and click the next step.
3. The scan will look slightly different, and this is because the opacity is turned down low, so you can see both the plain bluescan and the texture of the scan.
4. Adjust the slider for the opacity at the top right corner of your screen to visualize any desired areas.
Share compressed file link
What has changed?
A new platform allows users to share scan files and templates.
How it affects you
Easier sharing of files with others.
How to use it?Go to Spentys Share, upload your file, and click the upload button to create a sharing link.
Texture Print
What has changed:
Full-color texture printing is now available, allowing for high-resolution textures to be applied to prints, enhancing visual appeal and realism.
How it affects you:
This allows you to showcase designs in full color, providing a more accurate representation of the final product. It's especially useful for presentations or when detailed aesthetics are crucial.
%2520Large.jpeg)
How to use it:
Through the iOS interface, select the texture print option and choose from various texture options to apply to your model. This feature is only available for B5 and B8 products for now due to the dimensions of the 3D printers.
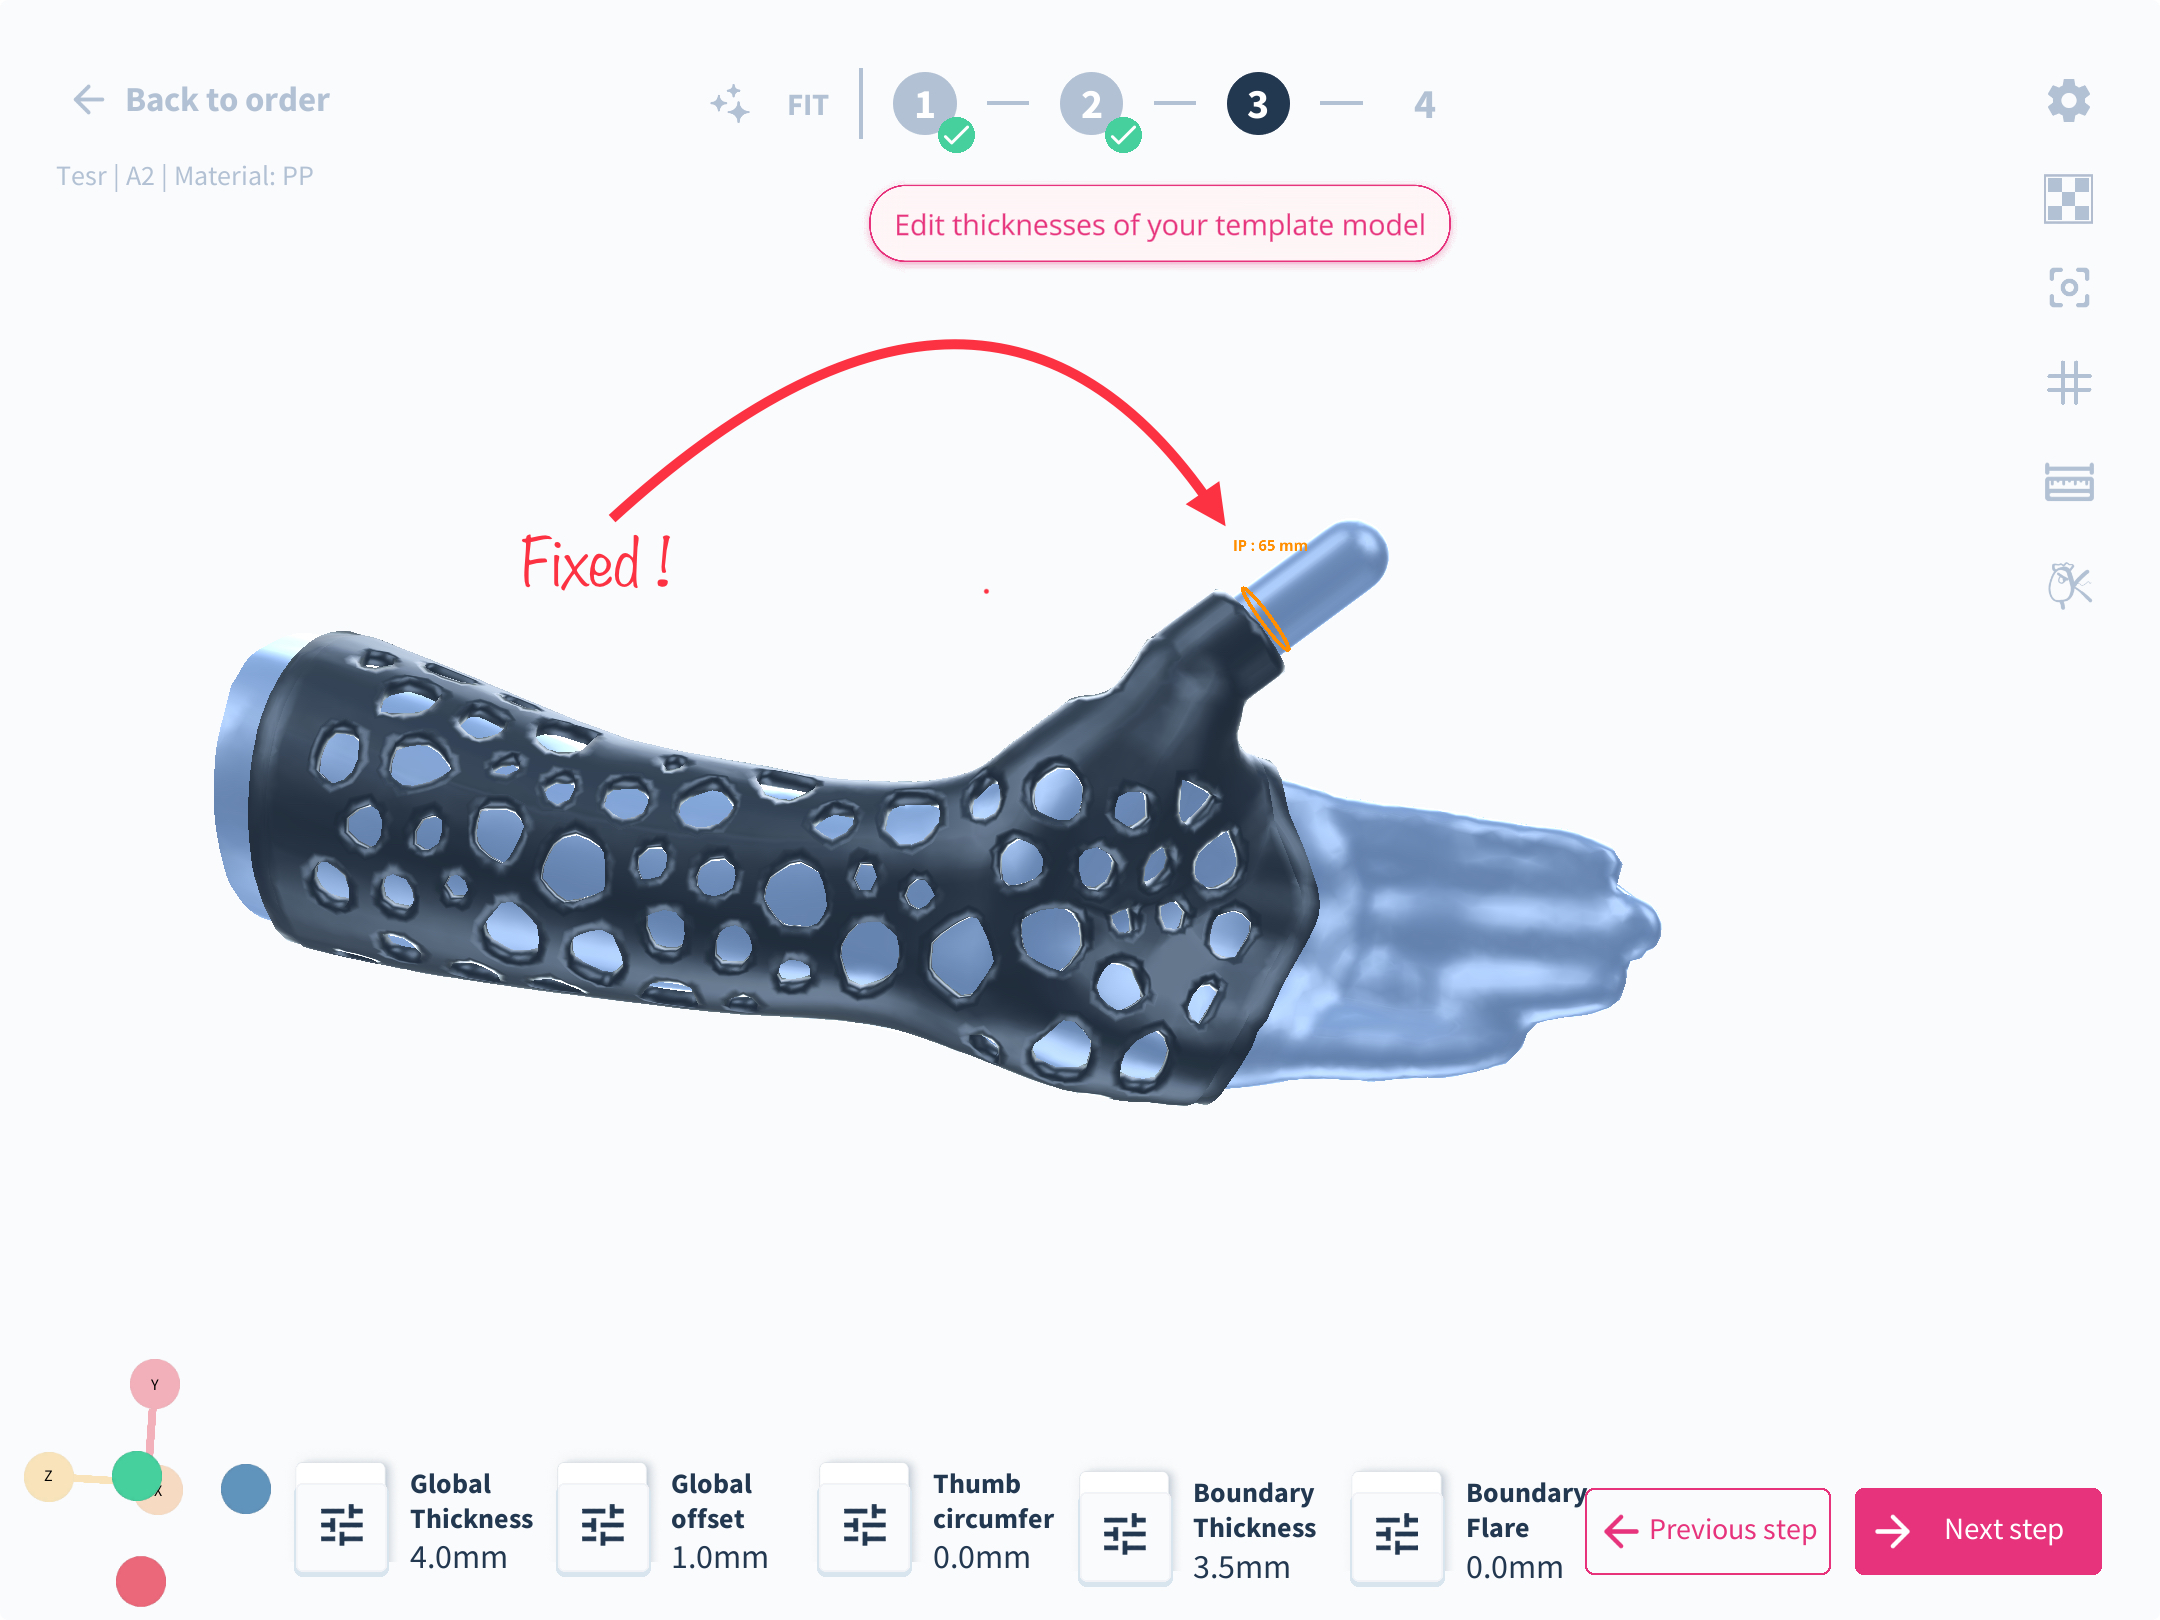
Thickness & Boundaries Update
What has changed: We've solved an issue that caused artifacts in the printed splint at the line of the boundary stripe when global thickness equals boundary thickness.
How it affects you: The fix ensures cleaner models when the global thickness and boundary thickness are identical.
How to use it: Continue printing splints even when global thickness equals boundary thickness without worries about artifacts.
Sculpt Max Height Adjustment
What has changed: We have refined the maximum limit within the Sculpt Level to 10mm. This allows users to either add or remove material from a scan up to a maximum of 10mm.
How it affects you: With this adjustment, you now have the capability to make more precise modifications, which is particularly beneficial for creating pressure relief areas as well as pressure-bearing areas.
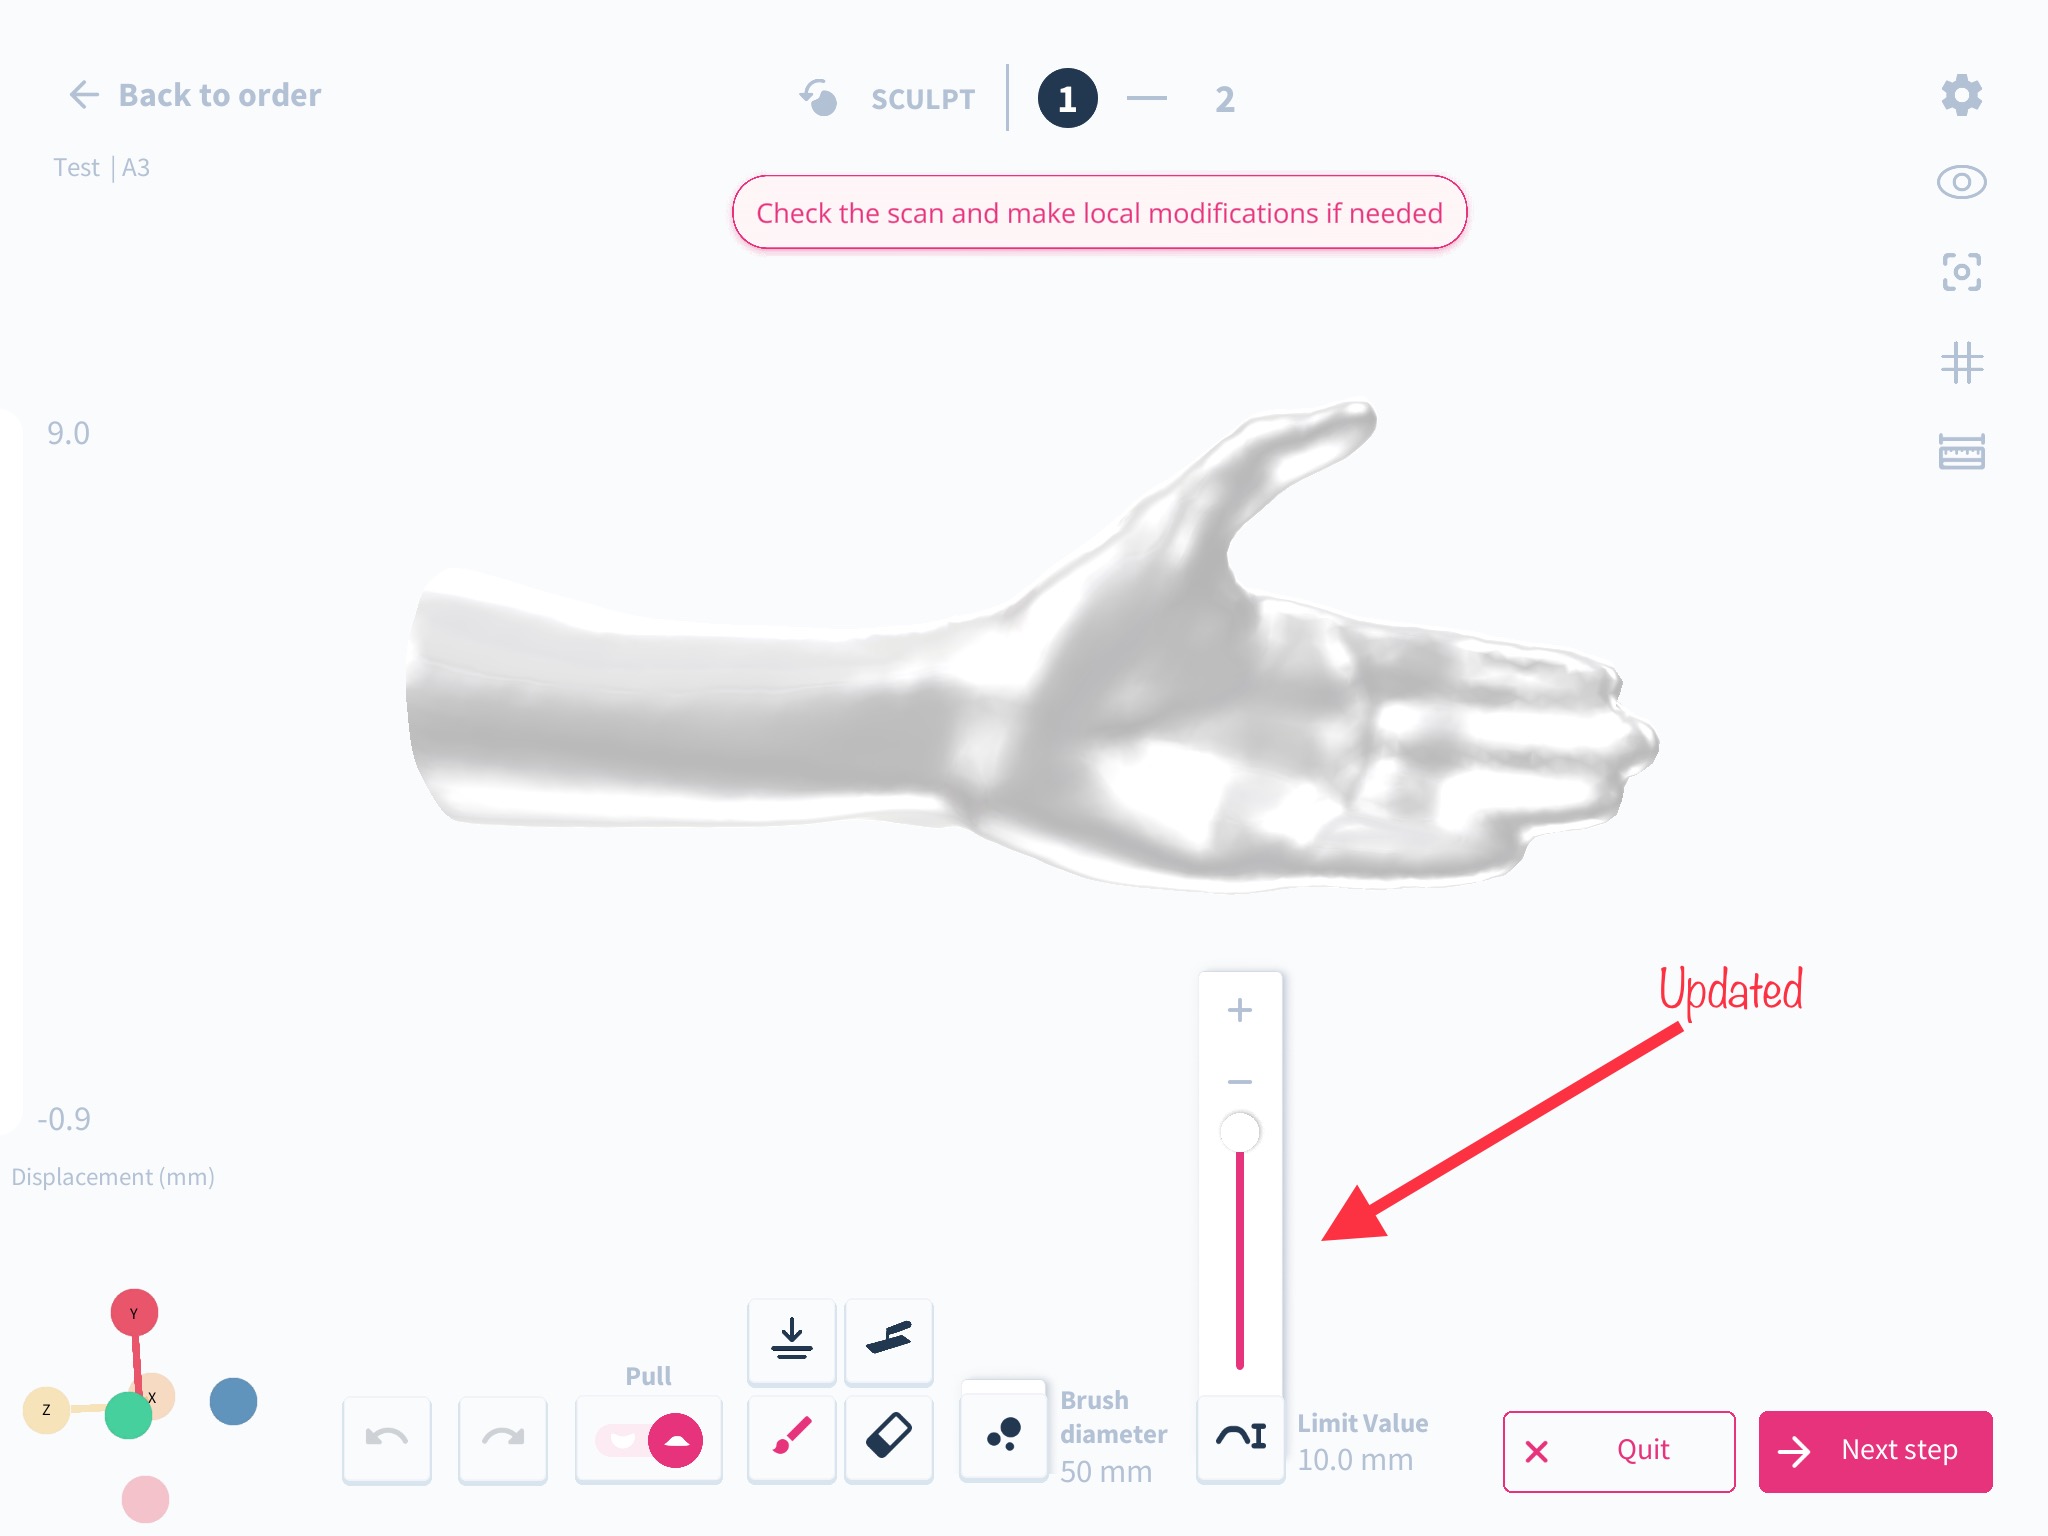
How to use it: Within the Sculpt Level, manipulate the maximum height by adjusting the slider, as depicted in the image above, to add or remove material up to 10mm as per your requirements.
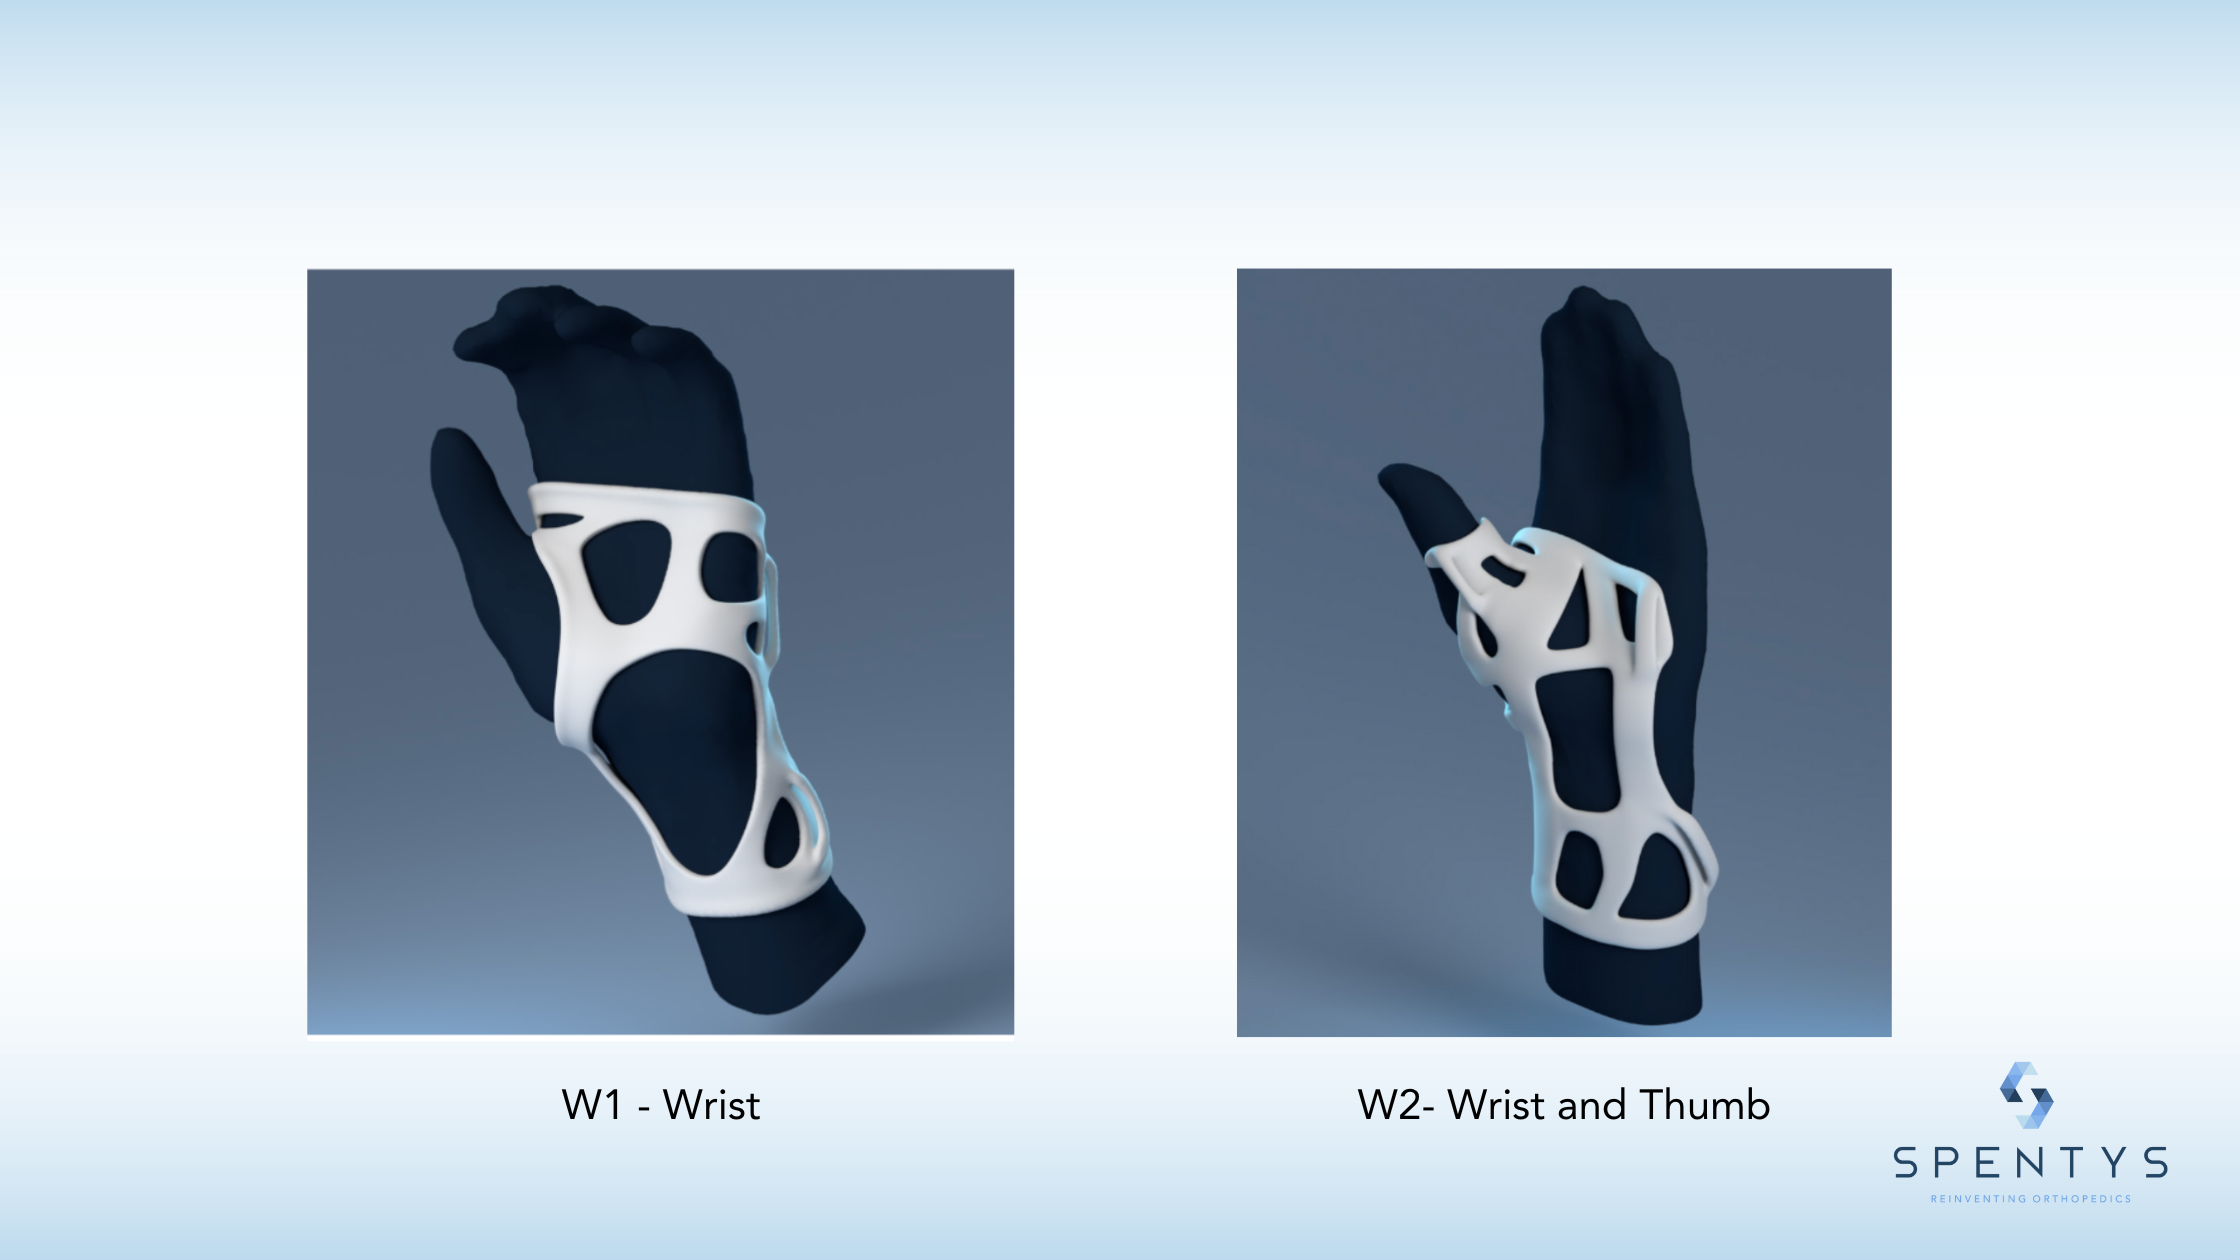
Now available: W1 and W2 models on autoForma
With the automatic function of Autoforma, you can now easily create models for W1 and W2
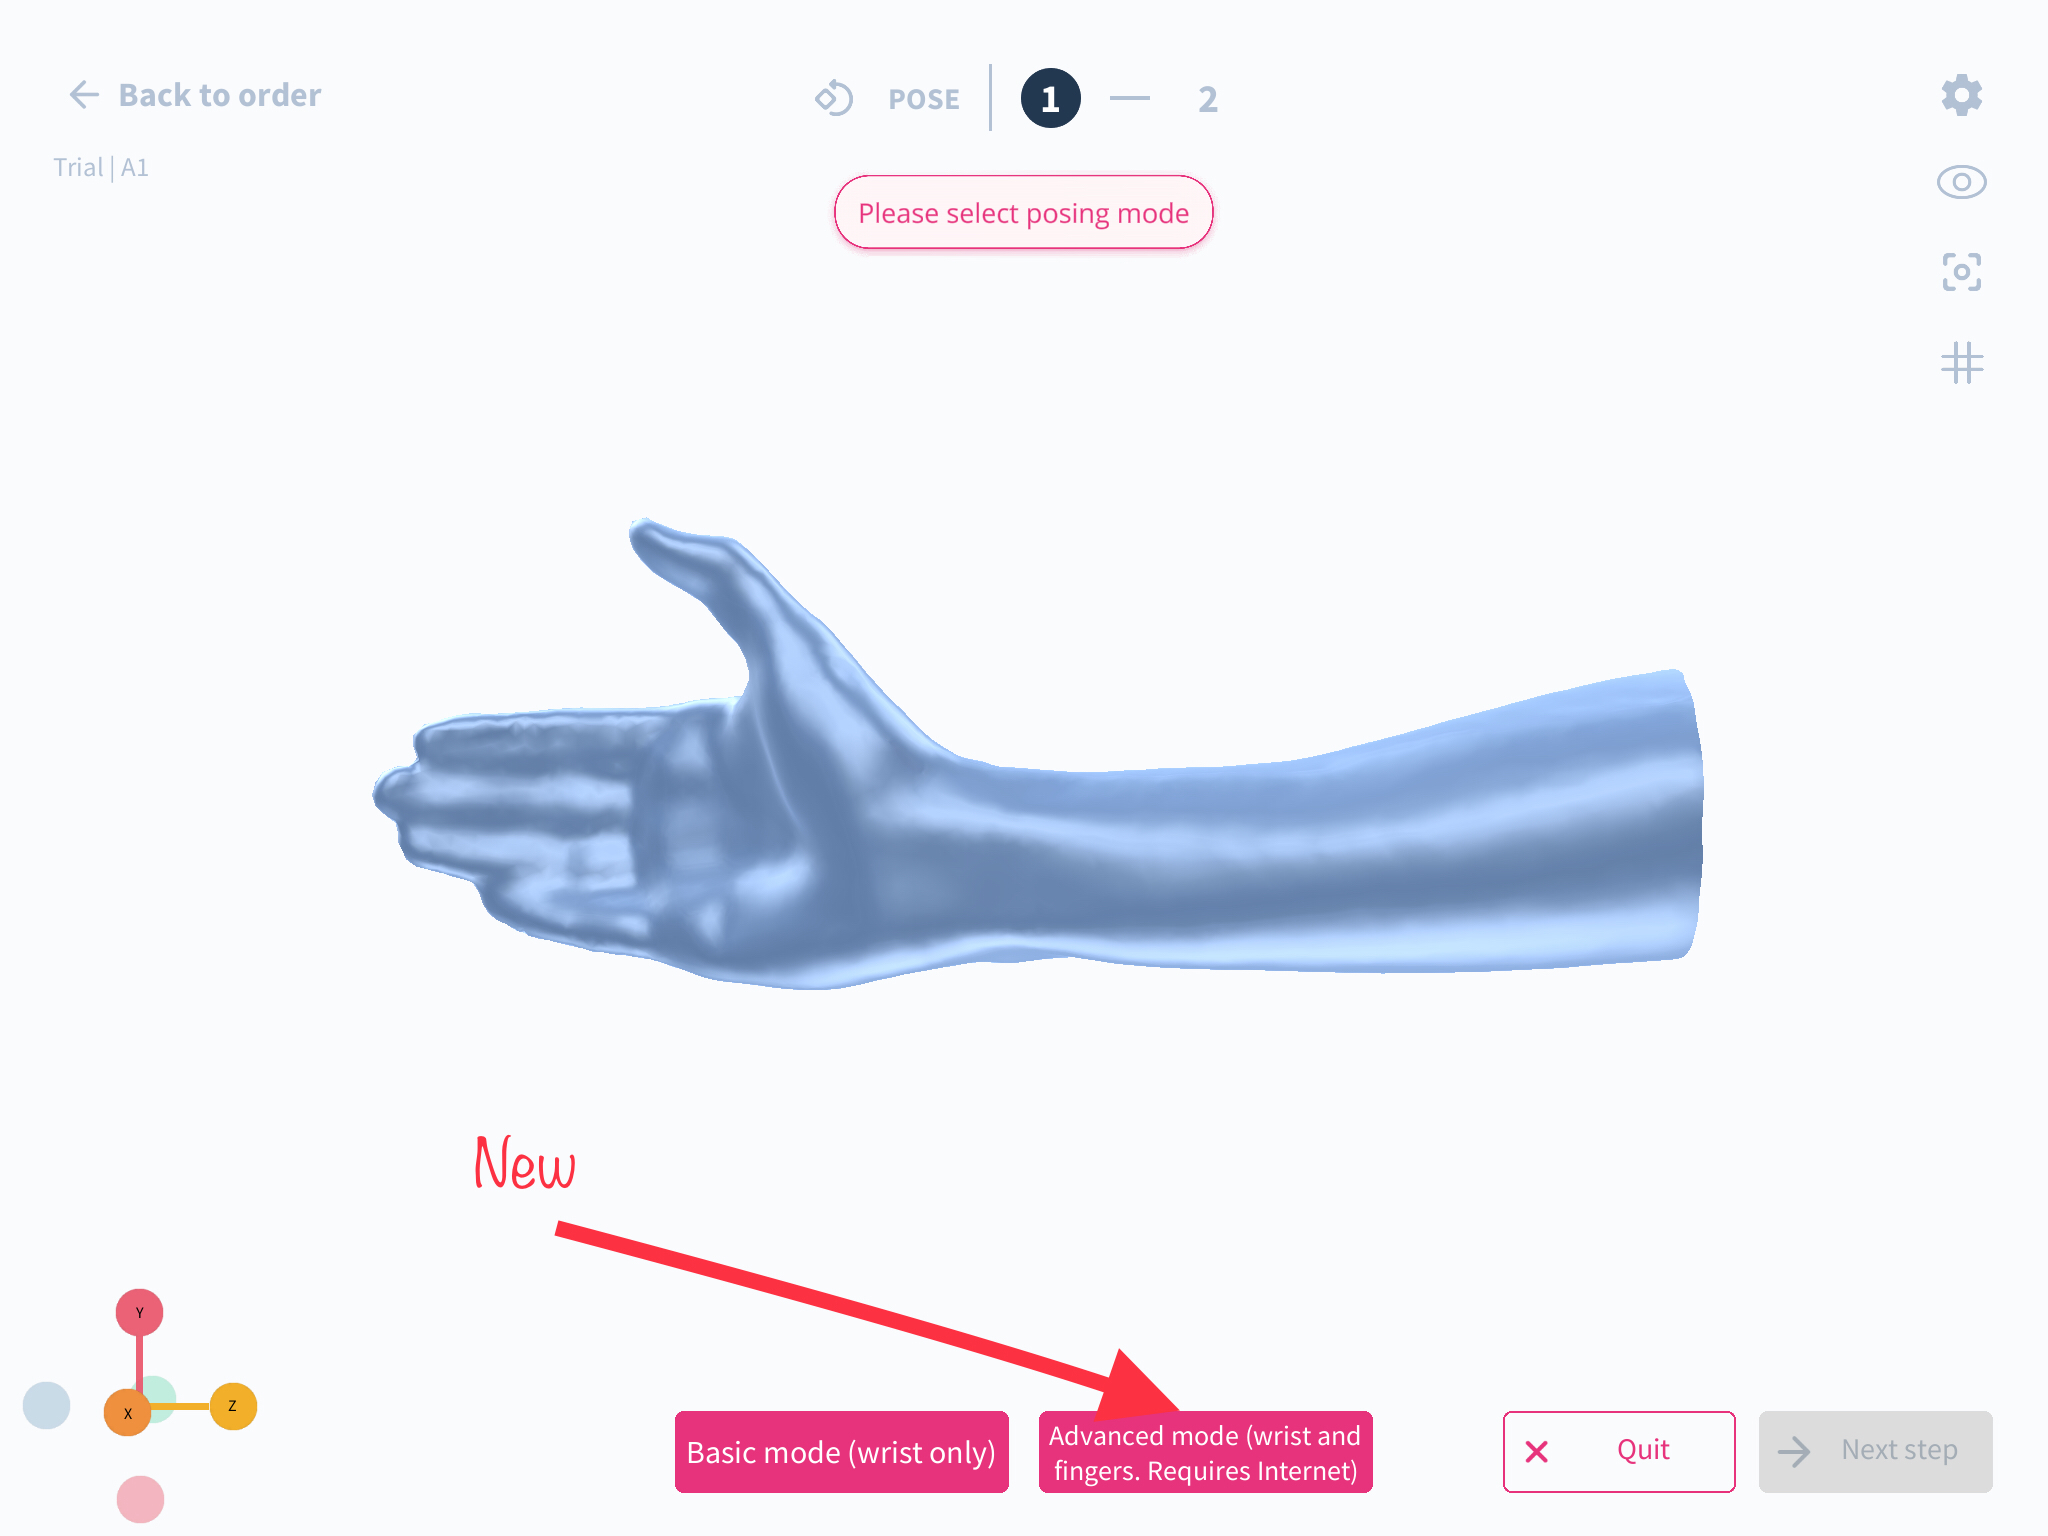
Pose Level Transparency
What has changed: We have introduced a new feature in the Pose Level during the scan step that enables users to change the opacity of scans, making them transparent. Additionally, this transparency feature can be used simultaneously with grid lines for better reference.
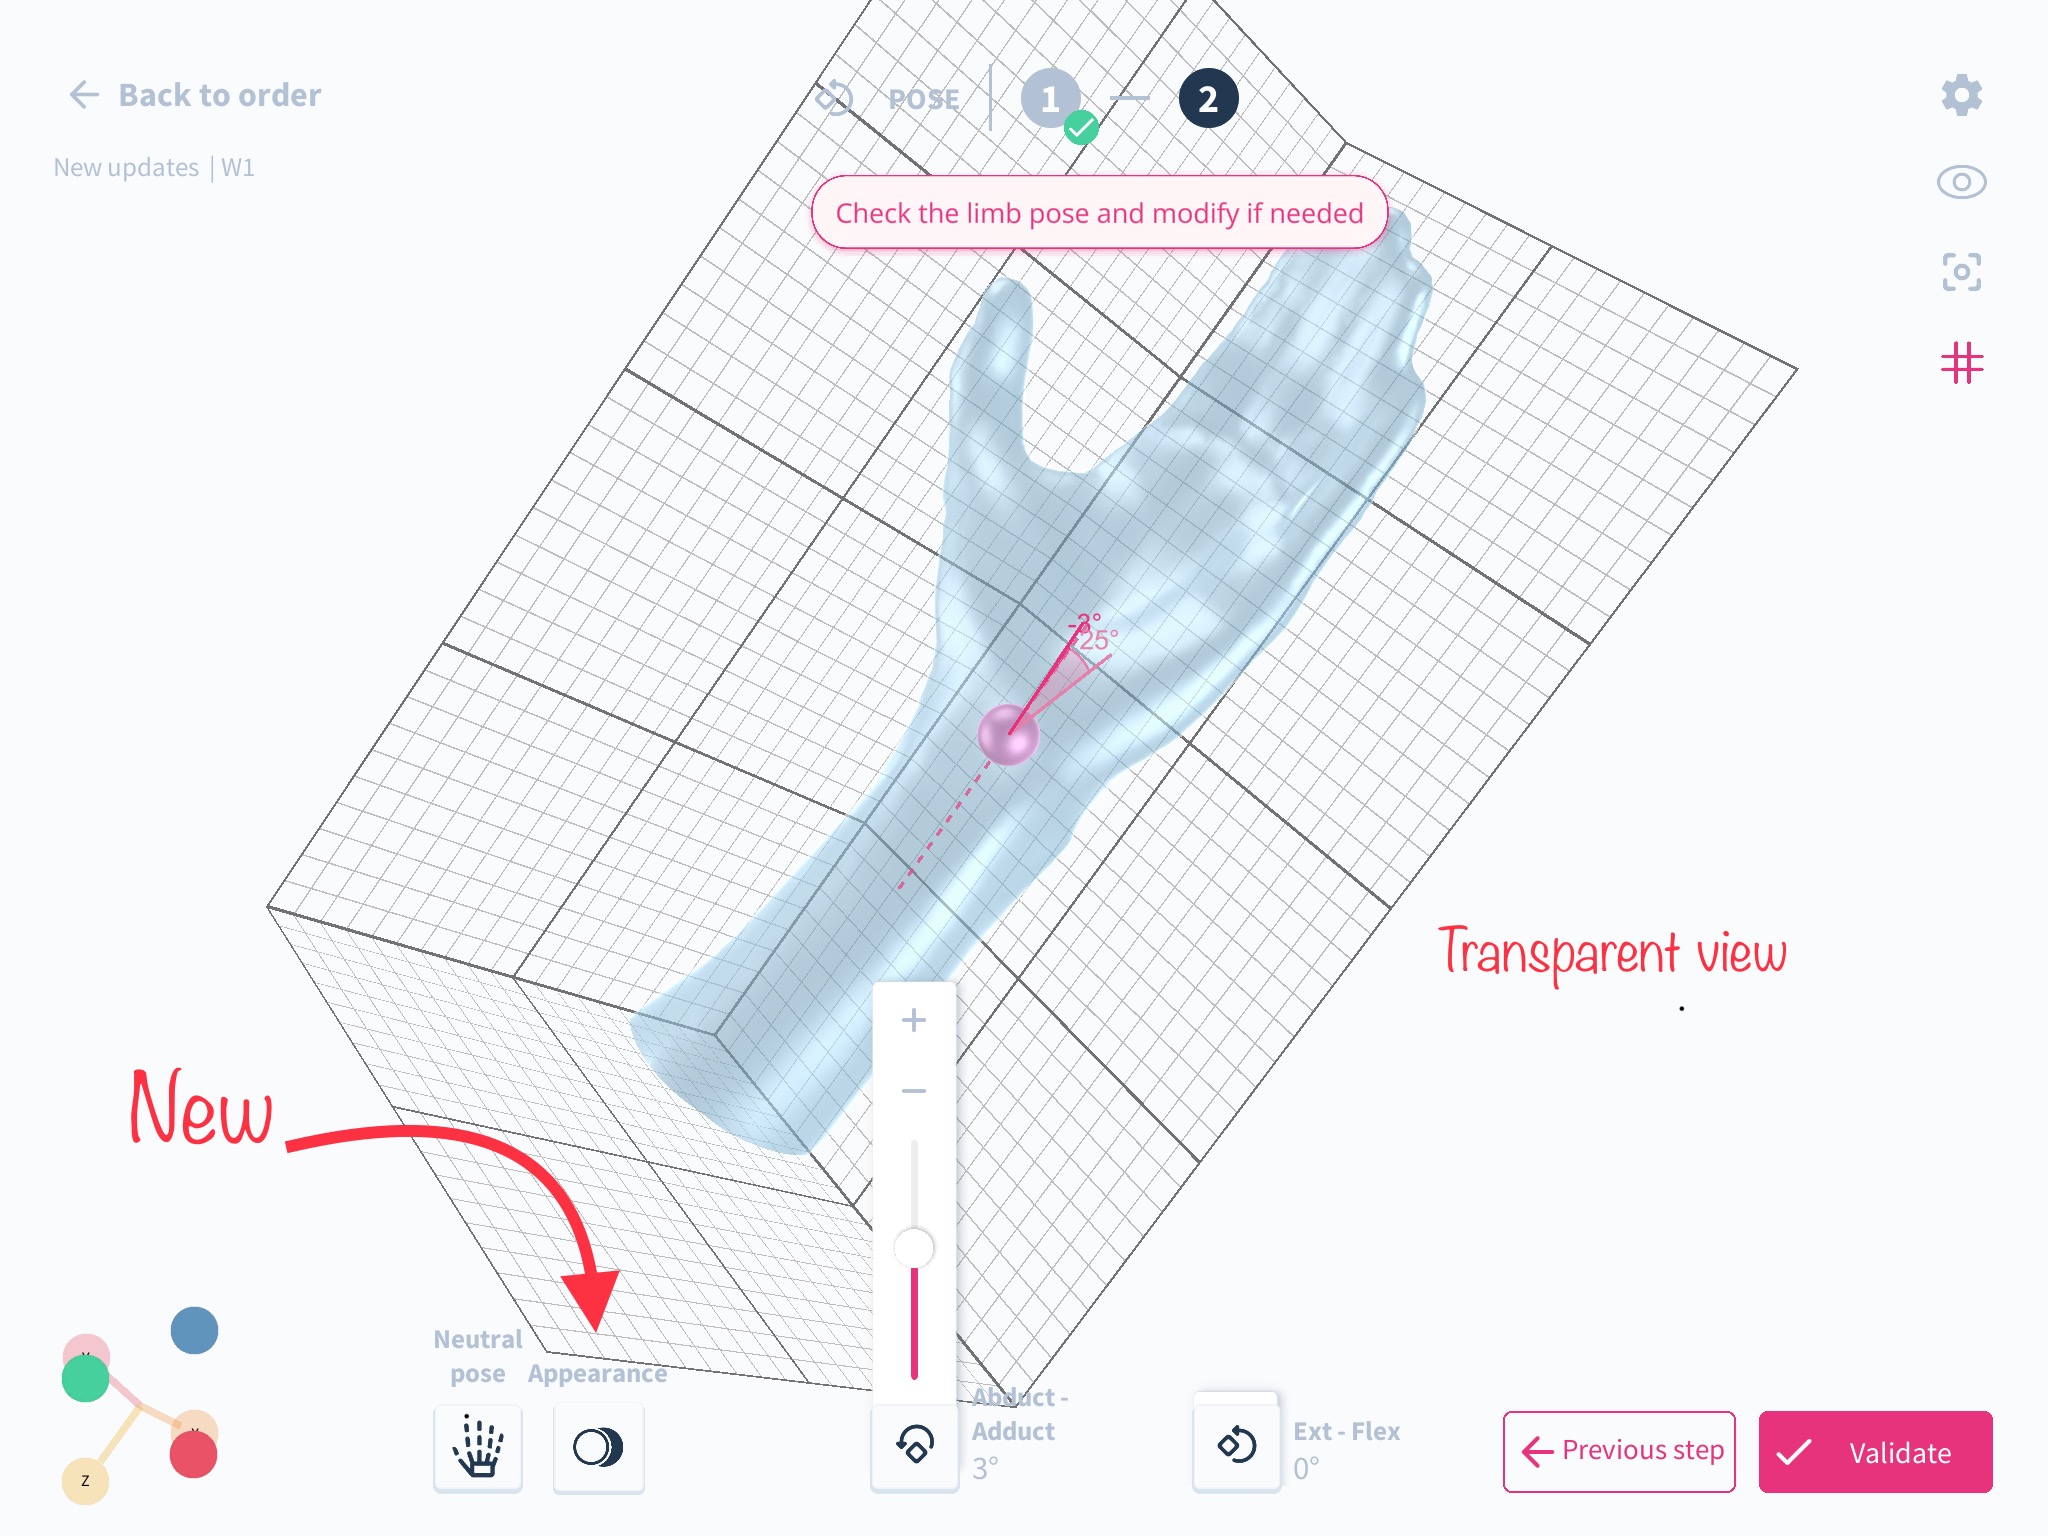
How it affects you: This enhancement empowers users to edit poses with an elevated level of accuracy by utilizing the grid as a reference point. Tasks such as adjusting abduction, adduction, extension, and flexion angles are now more intuitive and streamlined.
How to use it: Within the Pose Level, select ‘Appearance’ and then choose from three options: Normal, Transparent, or Neutral Ghost to adjust the opacity of the scans as per your preference. Use Transparent mode alongside grid lines for precision editing.
New Warning Popup in freeForma and autoForma to Remind Users of Beltloop Placement Requirements
In both freeForma and autoForma, a new warning popup now appears at the start of the Fit & Draw validation step. The popup serves as a reminder to check the dimensions of the splints to ensure that there is adequate space to add the closing system before proceeding to the next level. This step is crucial because if users exit the level and subsequently realize that there is no room to accommodate the beltloop on the splint, they will have to start the entire model again from scratch.
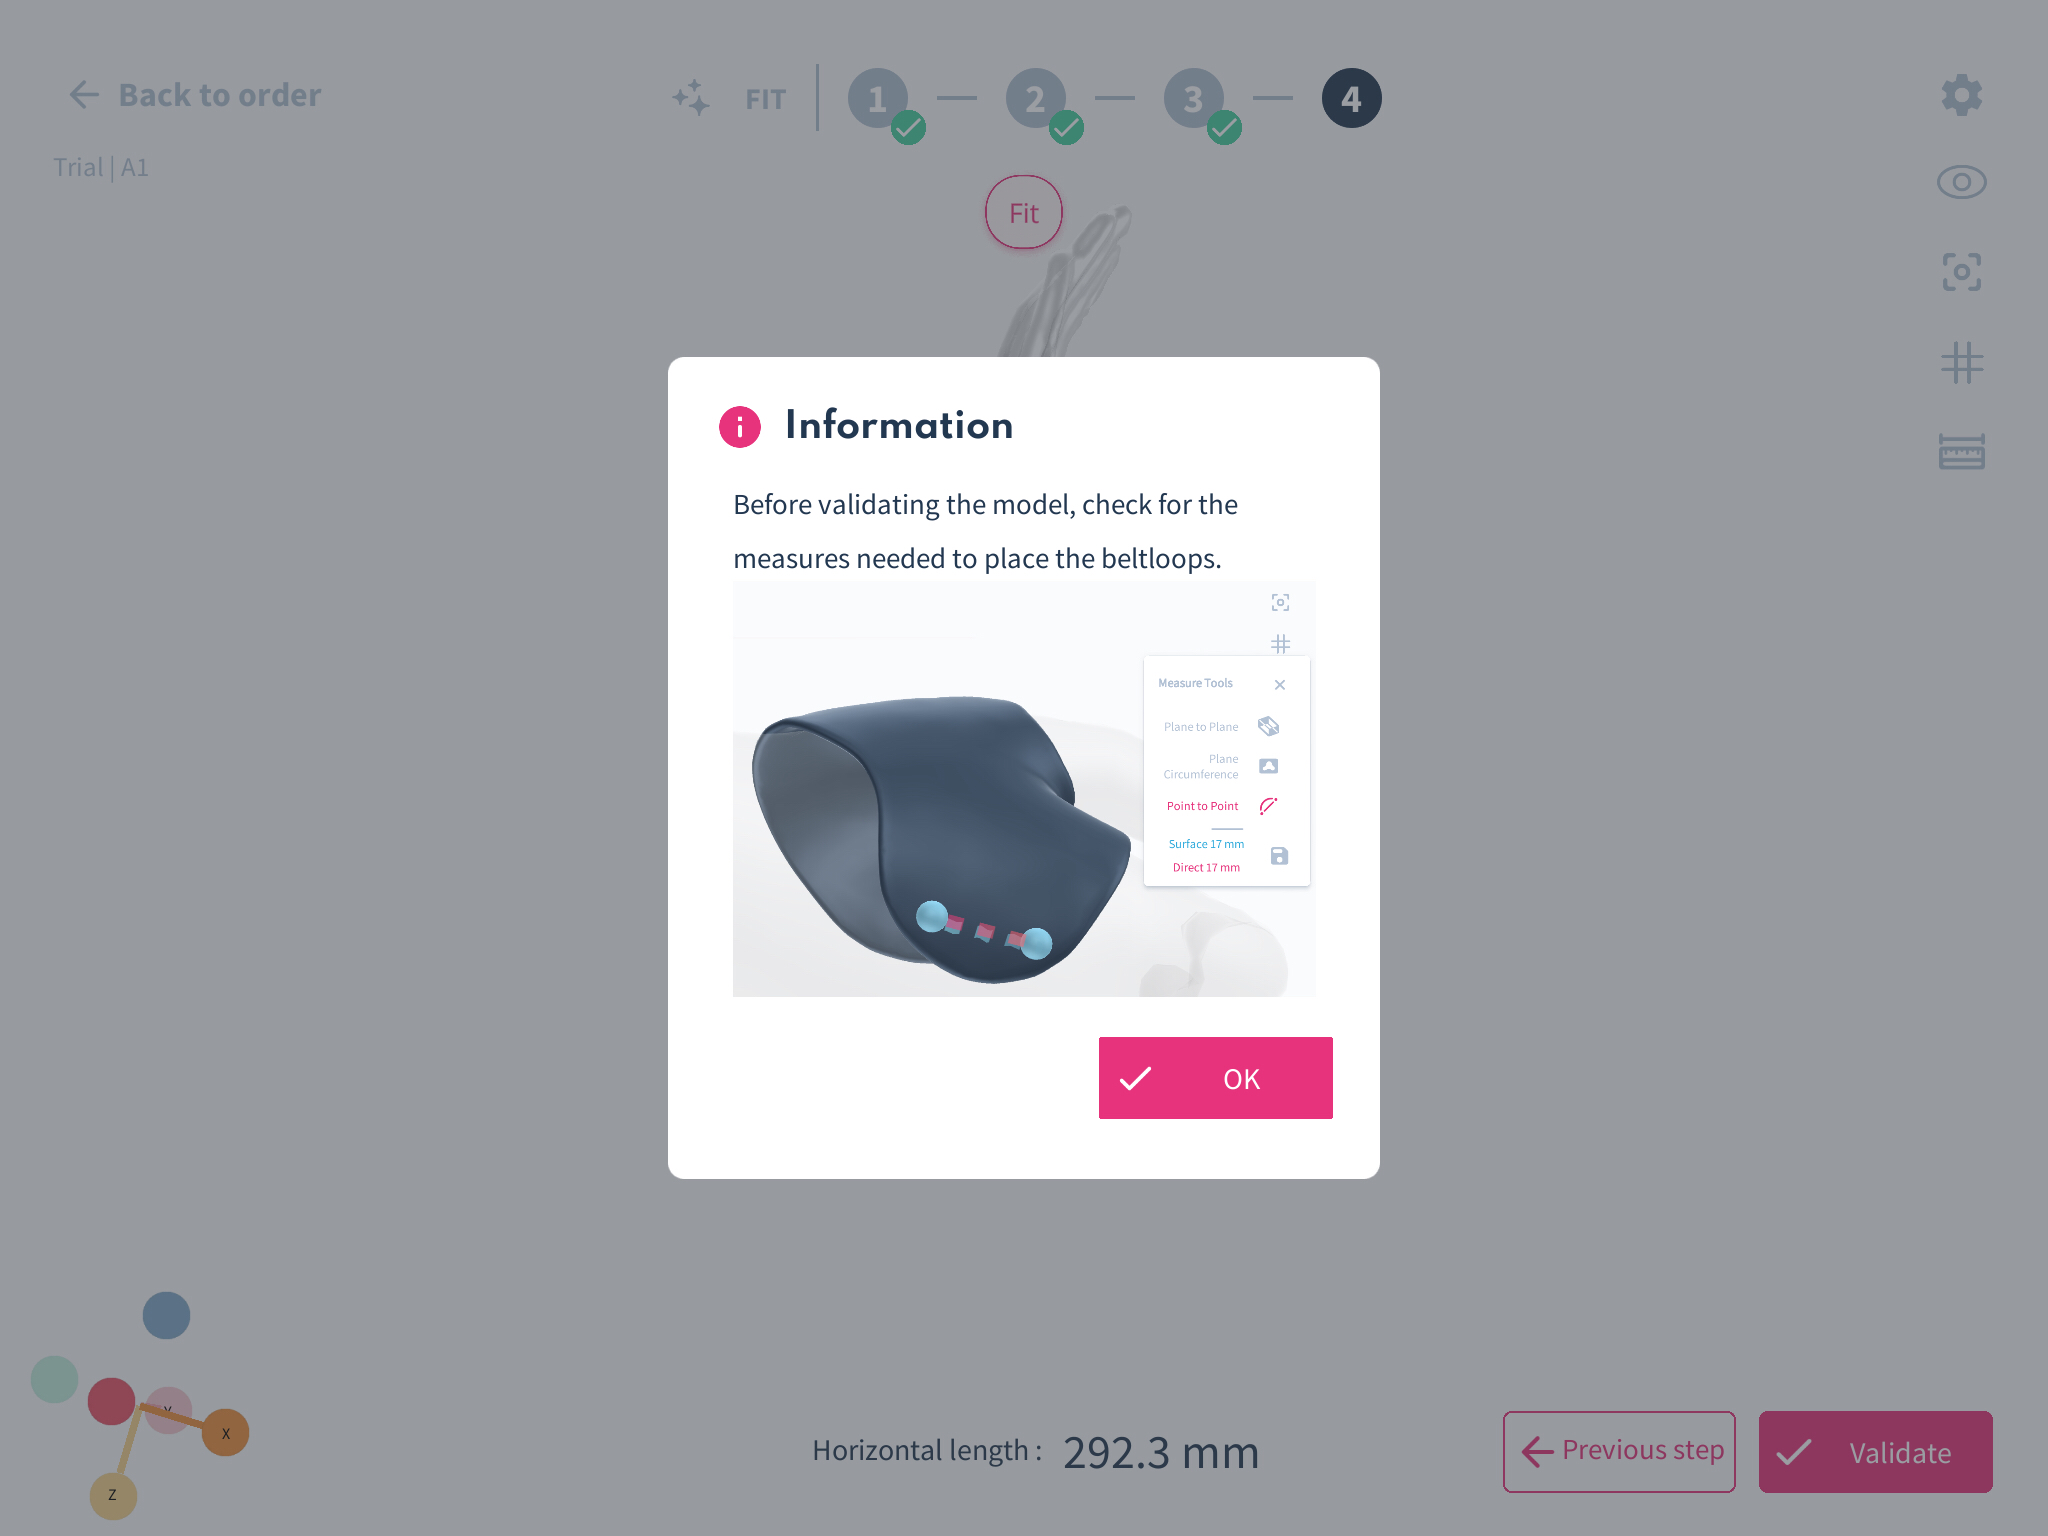
Point-to-Point Measure Tool for Splint Surface
What we’ve changed
Users can now use the Point-to-Point measure tool on the splint surface in both freeForma and autoForma. This feature allows the user to check the dimensions of the model for specific needs such as placing closing systems.
How it affects you
This new feature makes it easier for users to measure specific distances on the splint surface, which can be useful for a variety of purposes. It provides more precise measurements, leading to better-fitting splints and improved patient outcomes.
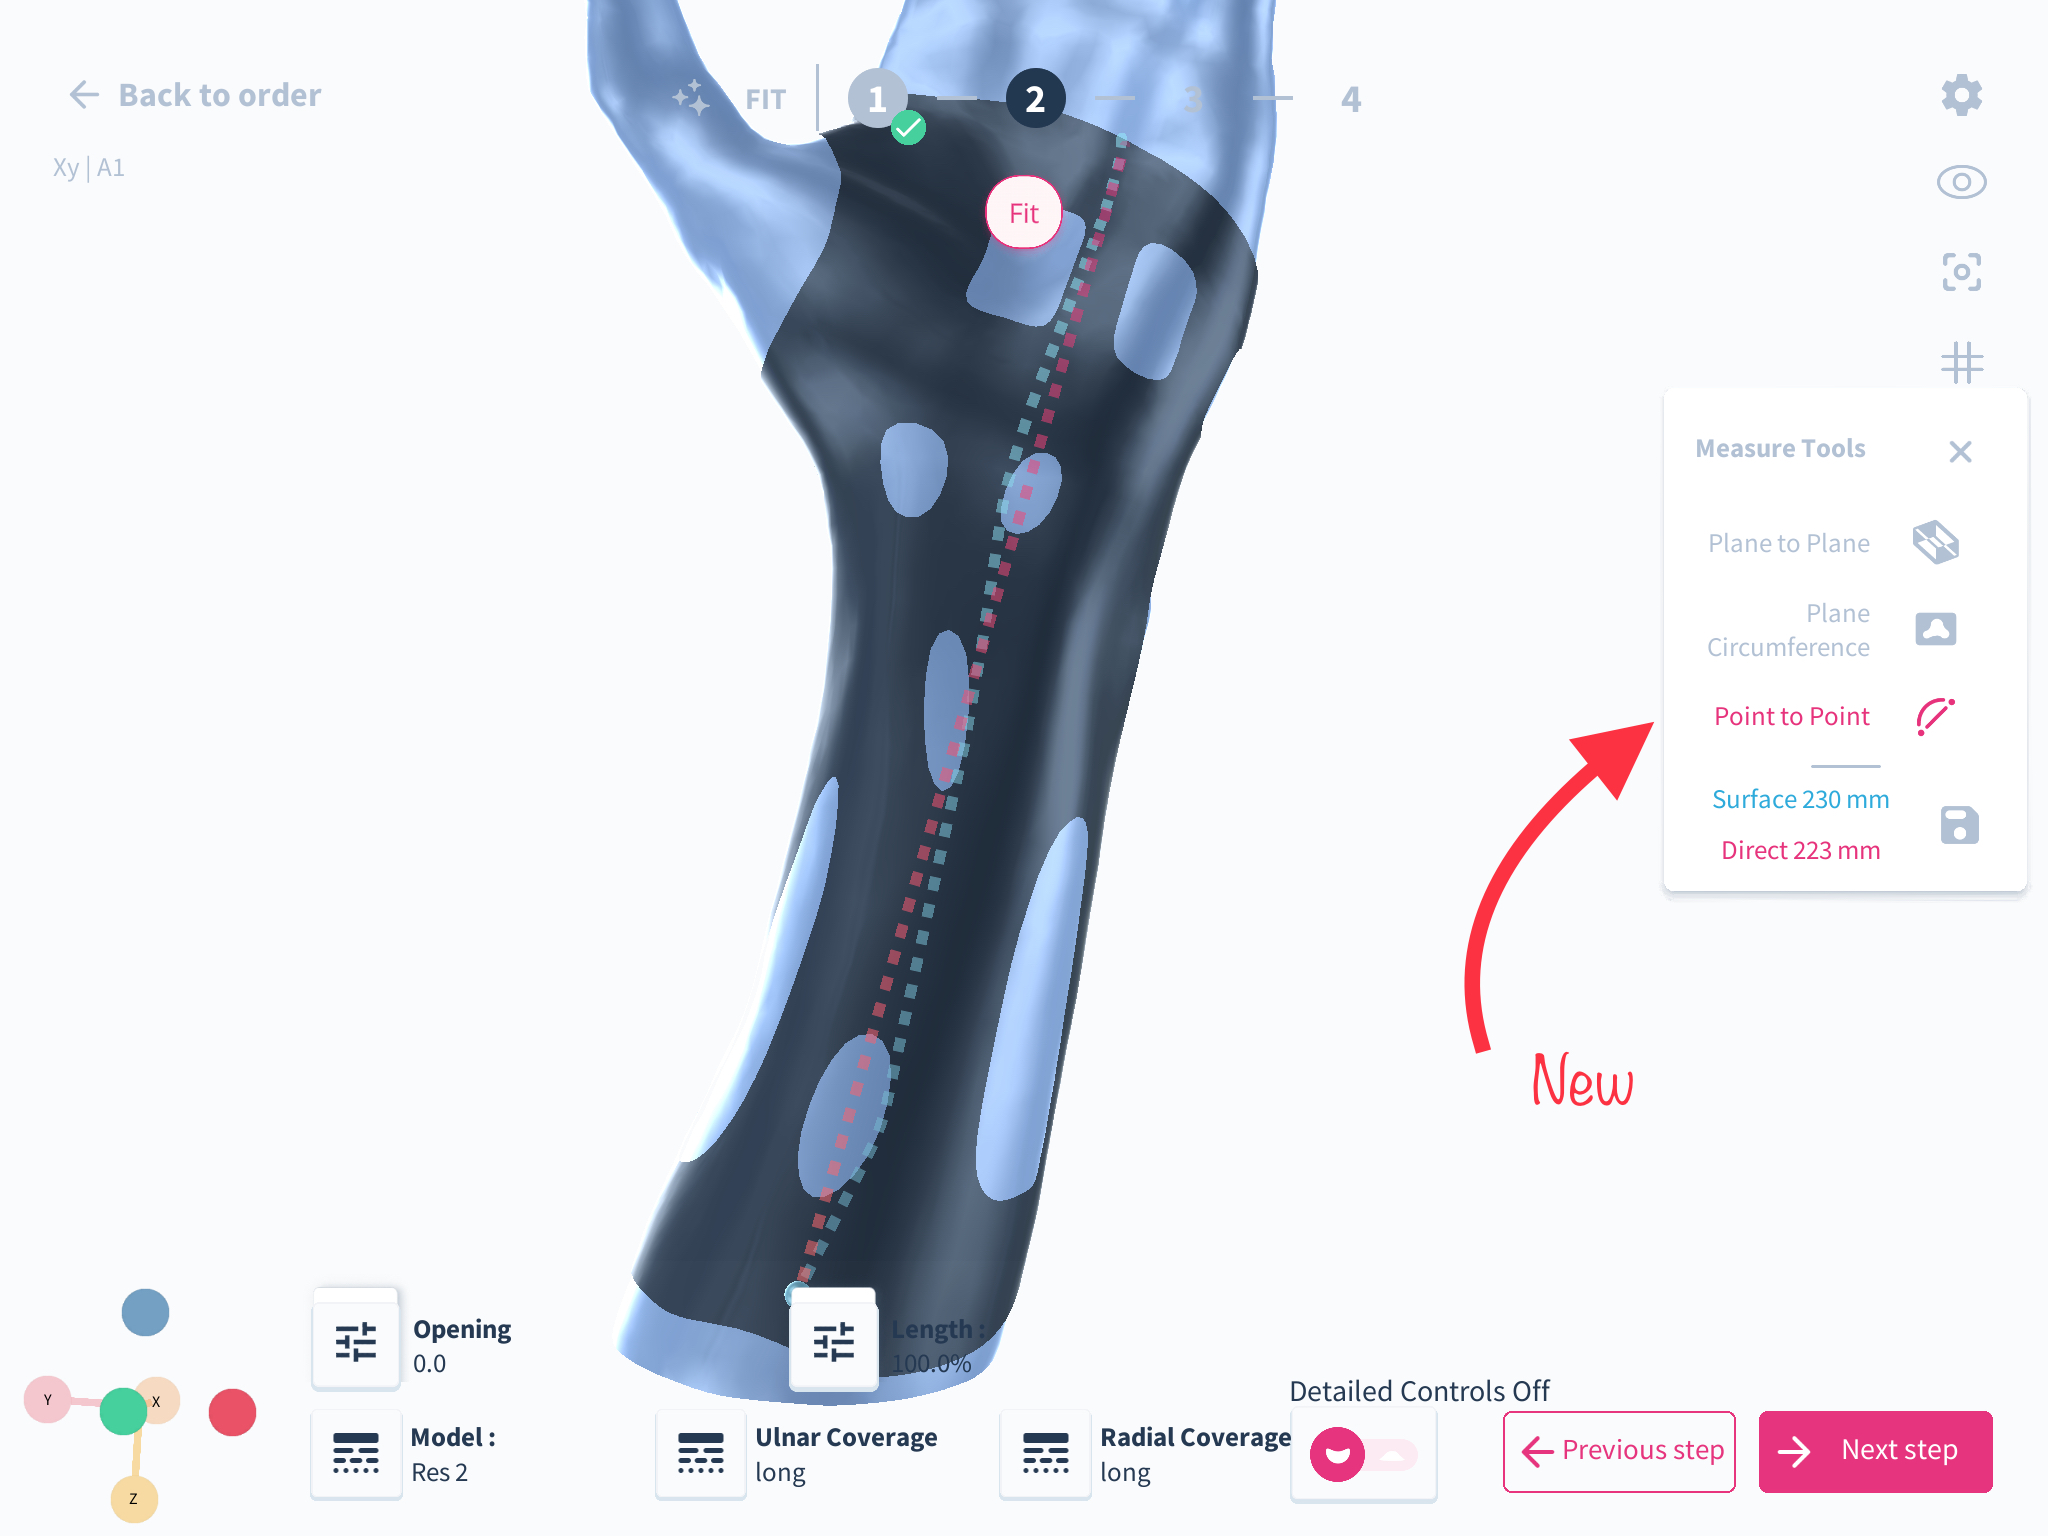
How to use it
To use this feature, simply open the measure tool in either freeforma or autoForma mode and select from the measure tools and select the point to point tool. Select a point on the splint surface that you want to measure. The tool will calculate the distance between the two points, allowing you to check the dimensions of specific areas on the model.
New Visual Distance Indicator
What we’ve changed
In this update, we have replaced the text-based distance indicator with a new visual indicator. This change provides users with a clearer sense of how far they are from their subject, as well as a visual representation of the range of movement.
How it affects you
As a user of our platform, this update will improve your scanning experience by providing you with a more intuitive and user-friendly interface. The new visual indicator will make it easier to see how close you are to your subject and how much movement you have available, resulting in more accurate and efficient scans.
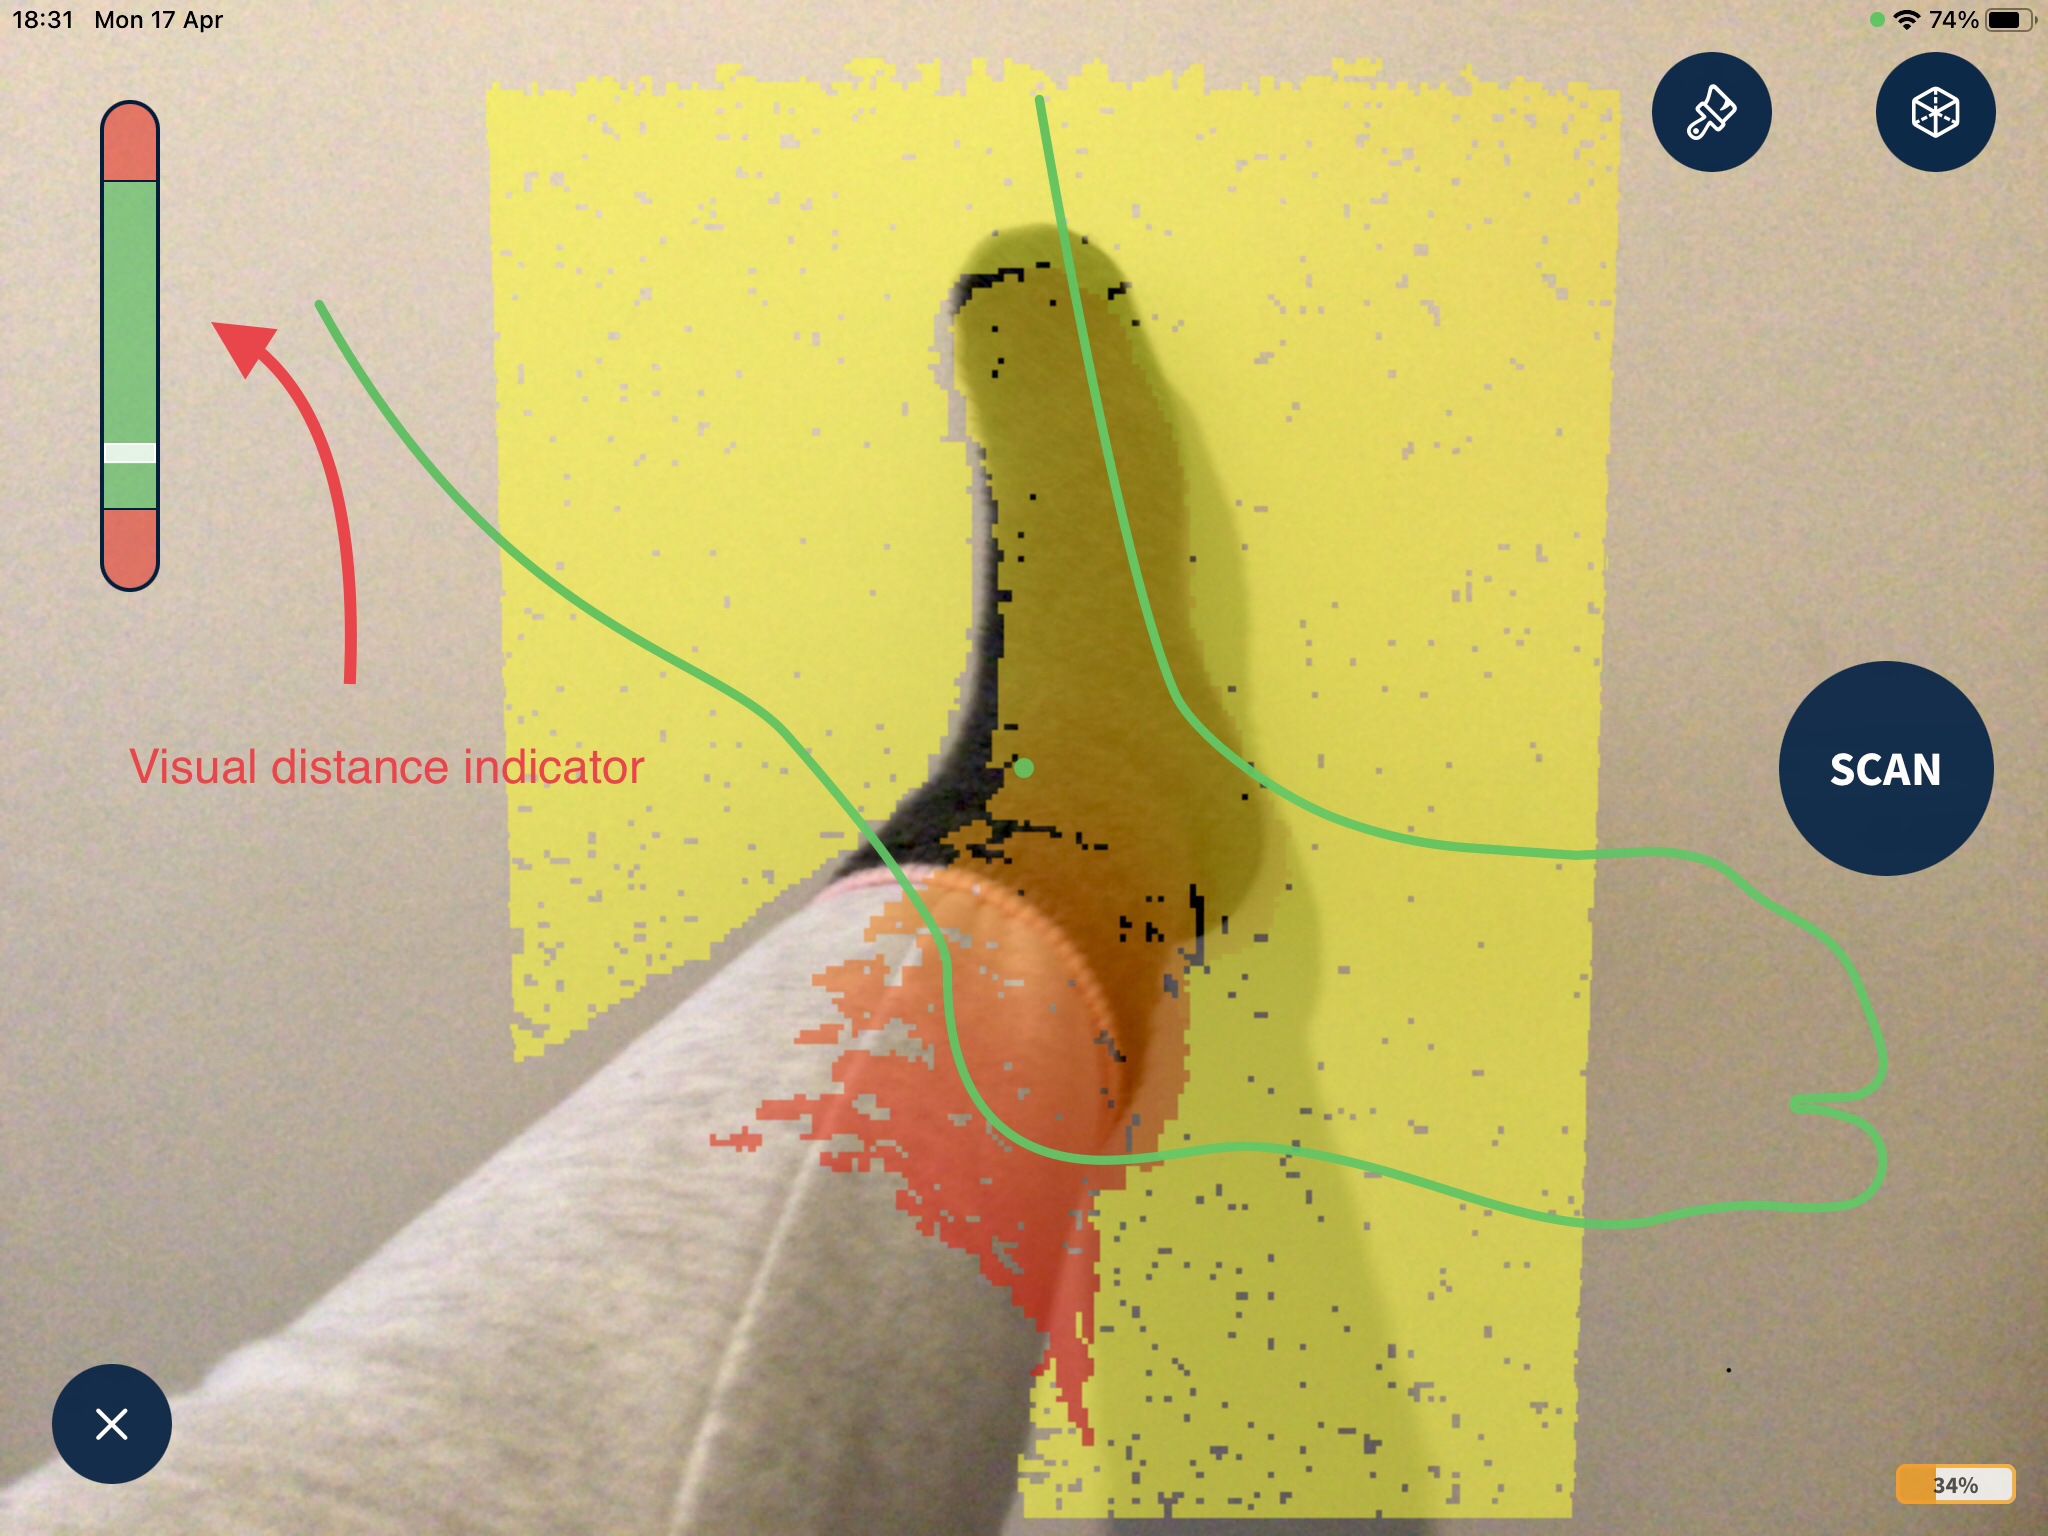
How to use it
Simply update the app to the latest version to take advantage of this improvement. When using the scanning feature, you will now see a visual indicator that provides a clear representation of your distance from the subject and your range of movement. This will make it easier to achieve the best possible results with your scans.
New update : Improvement of UI/UX for pose level
The pose tool in the correction step has been improved to accommodate changing the limb's position to a neutral position. Also, you can now visualize the angles on the axis to help you better immobilize the limb to the desired angles.
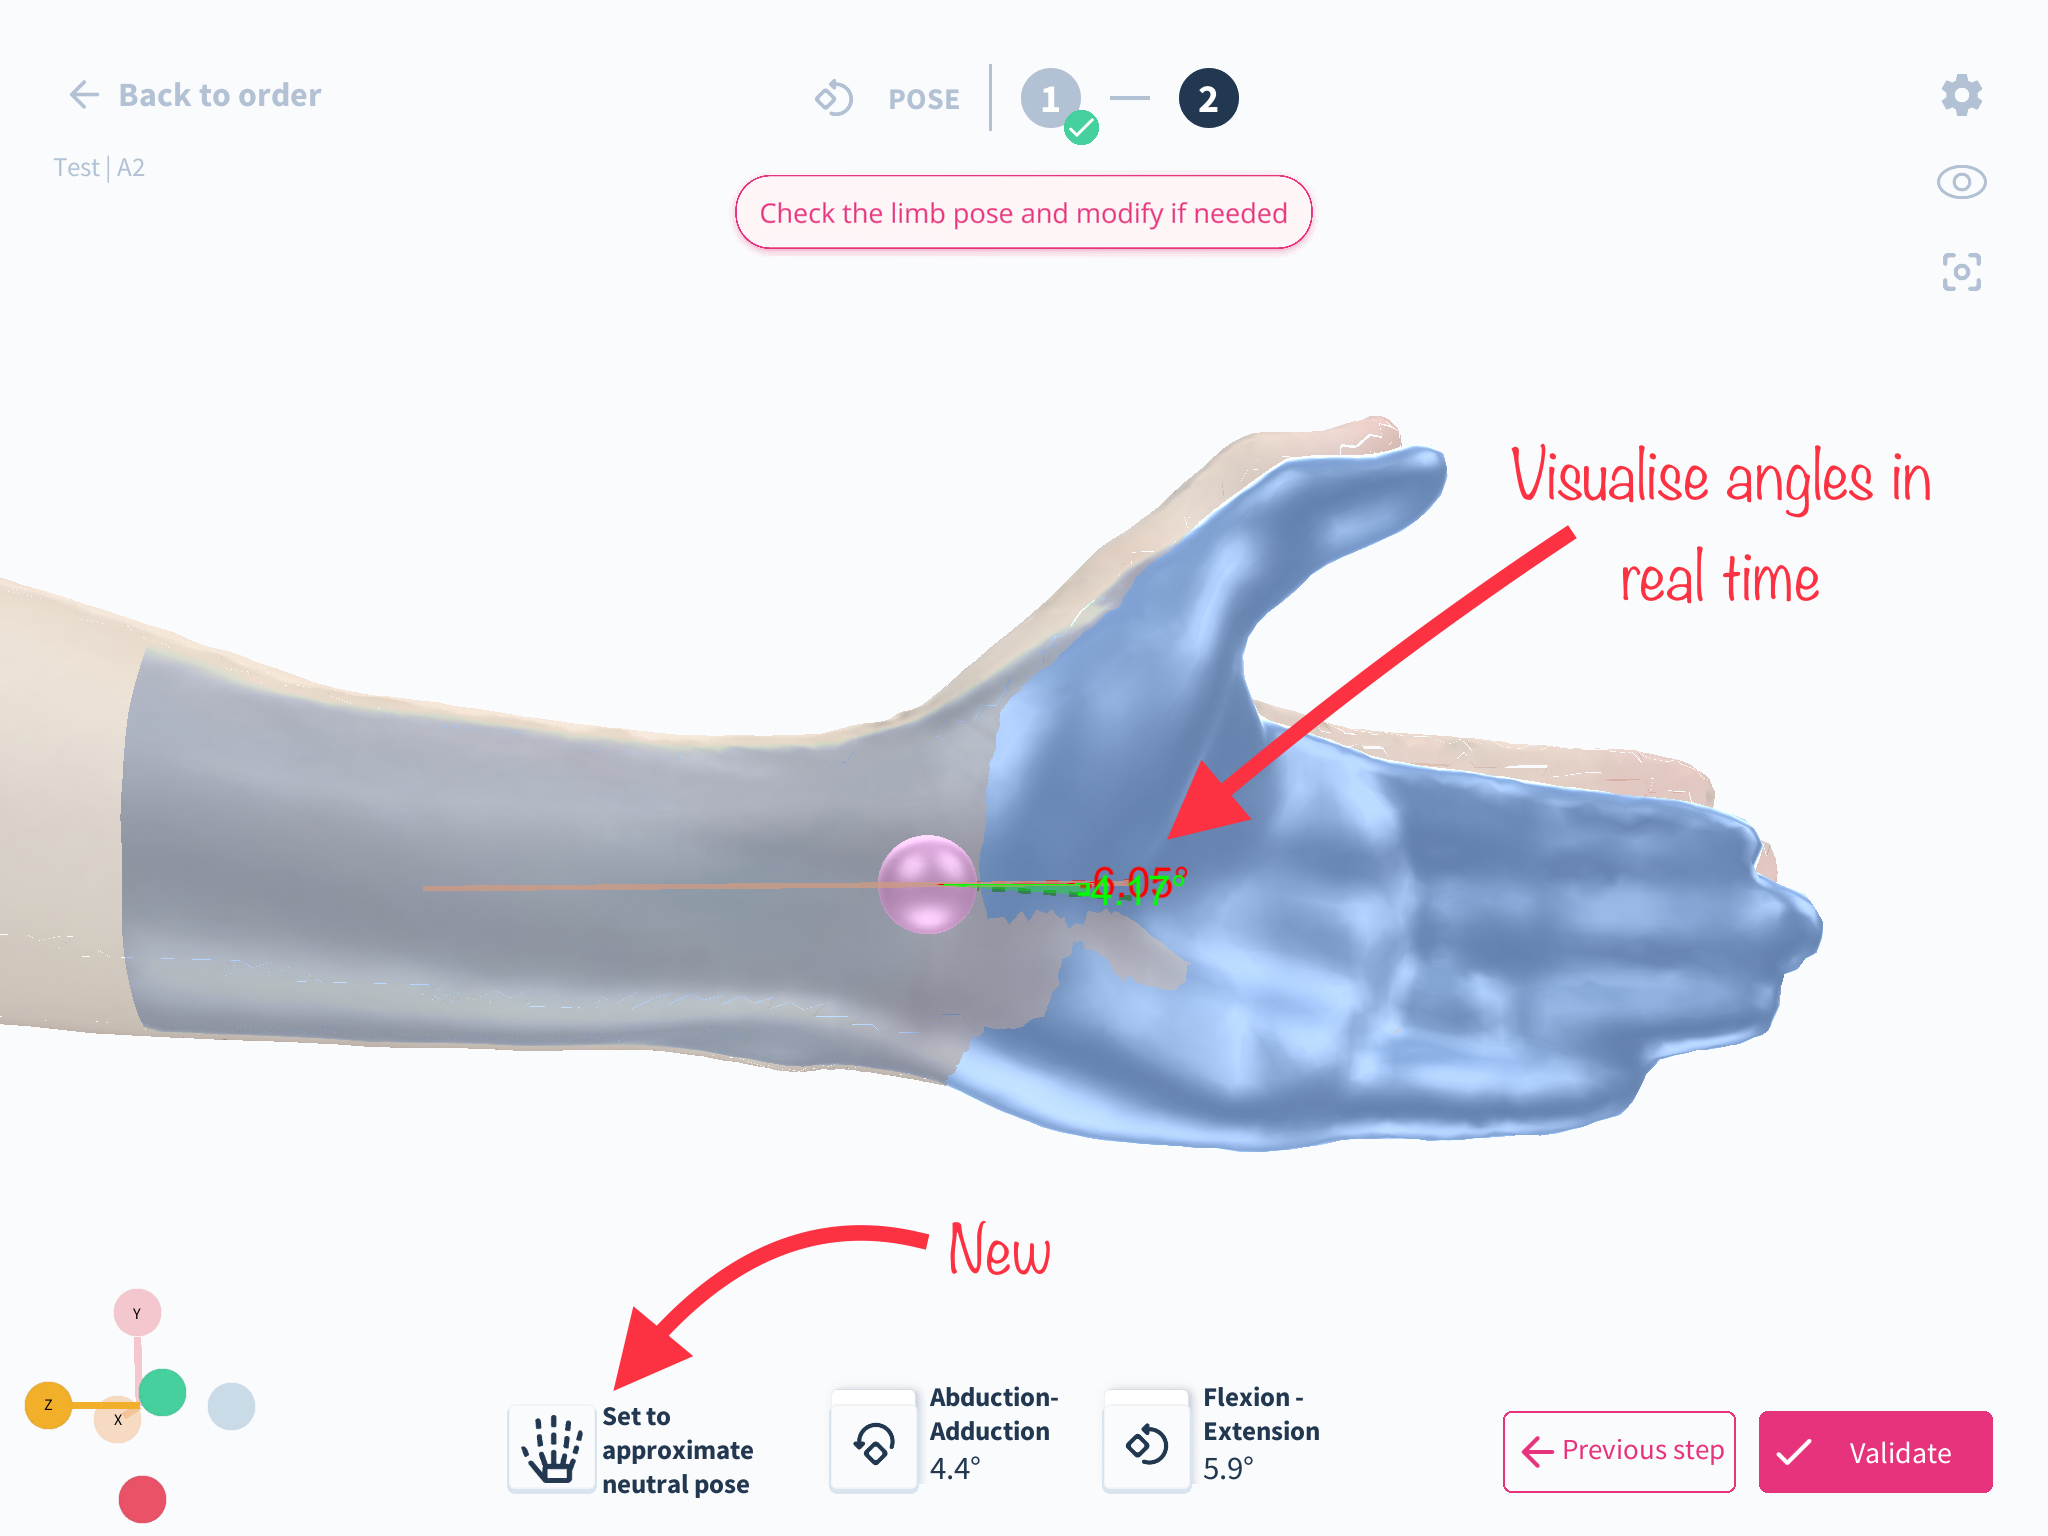
How to use the feature: step by step guide
- Once you have cleaned up the scan, you can decide to adjust the pose or save the scan and continue to the next step. Select pose.
- Depending on the model you are working on, you can choose the advanced setting or basic setting
- In basic settings, select the required landmarks and adjust accordingly.
New update: Scan correction step now available for all Q models
Spentys Forma tool allows you to make corrections to scans and even design devices. Our Q models have previously been ordered through measurements, but now we have included scan correction possibilities in our Q models. To learn more about our Q models, click here.
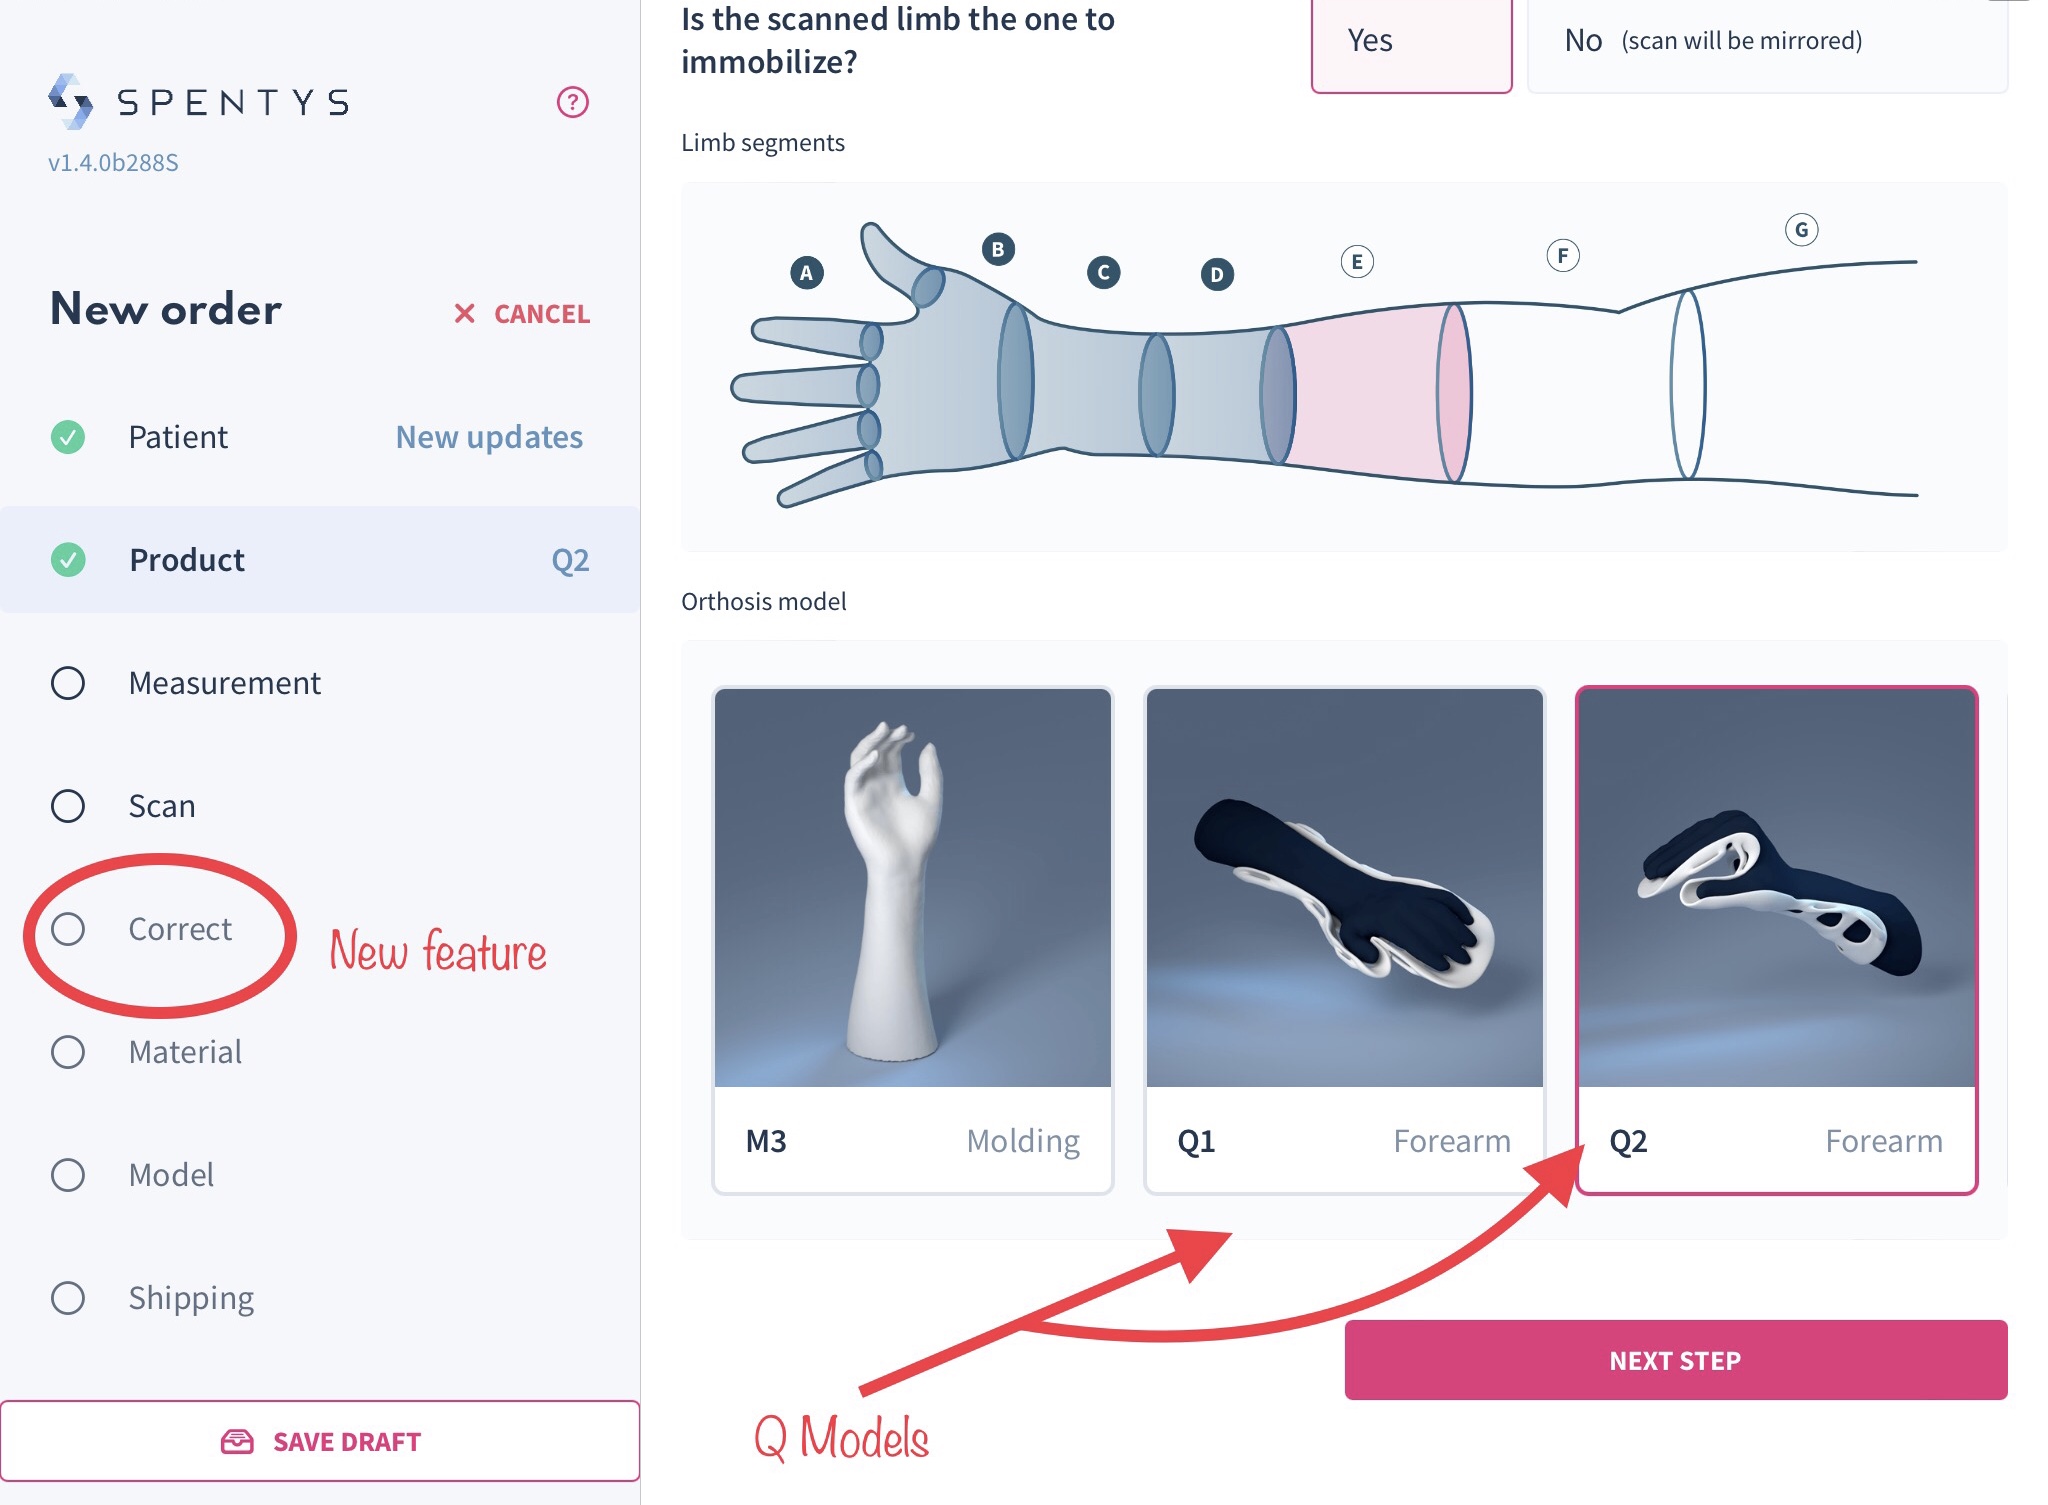
With the scan correction tool, you can easily add your modification to your scans. This allows you to add or remove material on desired areas of the scan, change angles of flexion and extension, as well as abduction and adduction.
New Update: Manually align your scan
Introduction: With this updated interface within the scan correction step, you can manually align the scan if unsatisfied with the automatic alignment provided by the chosen landmarks. We understand that the software might only sometimes automatically generate the desired alignment of the scanned limb. That is why we have added a rotational axis ball to allow easy positioning along all axes.
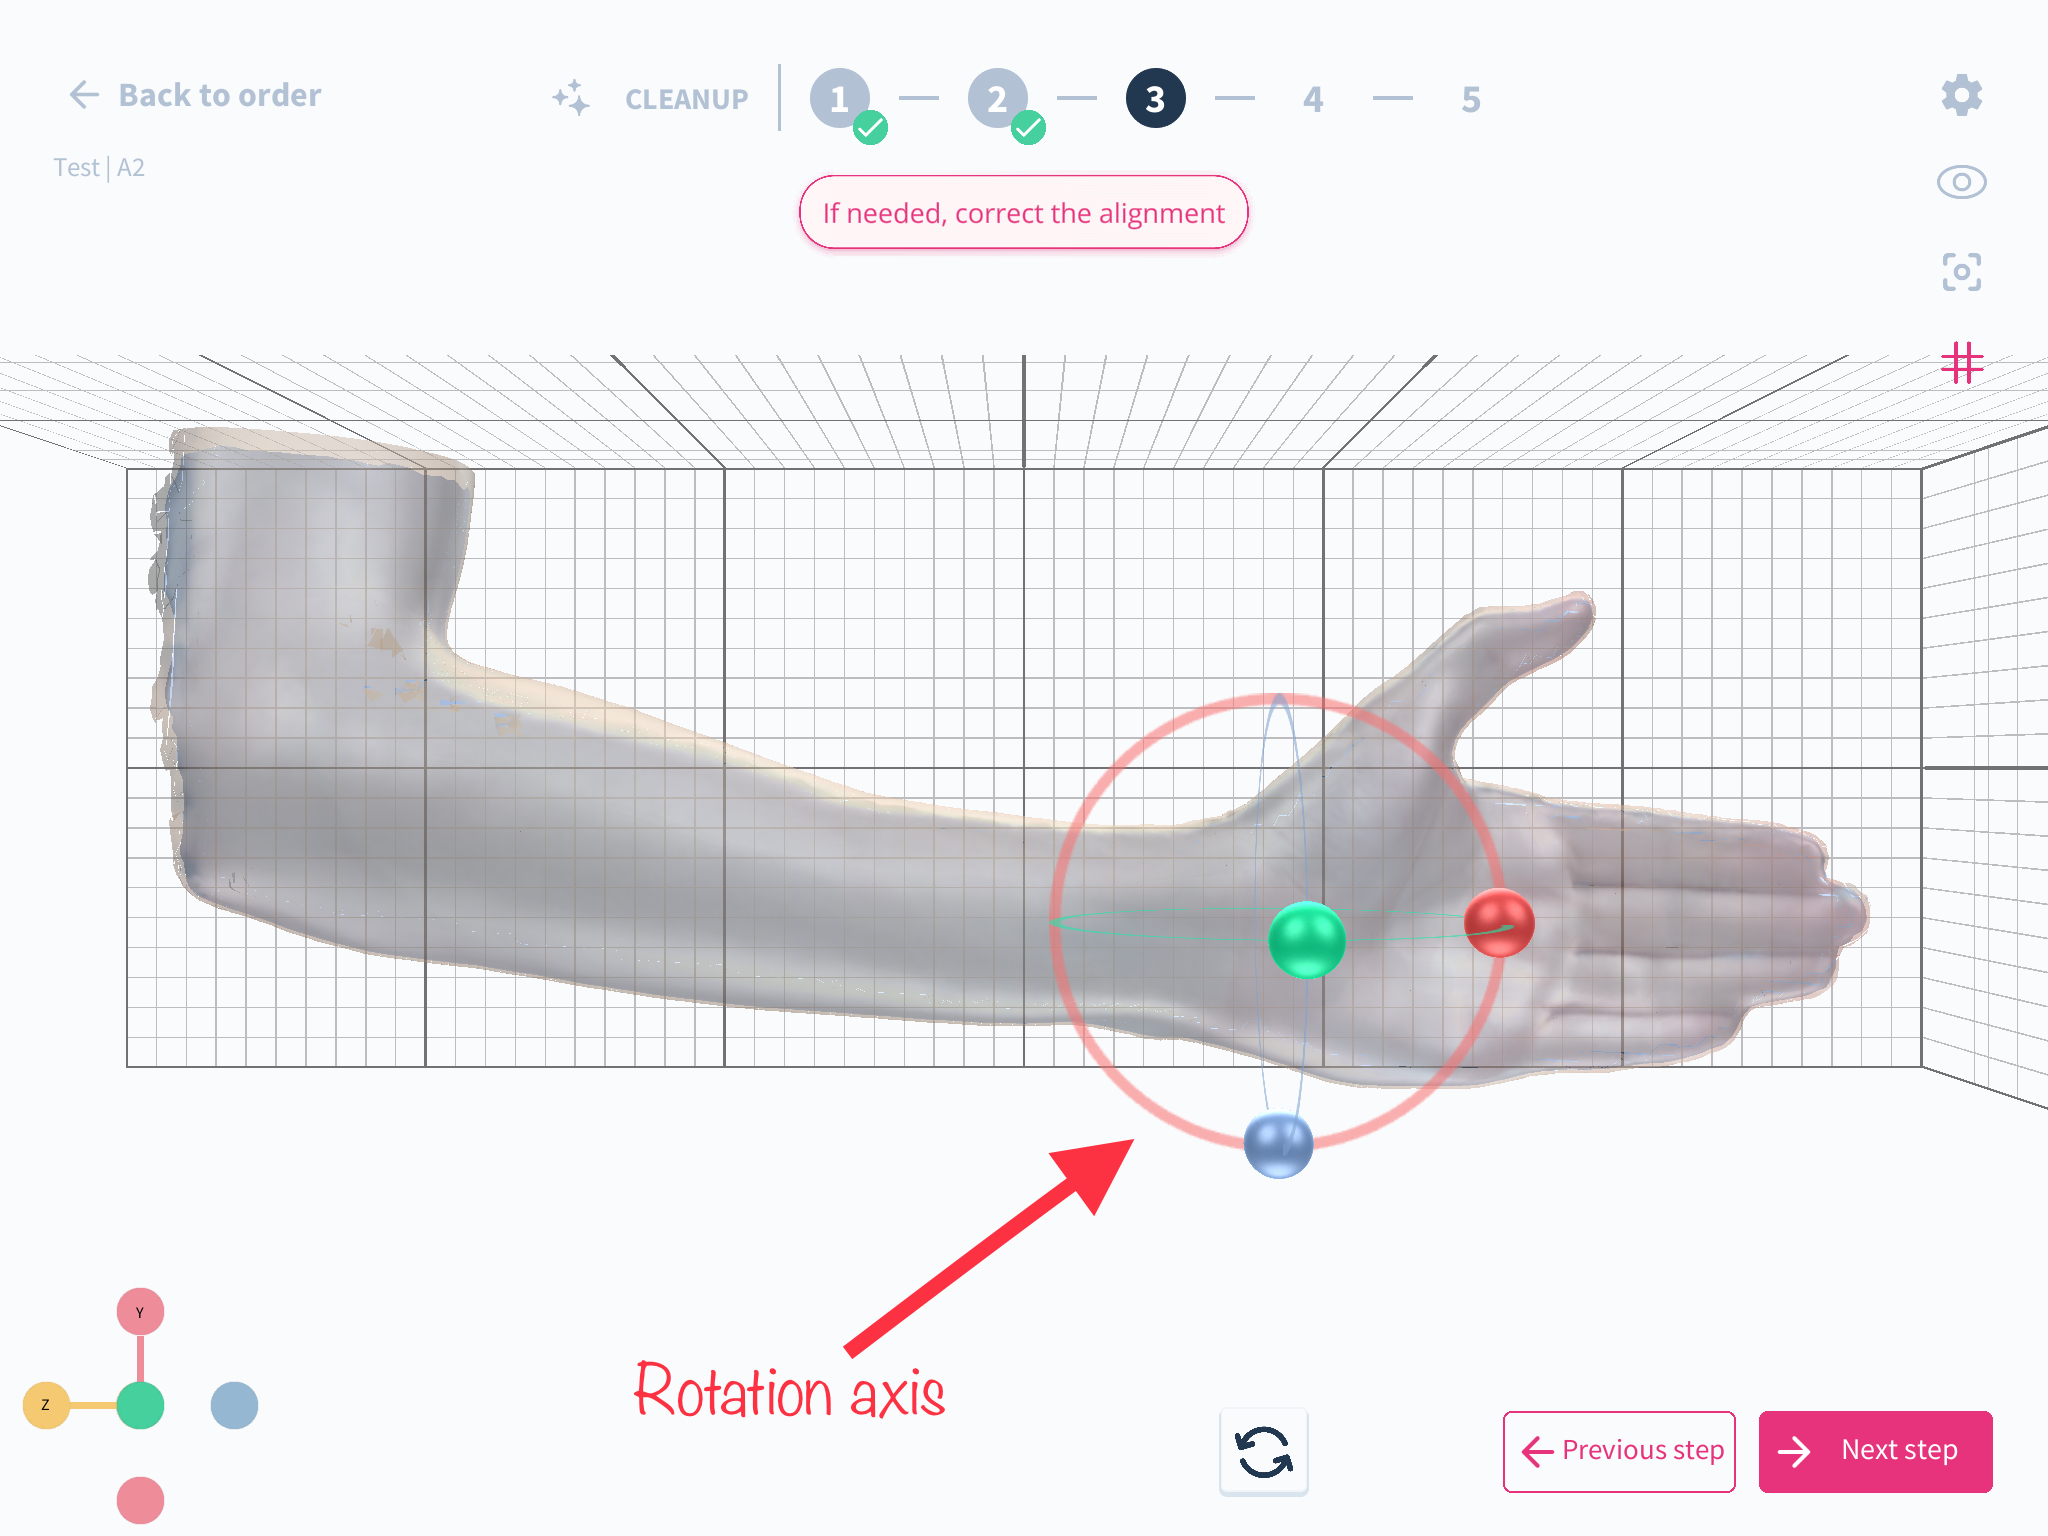
How to use the feature: step by step guide
- Once you have added your scan, cleanup as usual in the scan correction step
- Select landmarks as shown below the scan and click next
- The next step will be to validate if the alignment is correct and can be changed if required
- By holding the green, blue or red ball,, you can adjust the scan to any position desired. Please note that this cannot be changed after this step
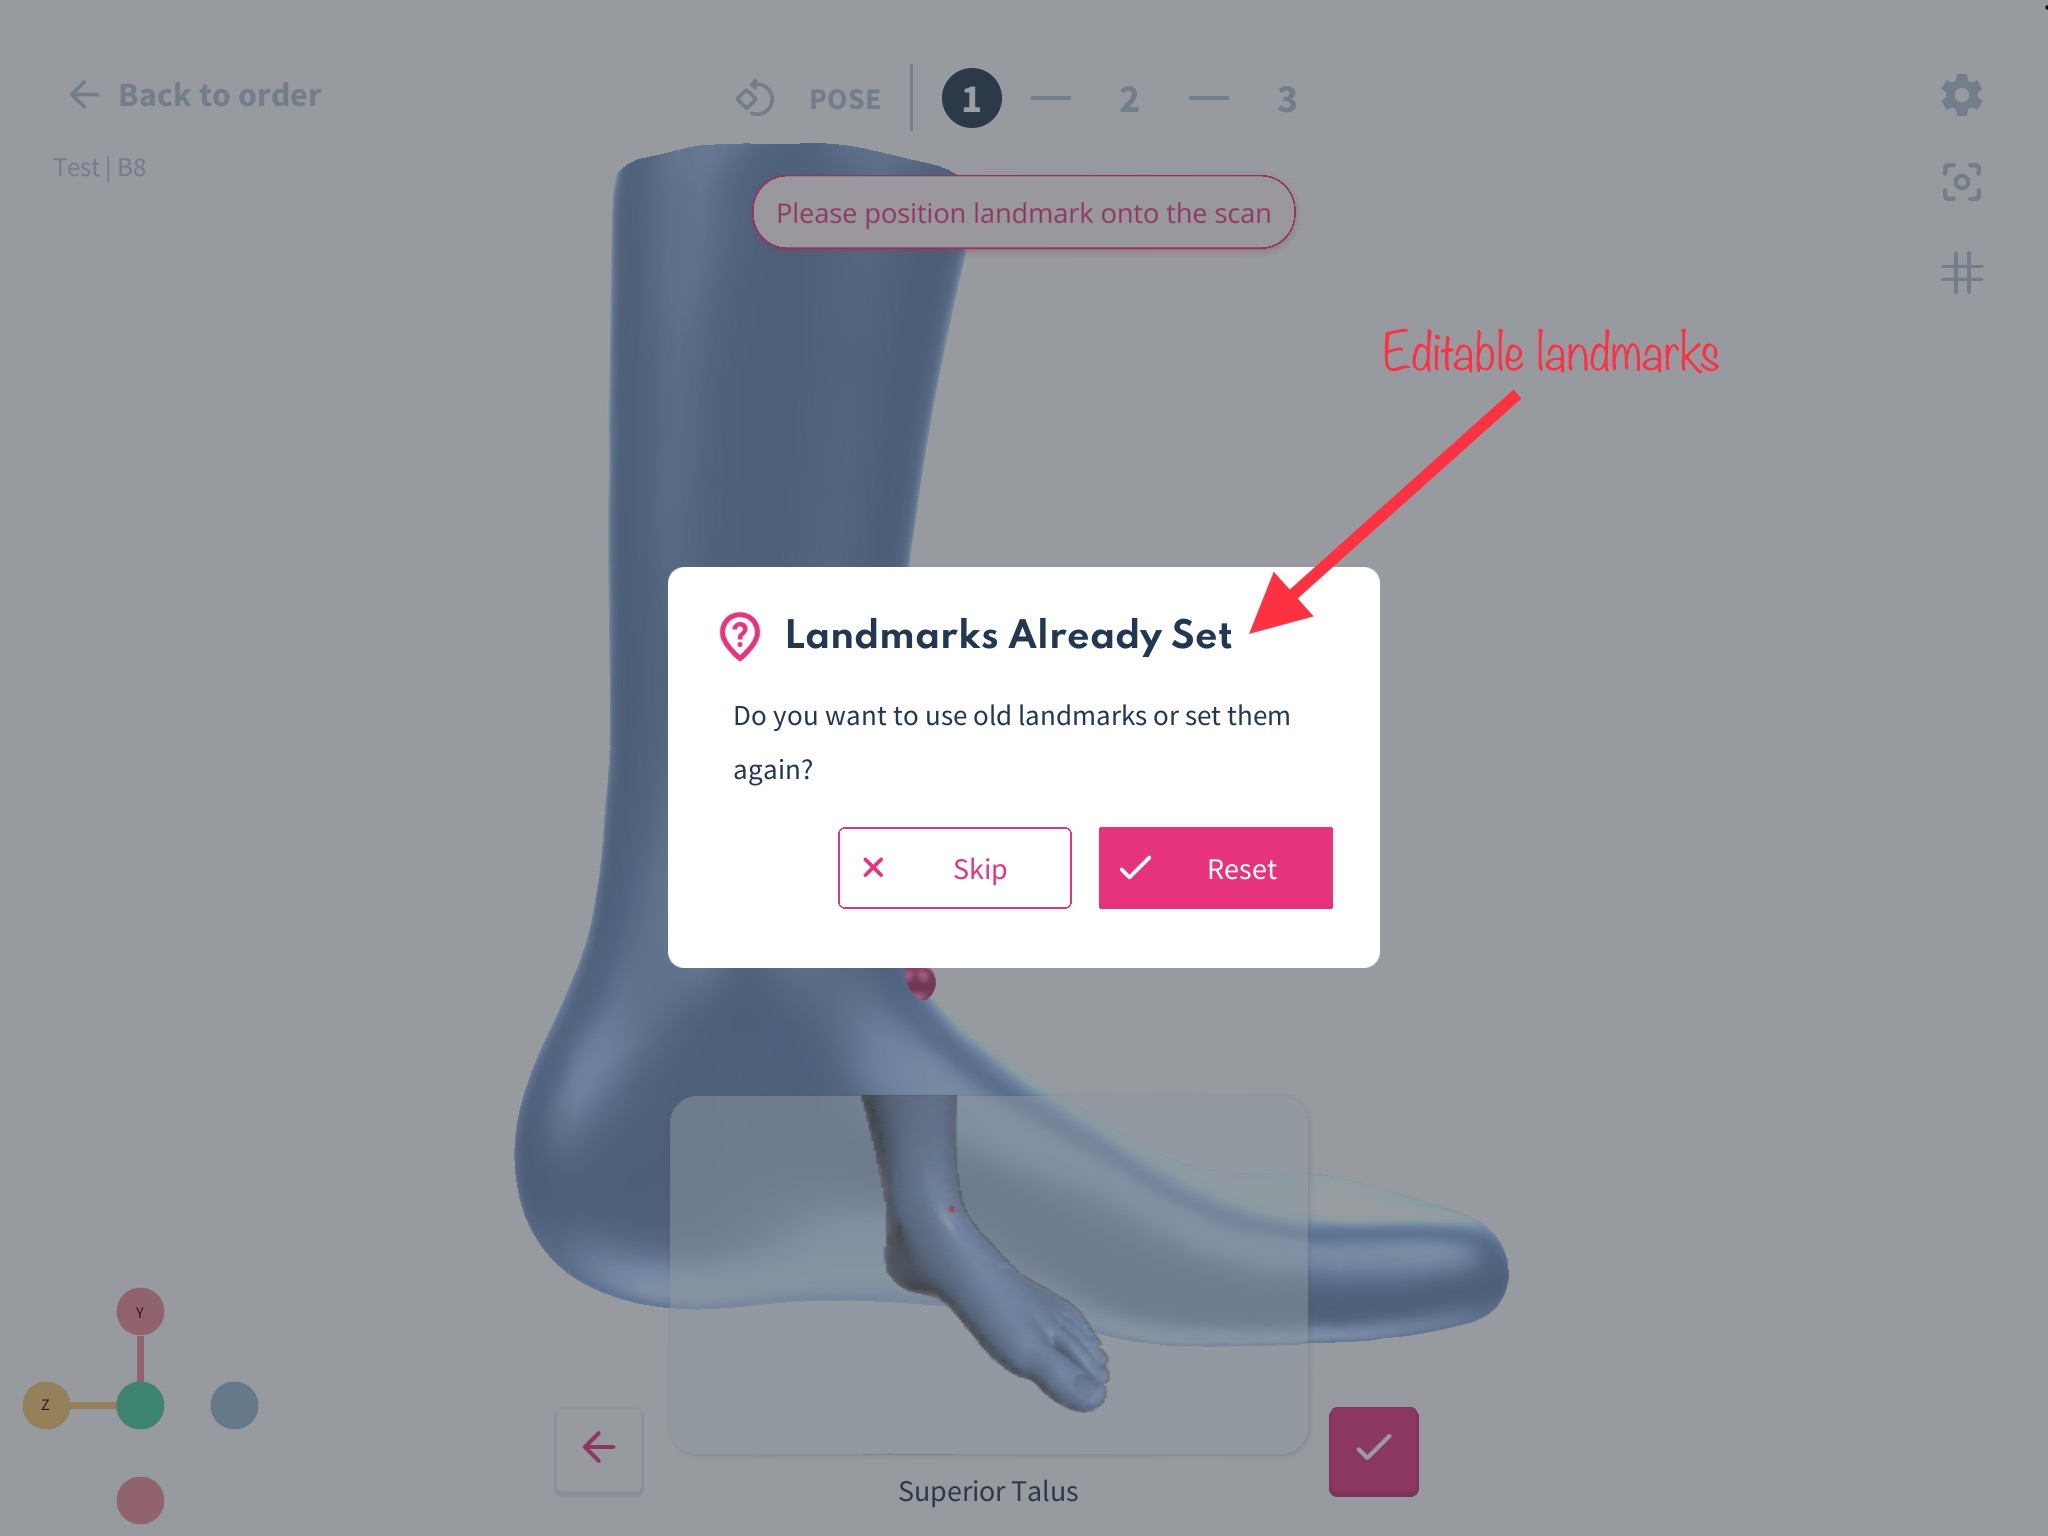
New update: Save and edit landmarks on scan through each step
With this new feature update, you don't have to worry about losing your landmark placements when you progress through a step or go back. All landmarks are now saved and can be easily accessed and edited/changed throughout the workflow, thus saving you time.
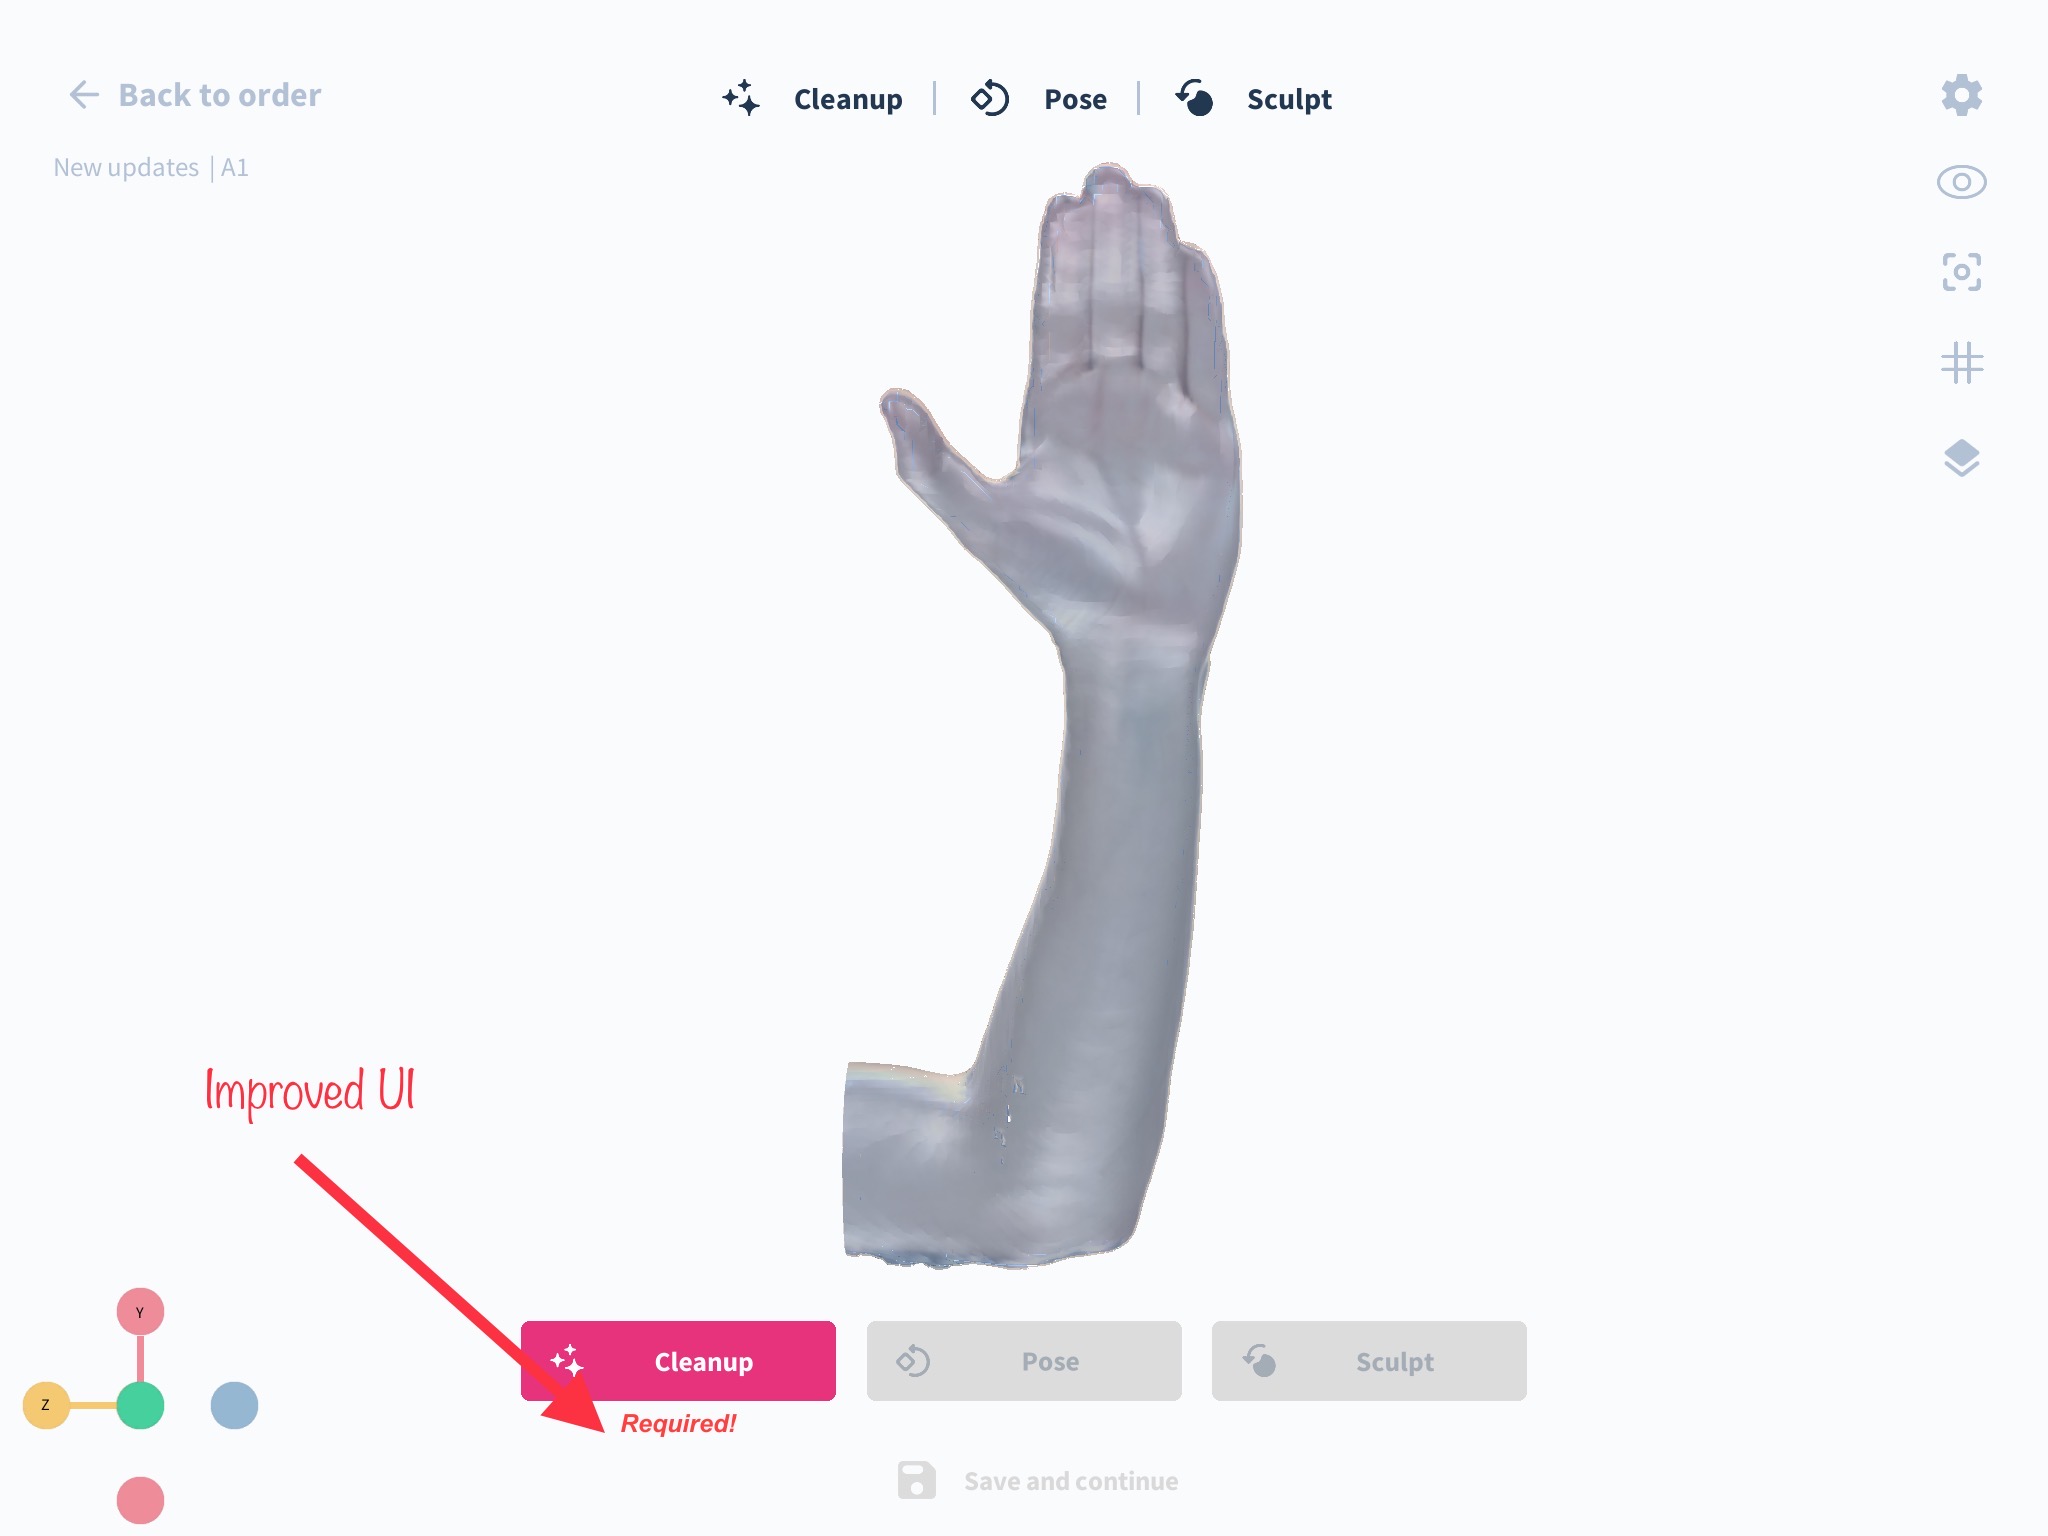
New Update: Improvement of UI/UX. Highlighting compulsory and optional steps throughout the workflow
Now you know which step you absolutely need to do and which step you can skip. We hope that this minor adjustment helps you navigate the Spentys app even better.
New Update: Improved Grid lines with alignment options
We have improved the grid lines' contrast, transparency, andwidth to enable you to align your scans easily. Grid lines can now be adjusted from the center to either side of the splint, and they rotate accordingly to follow the current view of the scan. By clicking on the grid icon on the right-hand side of the scan will be recentred to the middle of the screen. We have also improved the grid boundaries to ensure complete squares throughout the grid and verified that the little squares are 1cm long and the big squares 10 cm long.

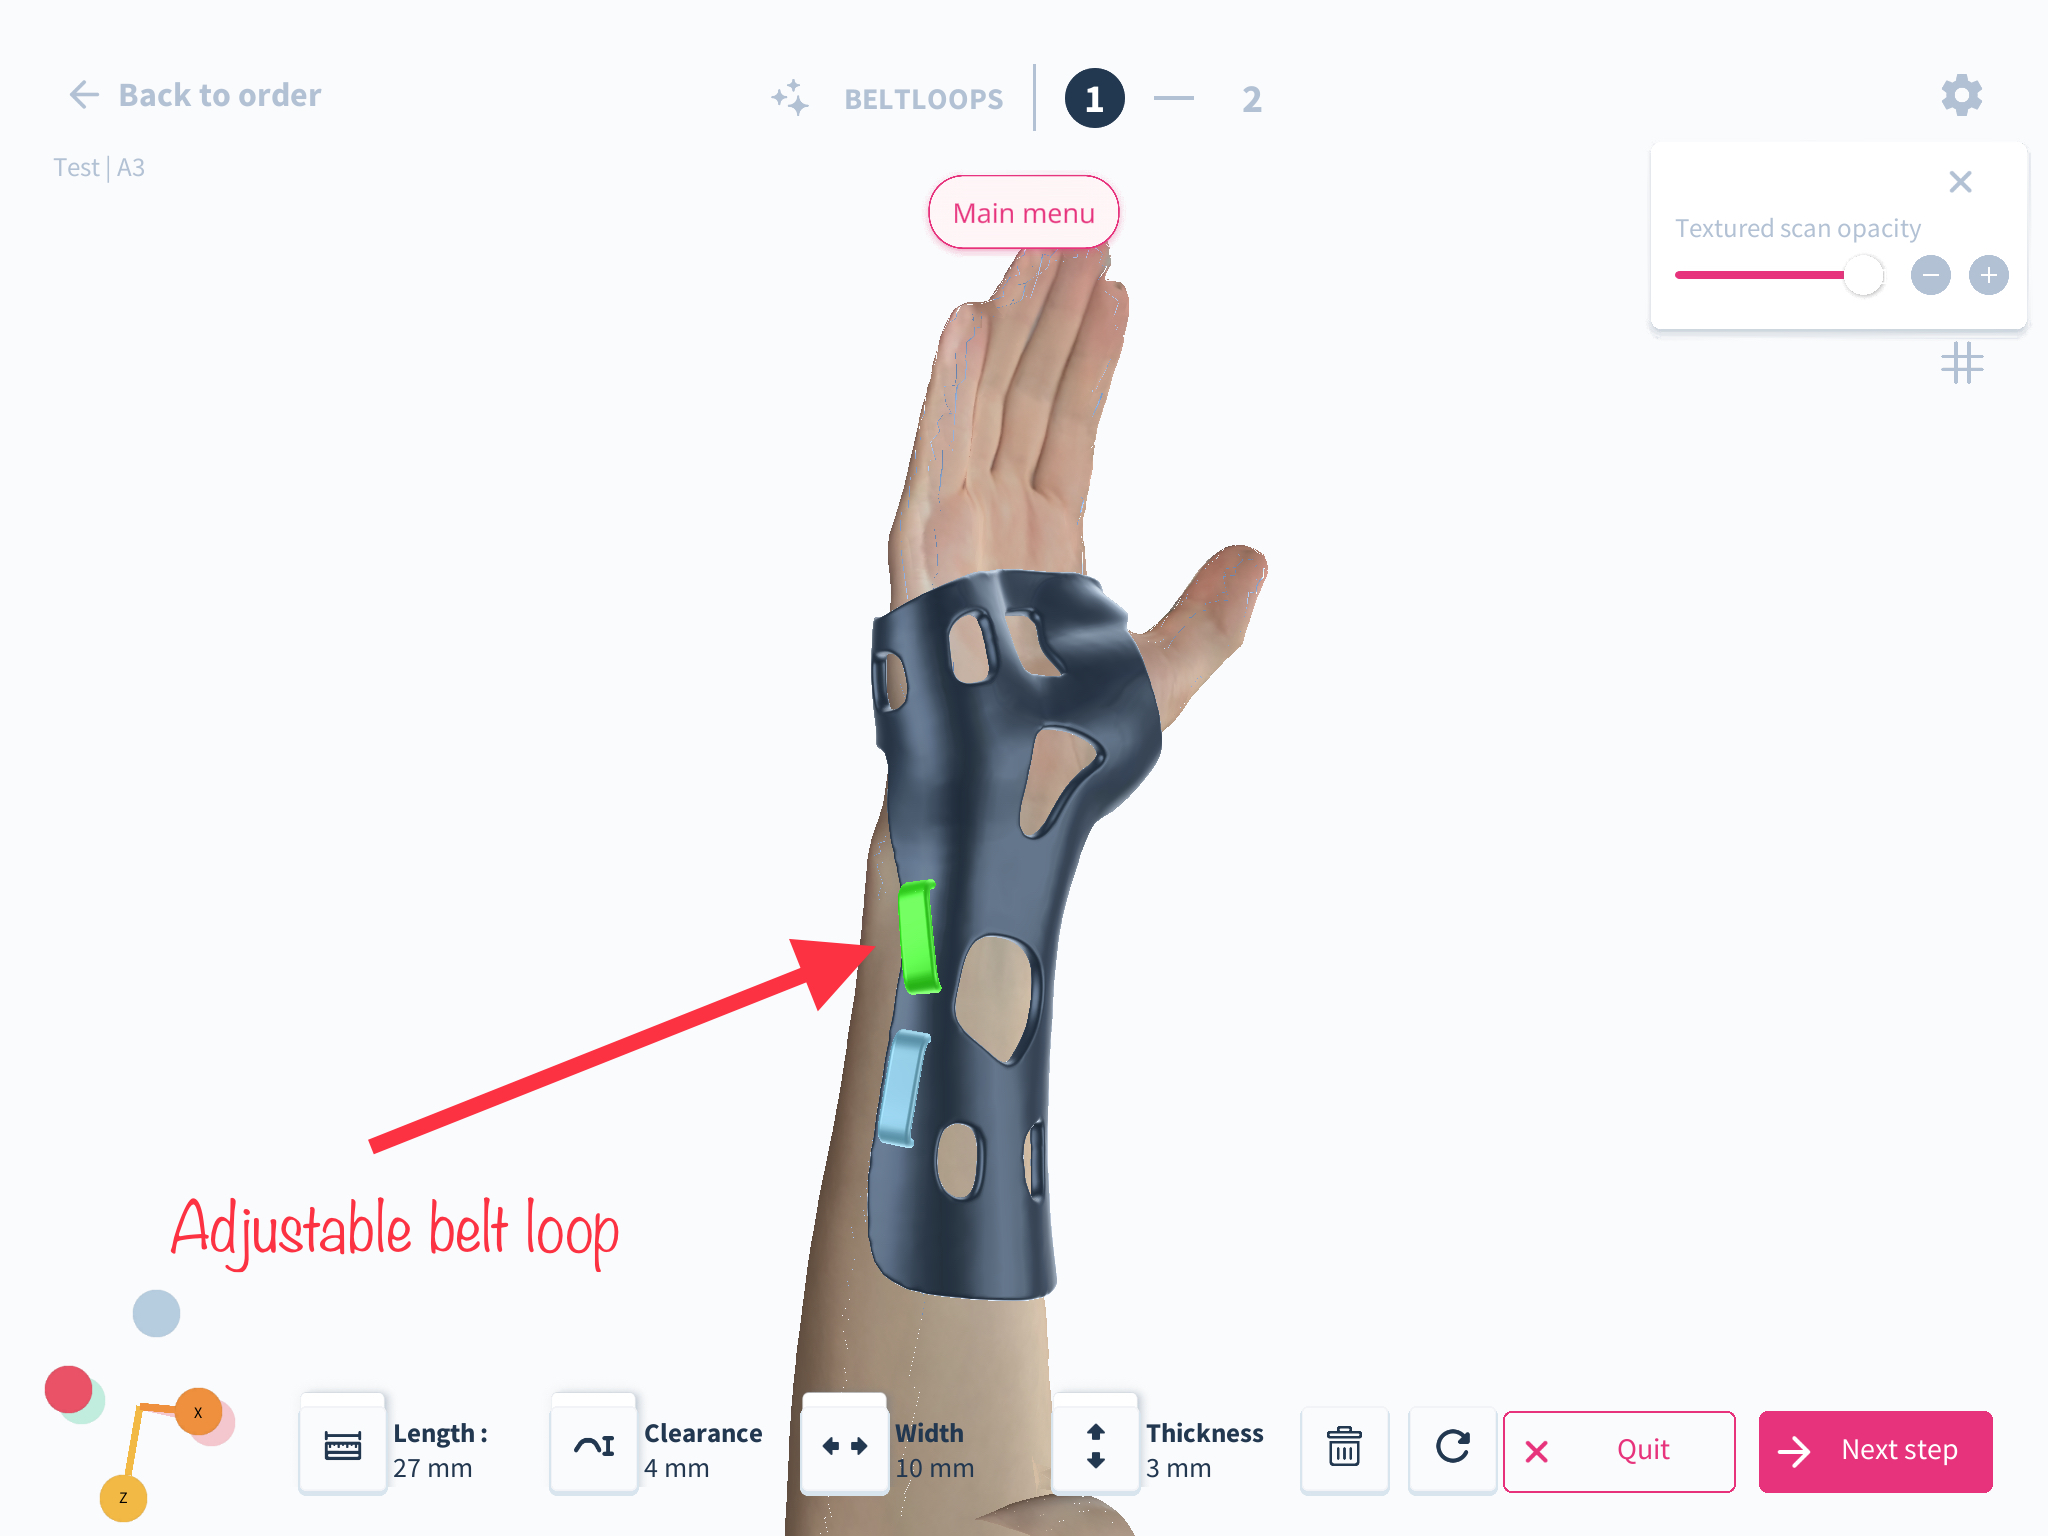
New Update: Free belt loop placements
We have added options to add belt loops separately without the railing to improve positioning in cases of uneven shapes.
New Update: Improved AFO Workflow
Our updated workflow now includes precise navigation prompts and enhanced tool selection, making it easier to navigate your AFO designs.
New Update: Improved 3D viewer
W have improved our 3D viewer on our web app! With this update, you'll now have a better and more interactive experience while viewing 3D models on our platform. We've made significant improvements to the viewer's user interface, making it more intuitive and easy to use.
One of the most significant improvements is the addition of a scan colour picker which allow you to change the colours of the 3D model in a more fluid and natural way. You'll also notice that the viewer now supports high-quality 3D imagery, giving you a more realistic and immersive experience.
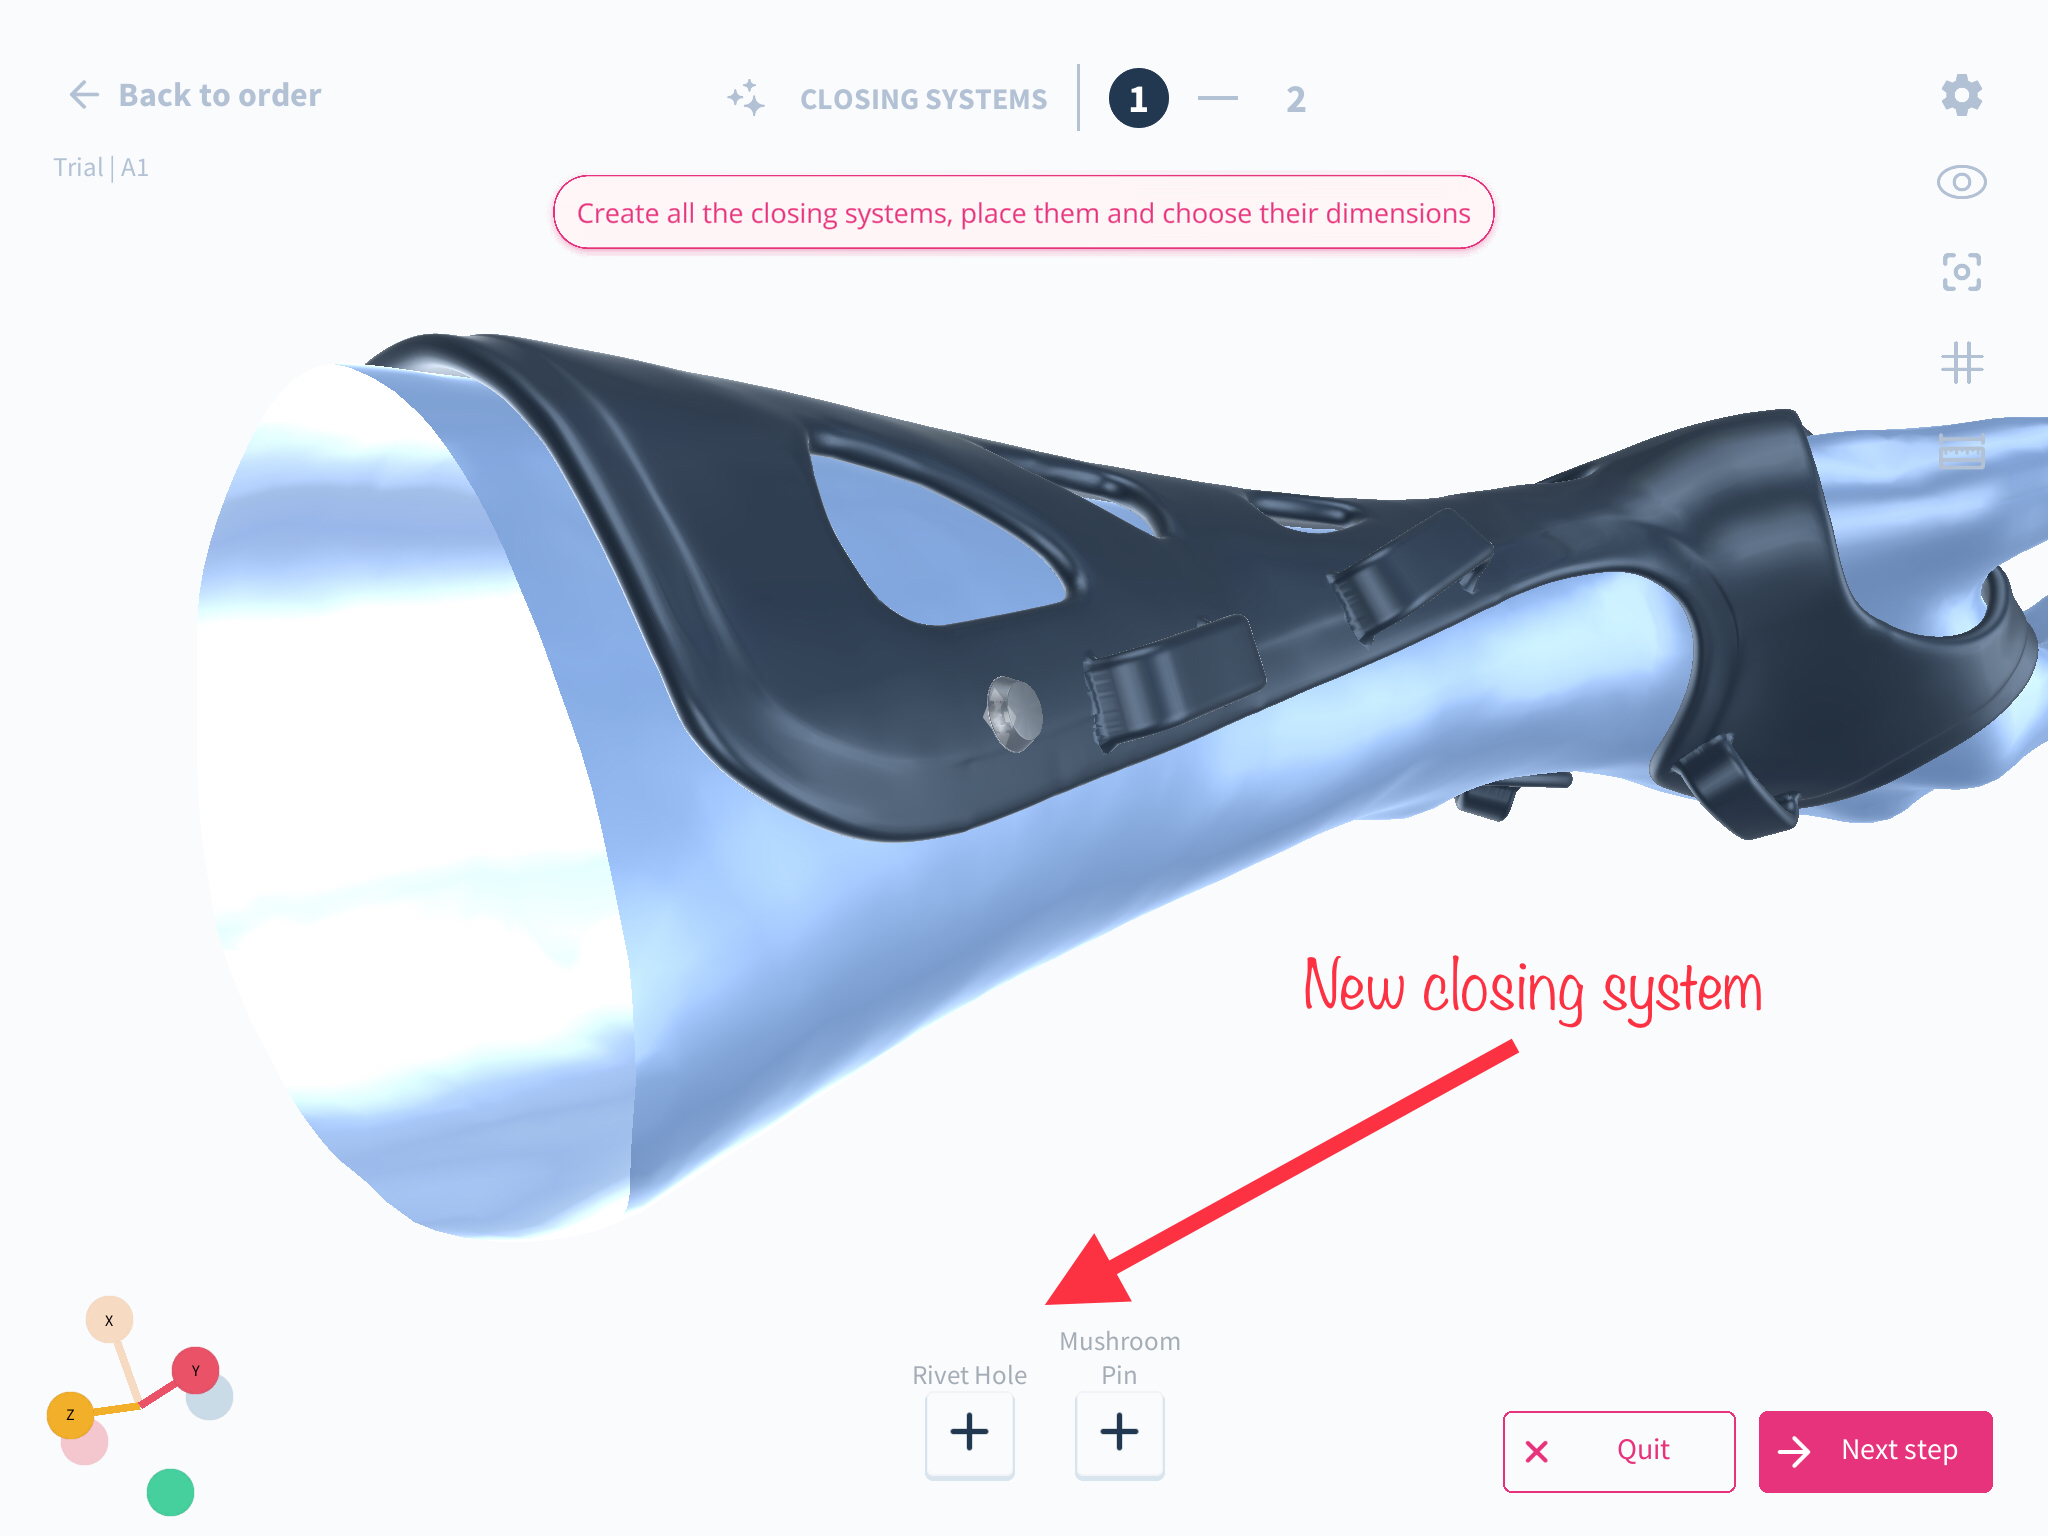
New Slotted hole closing system
What has changed?
A new "Slotted hole" closing system has been added.
How it affects you
You now have an additional option for closing systems.

How to use it?
Select "Slotted hole" from the closing system dropdown menu.
New Thumb reconstruction Level
What Has Changed
Our user interface (UI) for thumb reconstruction has undergone significant improvements, now boasting an advanced circumference editor. Moreover, the system is designed to automatically compare the circumference you enter at the start of the workflow against the scan dimensions, and it will alert you with a warning if the two do not match.
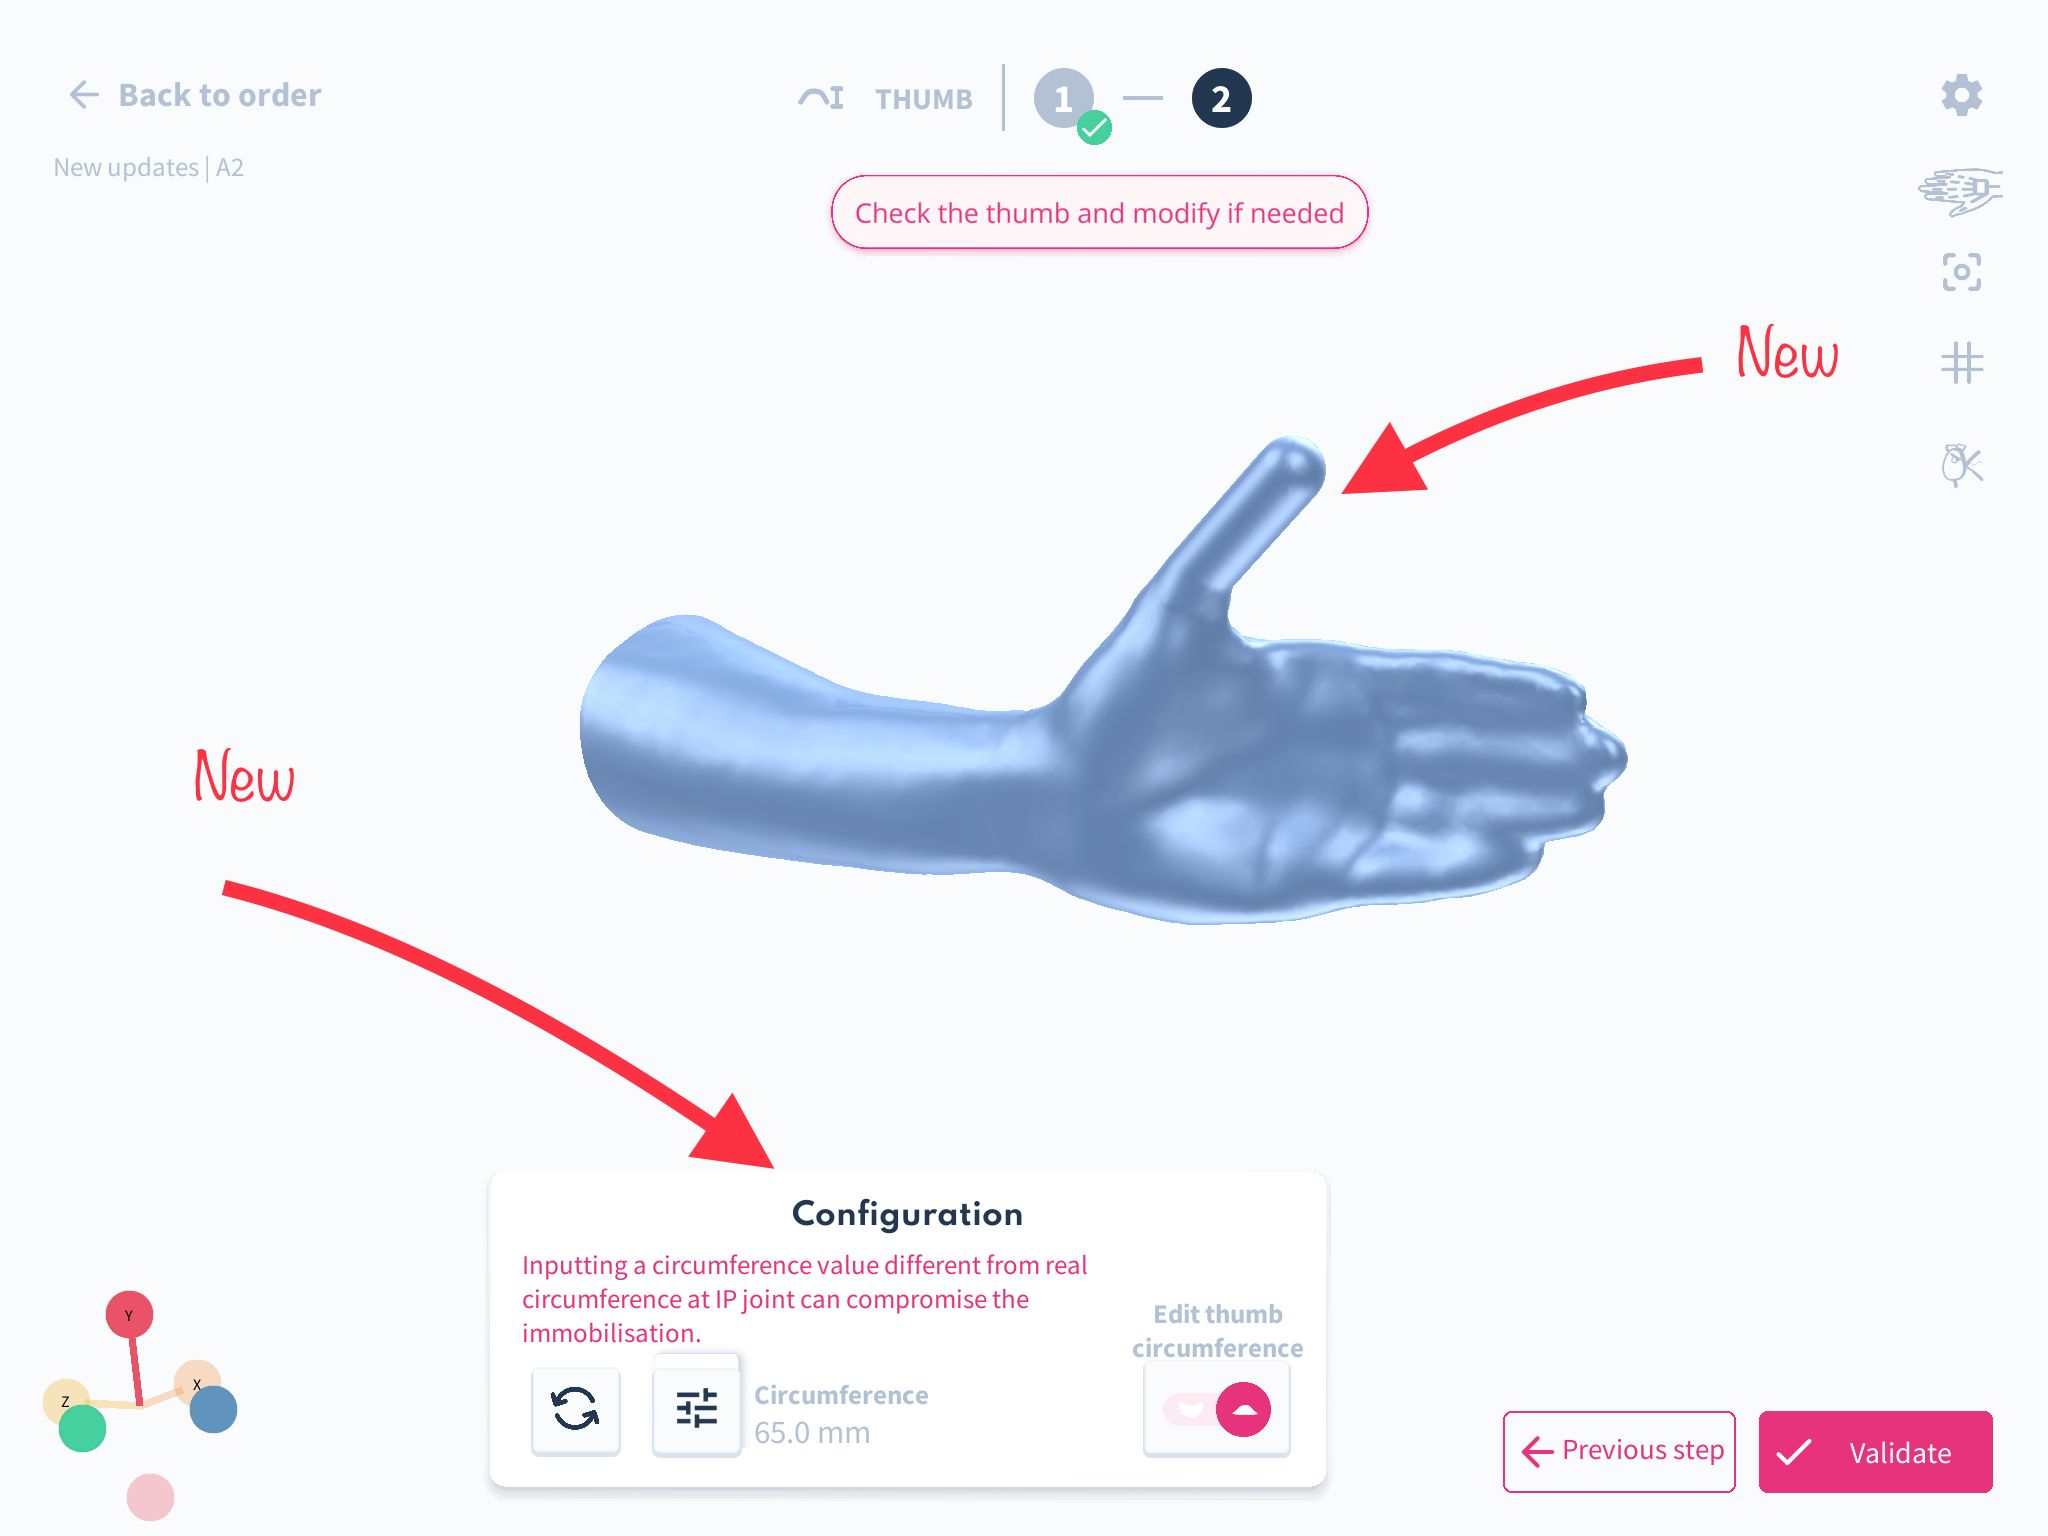
How It Affects You
Following an in-depth analysis of user feedback regarding the previous thumb correction steps, we have implemented these feature updates. Our aim with these refinements is to minimize the error margin in scans and ensure the orthosis fits perfectly.
How to Use It
As part of the enhanced process, this feature is the second step that follows the placement of landmarks. It is accessible when you are working on modeling devices that cover the thumb, including but not limited to the A2 device.
New Product Announcement: Introduction of A5
What Has Changed:
We are excited to announce the addition of a new carpal tunnel splint, named A5, to our product line. The A5 is designed for the Left/Right upper limb. This splint can be modeled exclusively using the Spentys designer tool.
The A5 is available in a range of materials and technologies, including FDM-PP, MJF-TPU, MJF-PA11, MJF-PA12, DLP-ST45, and DLP-IND405.
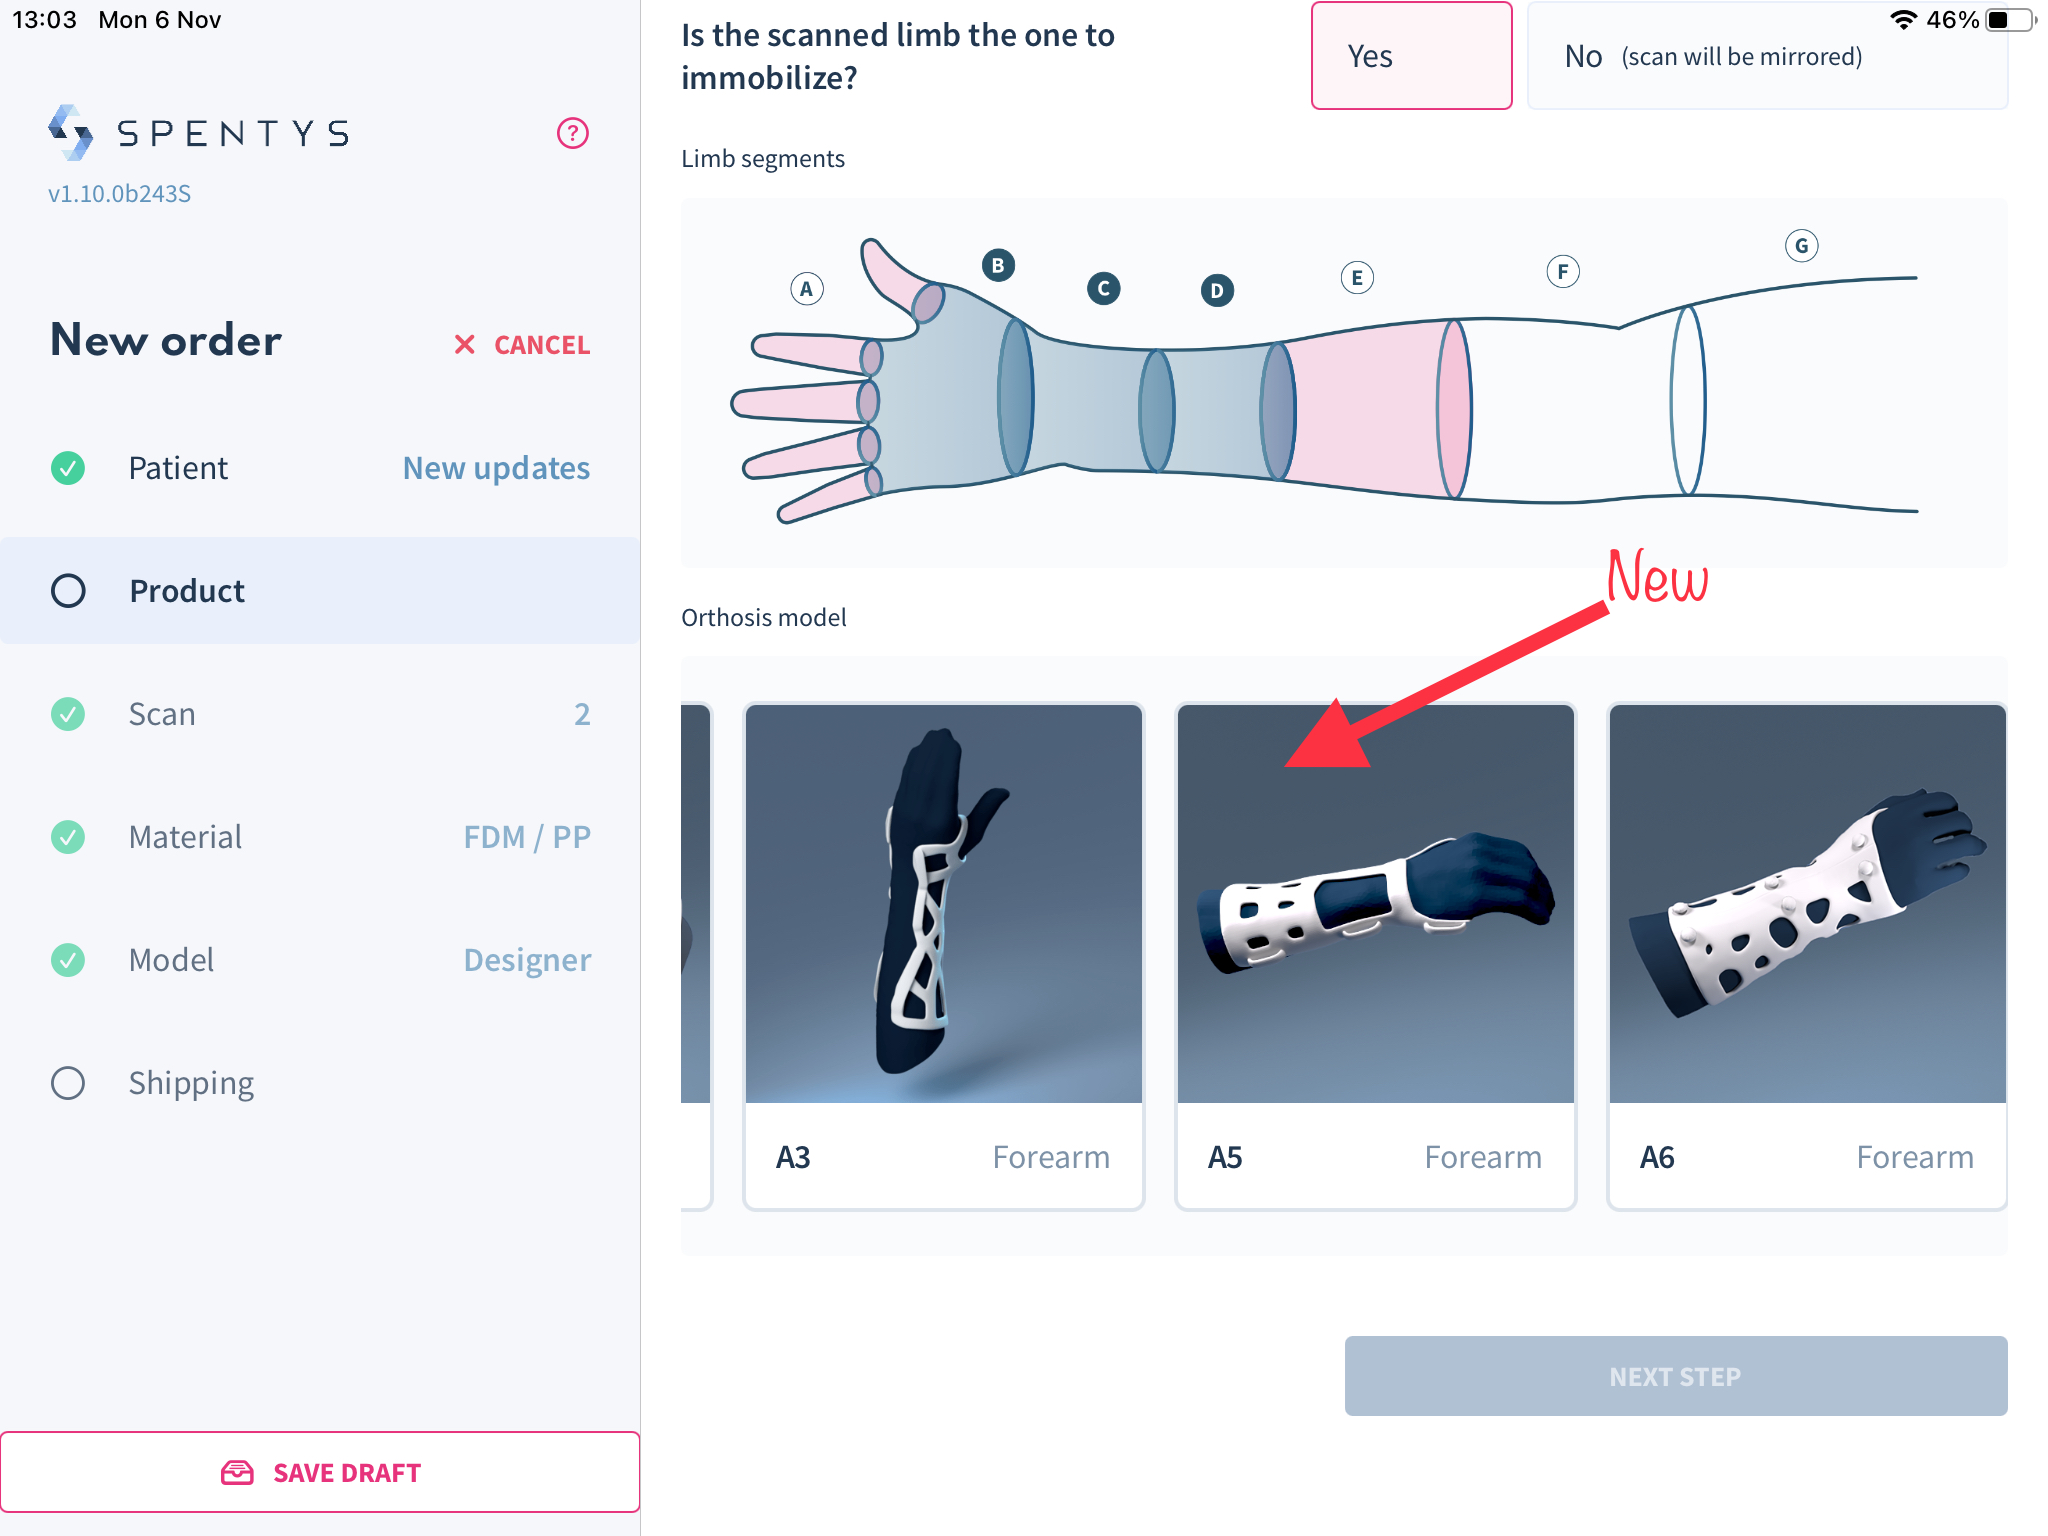
How It Affects You:
The A5 provides a new solution for immobilizing the wrist segment, offering support in managing carpal tunnel compression.
How to Use It:
To utilize this new option, select segment BCD in the tool and choose the A5 model.
New Note Editor
What Has Changed
We've recognized the need for more comprehensive information regarding design requirements, which has led us to introduce the new note editor within the iOS app.
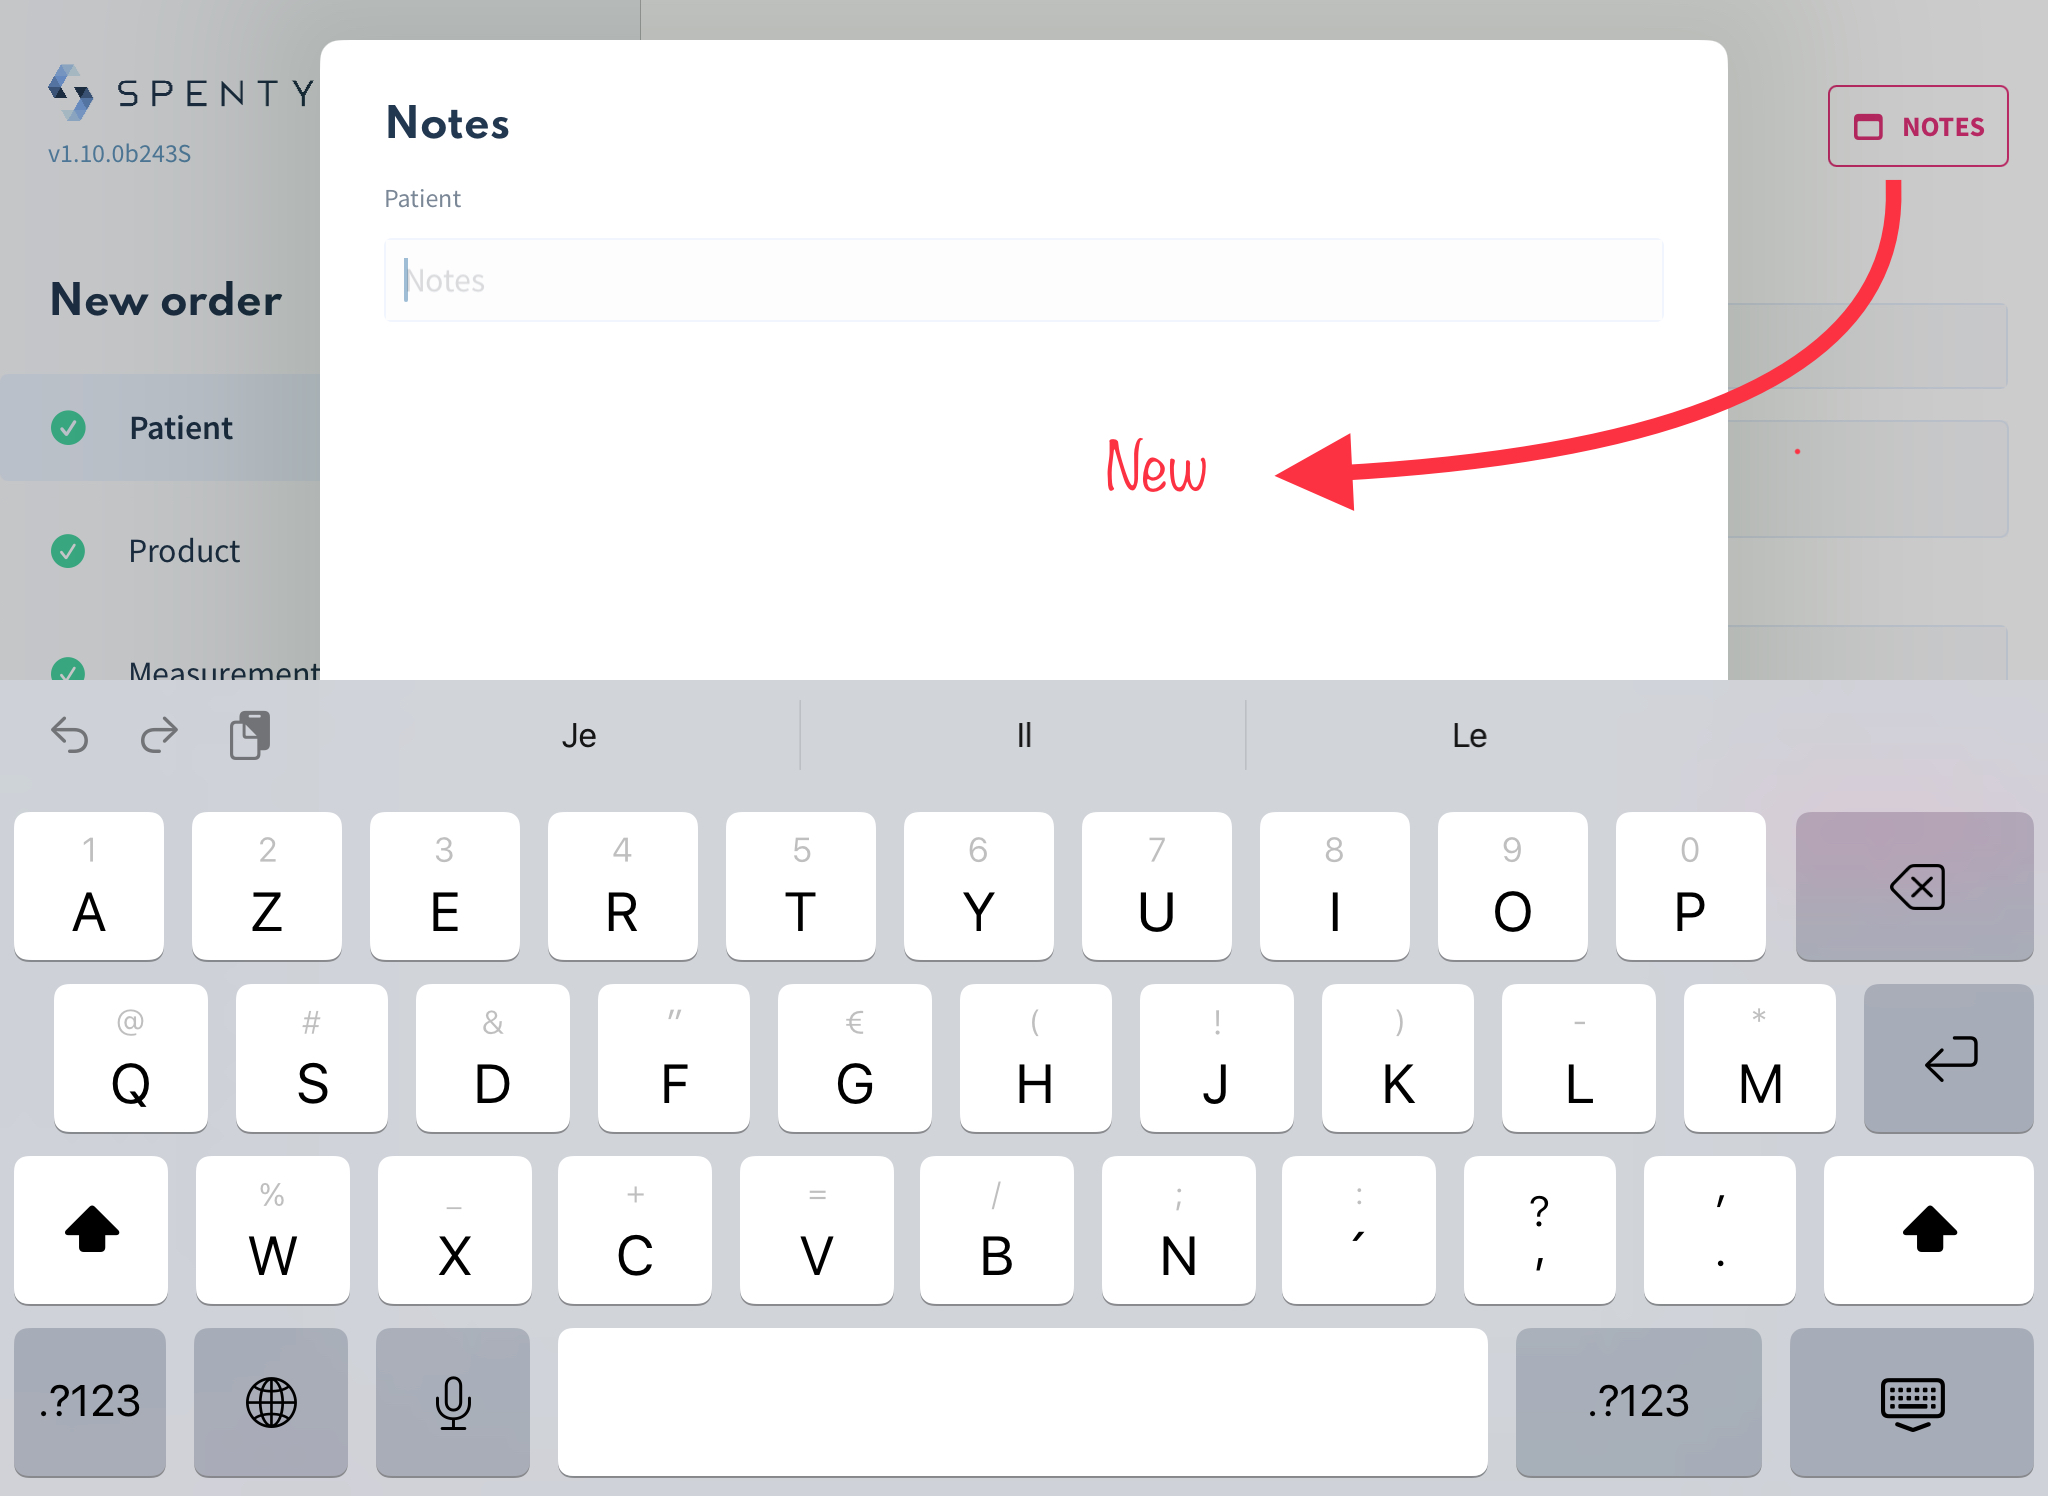
How It Affects You
With this update, you can bypass the back-and-forth of messages or emails. Feel free to detail all the necessary specifications for your order directly in the app; these details will be conveniently saved to your dashboard for each order.
How to Use It
This feature is accessible from the top right corner of the patient section, as illustrated in the image above.
New product: Integration of Macu4 tool for upper limb prosthetics
Macu4 is collaborating with Spentys to provide their upper limb prosthetic modeling tool on the Spentys platform. This tool will allow users to create orders for upper limb prostheses directly on the Spentys platform. Clinicians can now do more than just orthosis with their Spentys application.
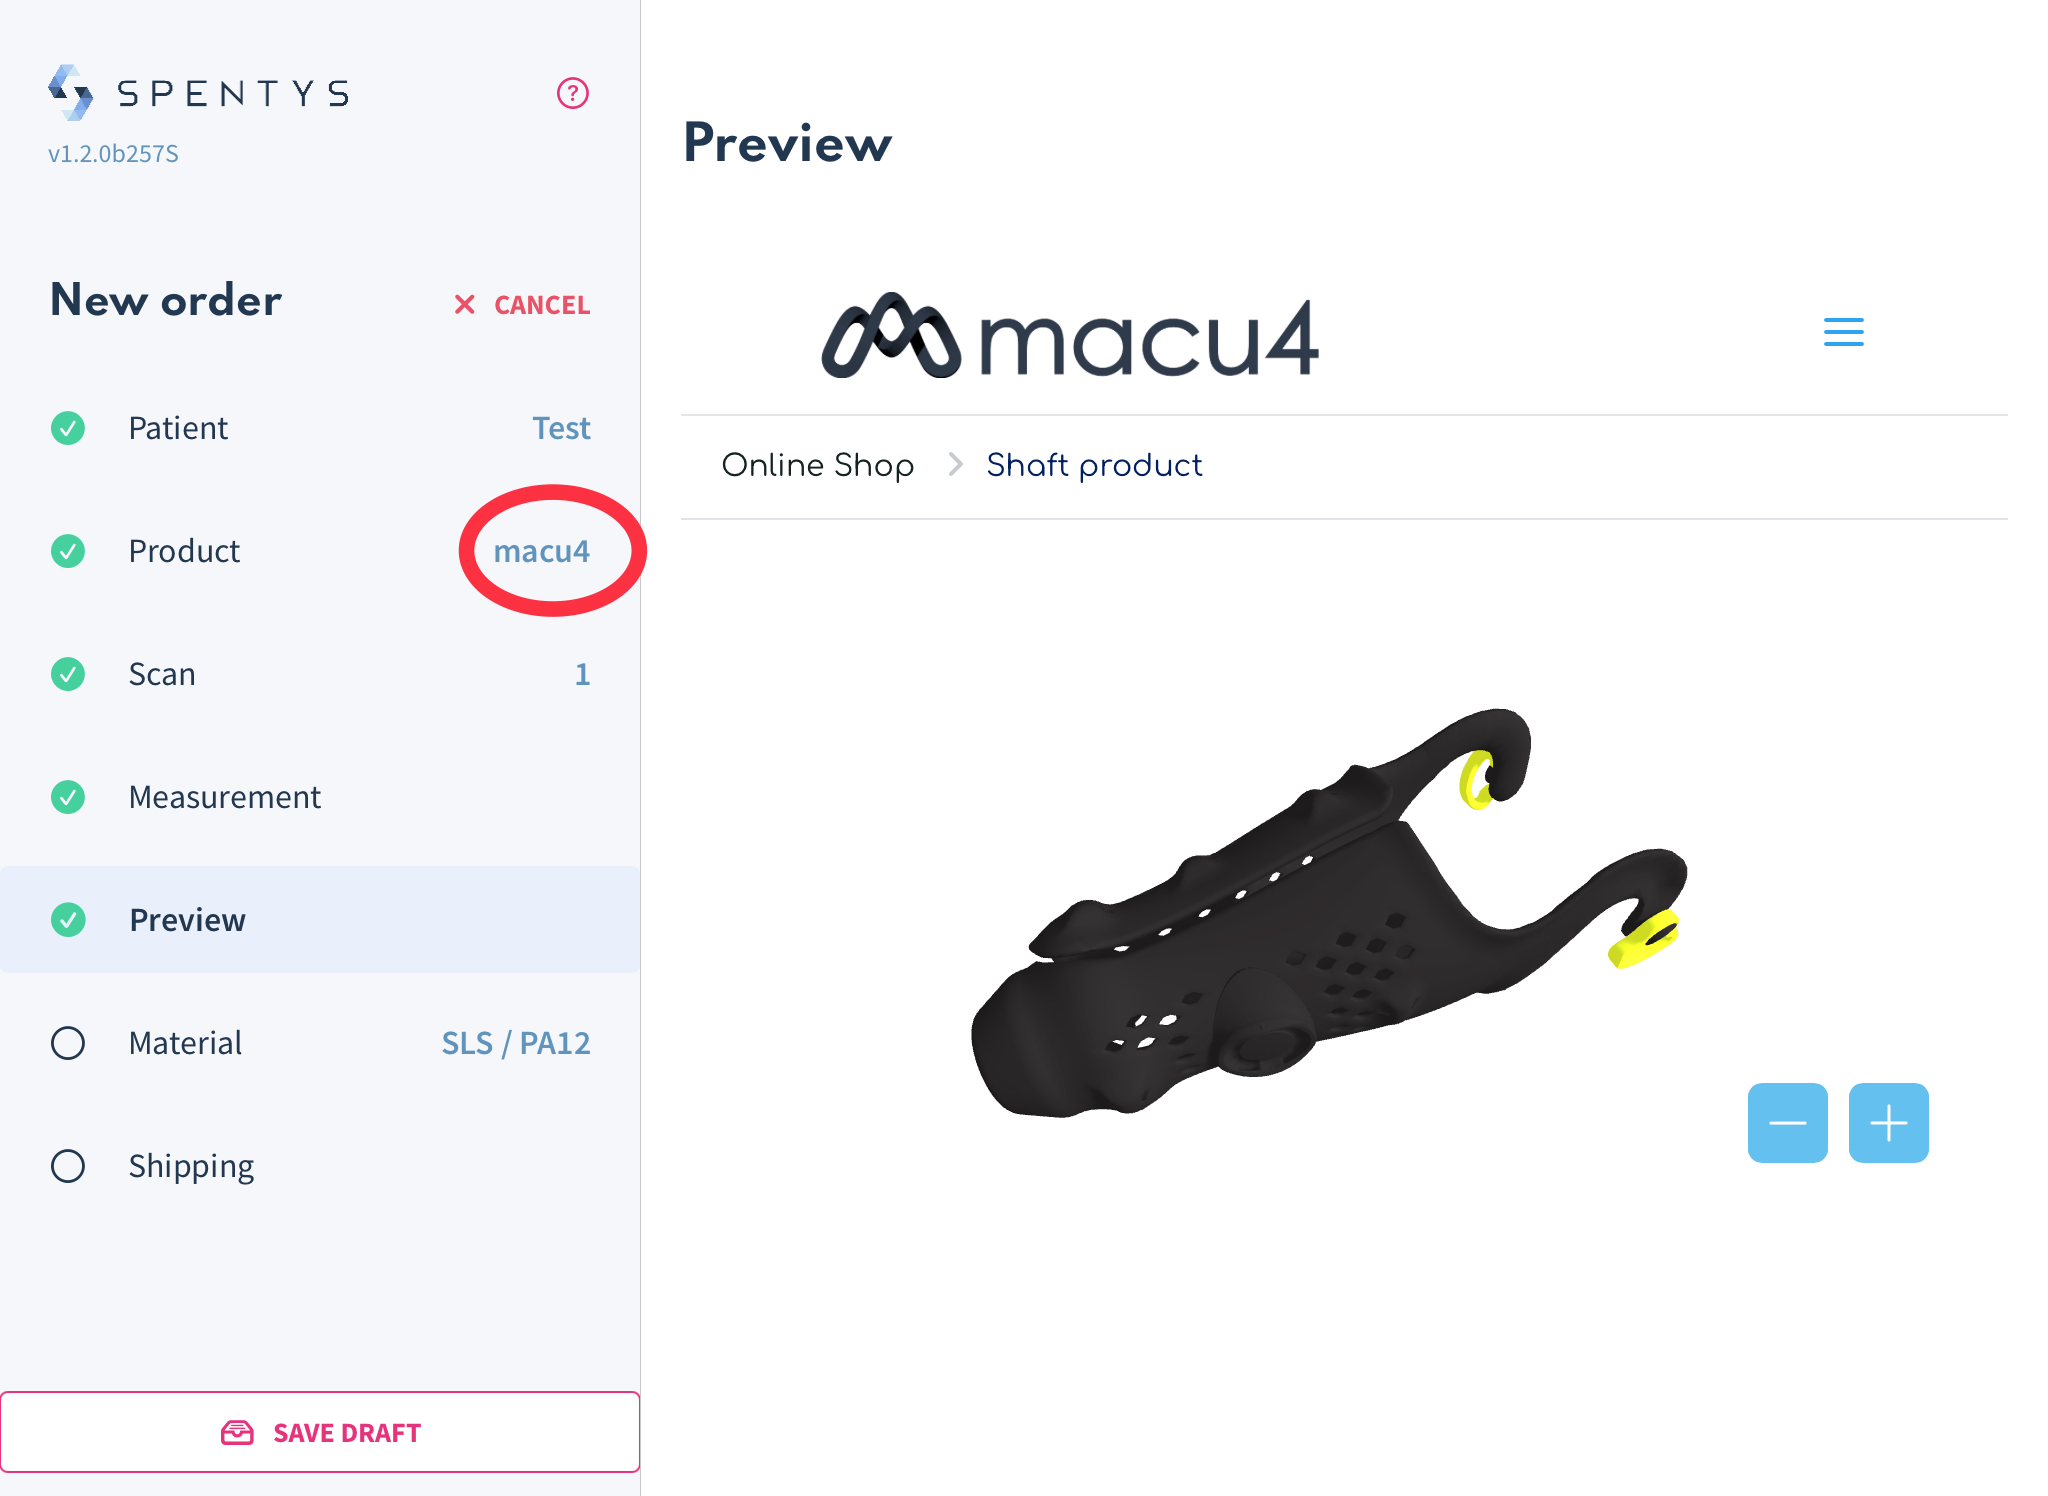
How to create an order for this product
- Add your patient details
- Select the prosthesis option, from which you will choose the appropriate parameters.
- Take a scan of the upper limb or import a file into the Spentys application.
- Place measurement markers based on the the type of residual limb
- preview your socket
- Select the material to print and add shipping details to finish the order.
New Feature: Selecting the Scan Type
What Has Changed
We've introduced a new dropdown list feature, enabling you to specify the type of scan you've either uploaded or performed.
How It Affects You
This addition helps in clearly identifying the type of scan you've submitted. It is beneficial for both you and us, as it informs about the potential modifications that might be applicable to your scan.
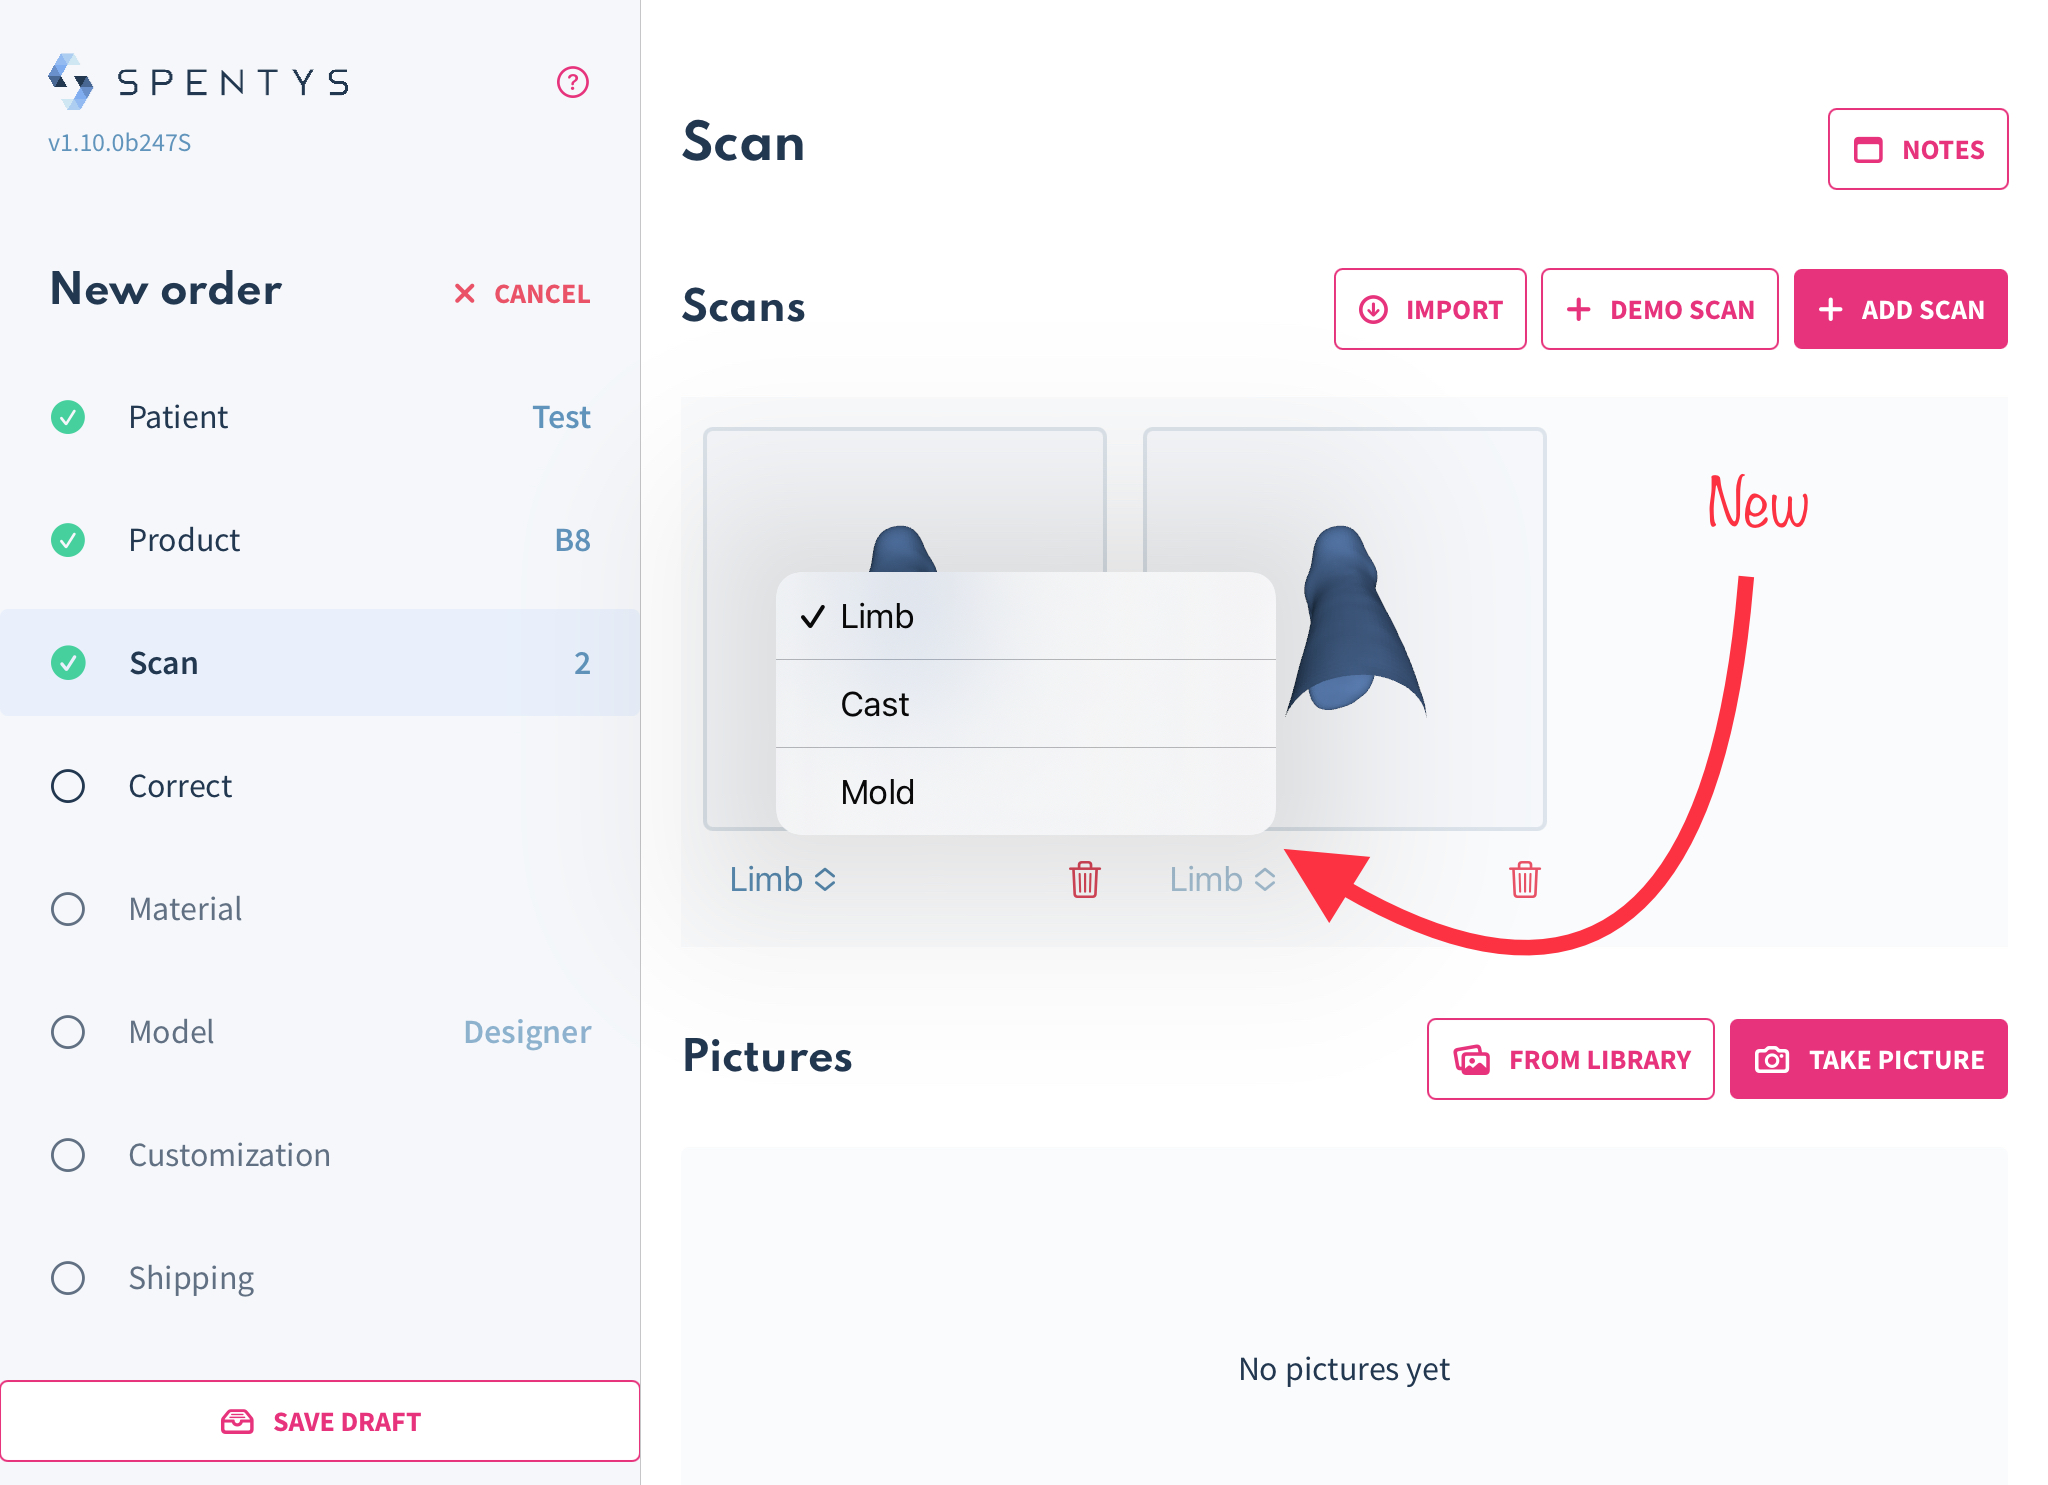
How to Use It
After uploading your scan, you can select the scan type from the dropdown menu located just below the 'scan' option, as shown in the image above.
New Feature: Create rivet holes after beltloop placement
A new tool has been added to the design step, which allows you to create rivet holes for rivet attachments. The holes can be placed on any desired spot on the model, and the diameter can be adjusted with a slider to offer you more flexibility. This tool is available on FreeForma and AutoForma.
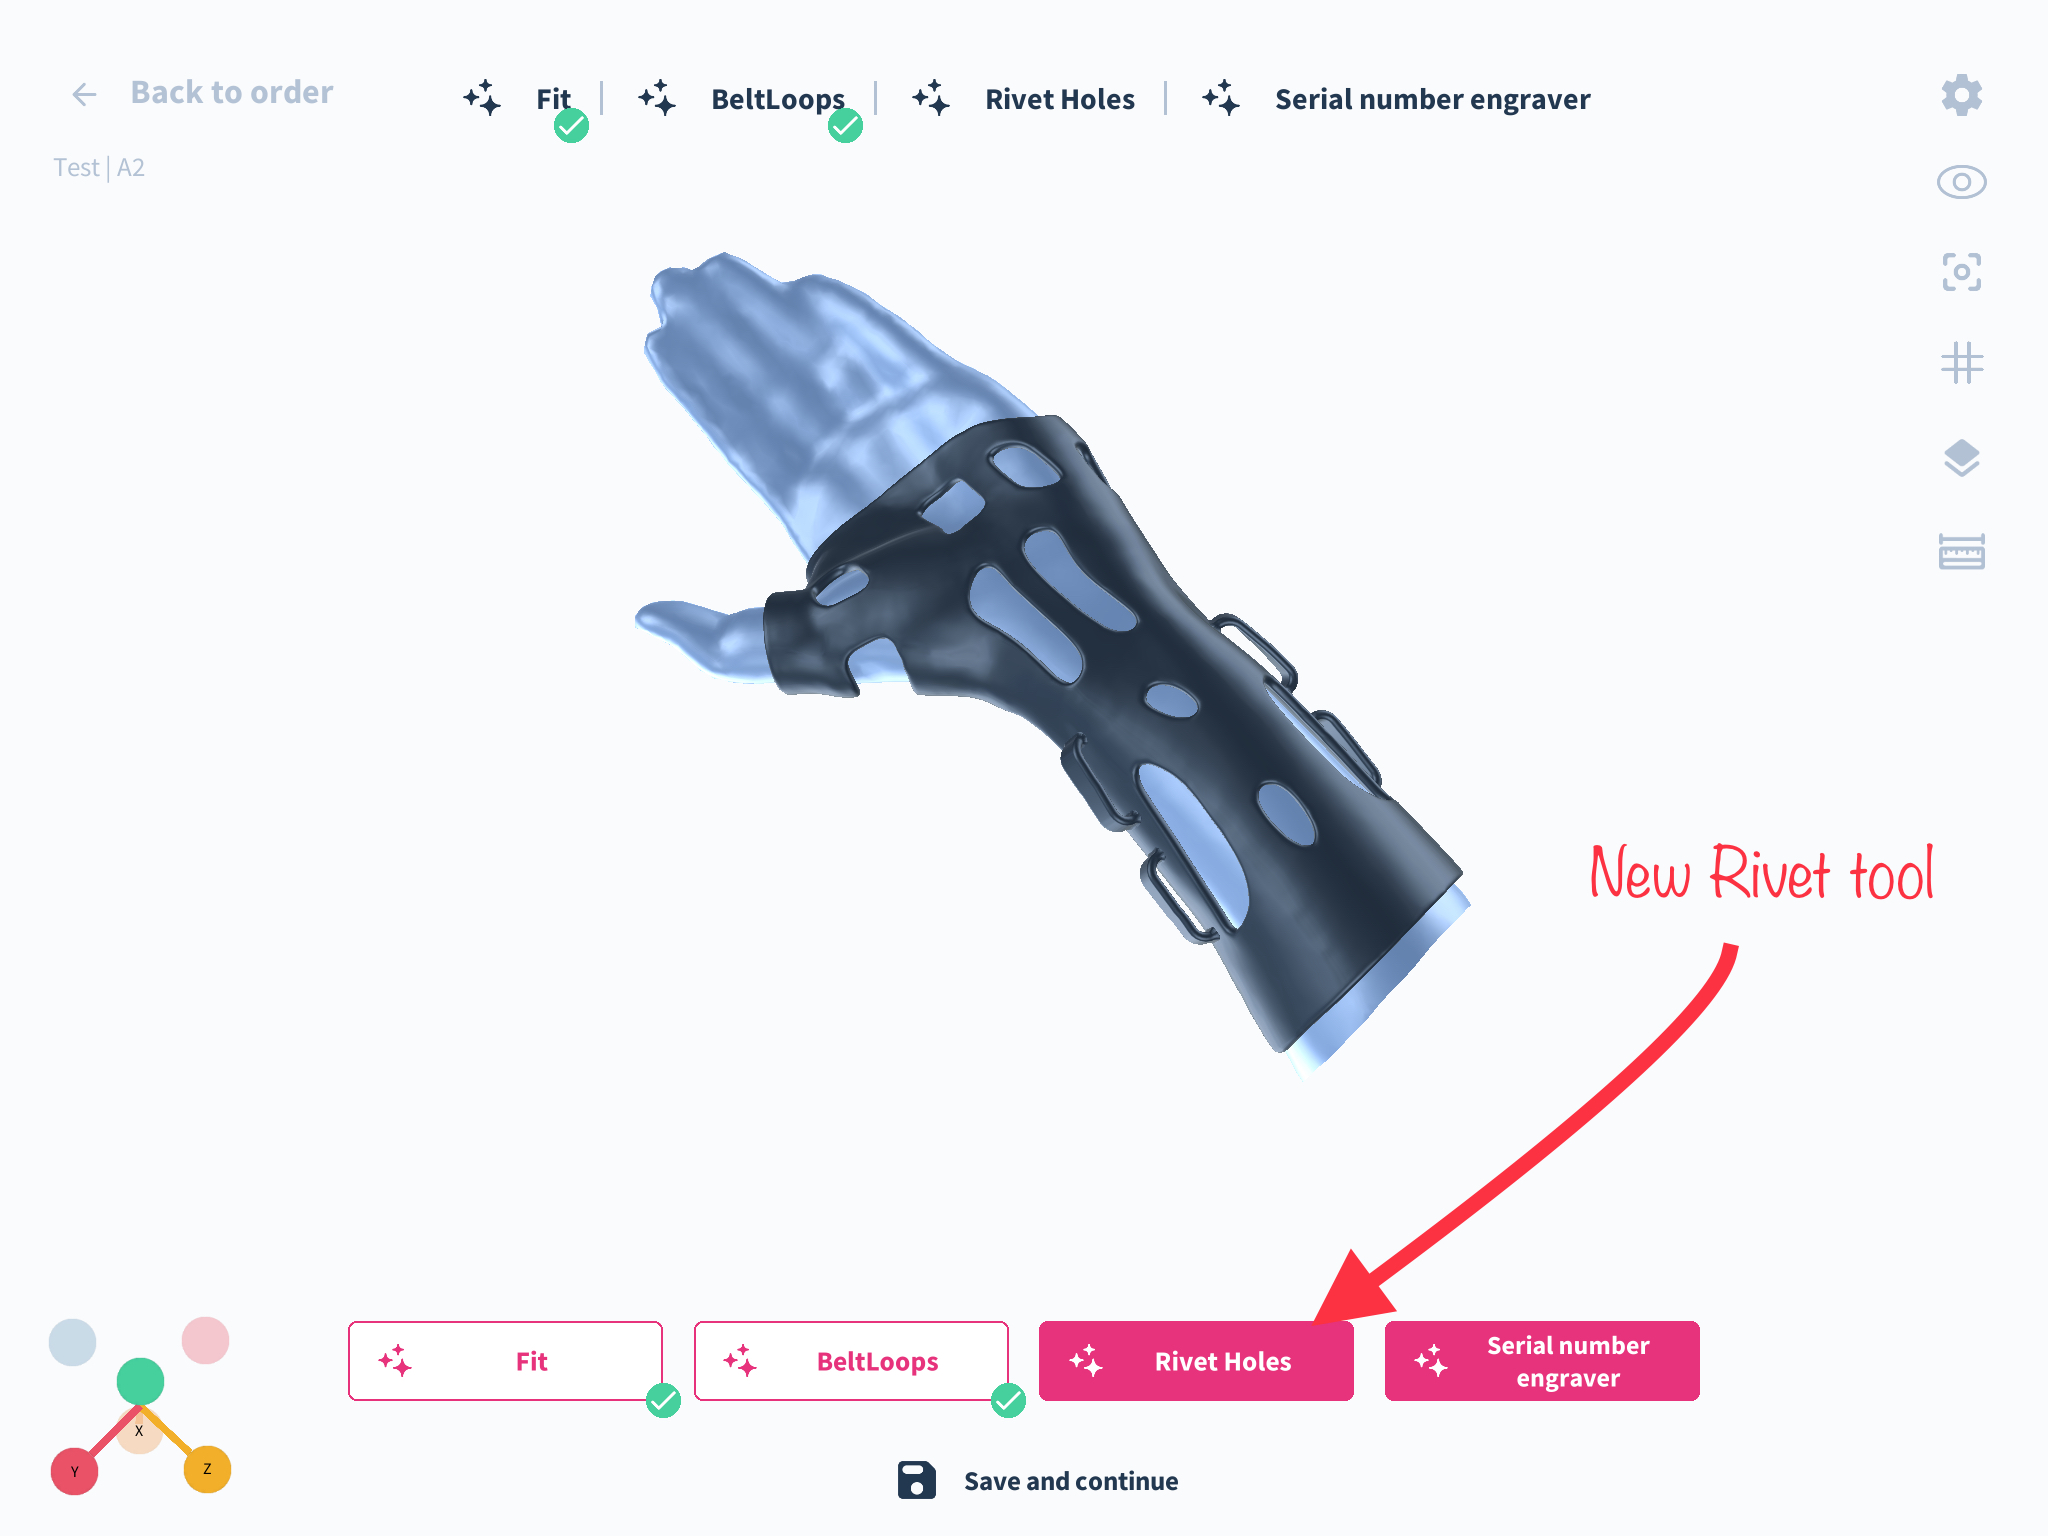
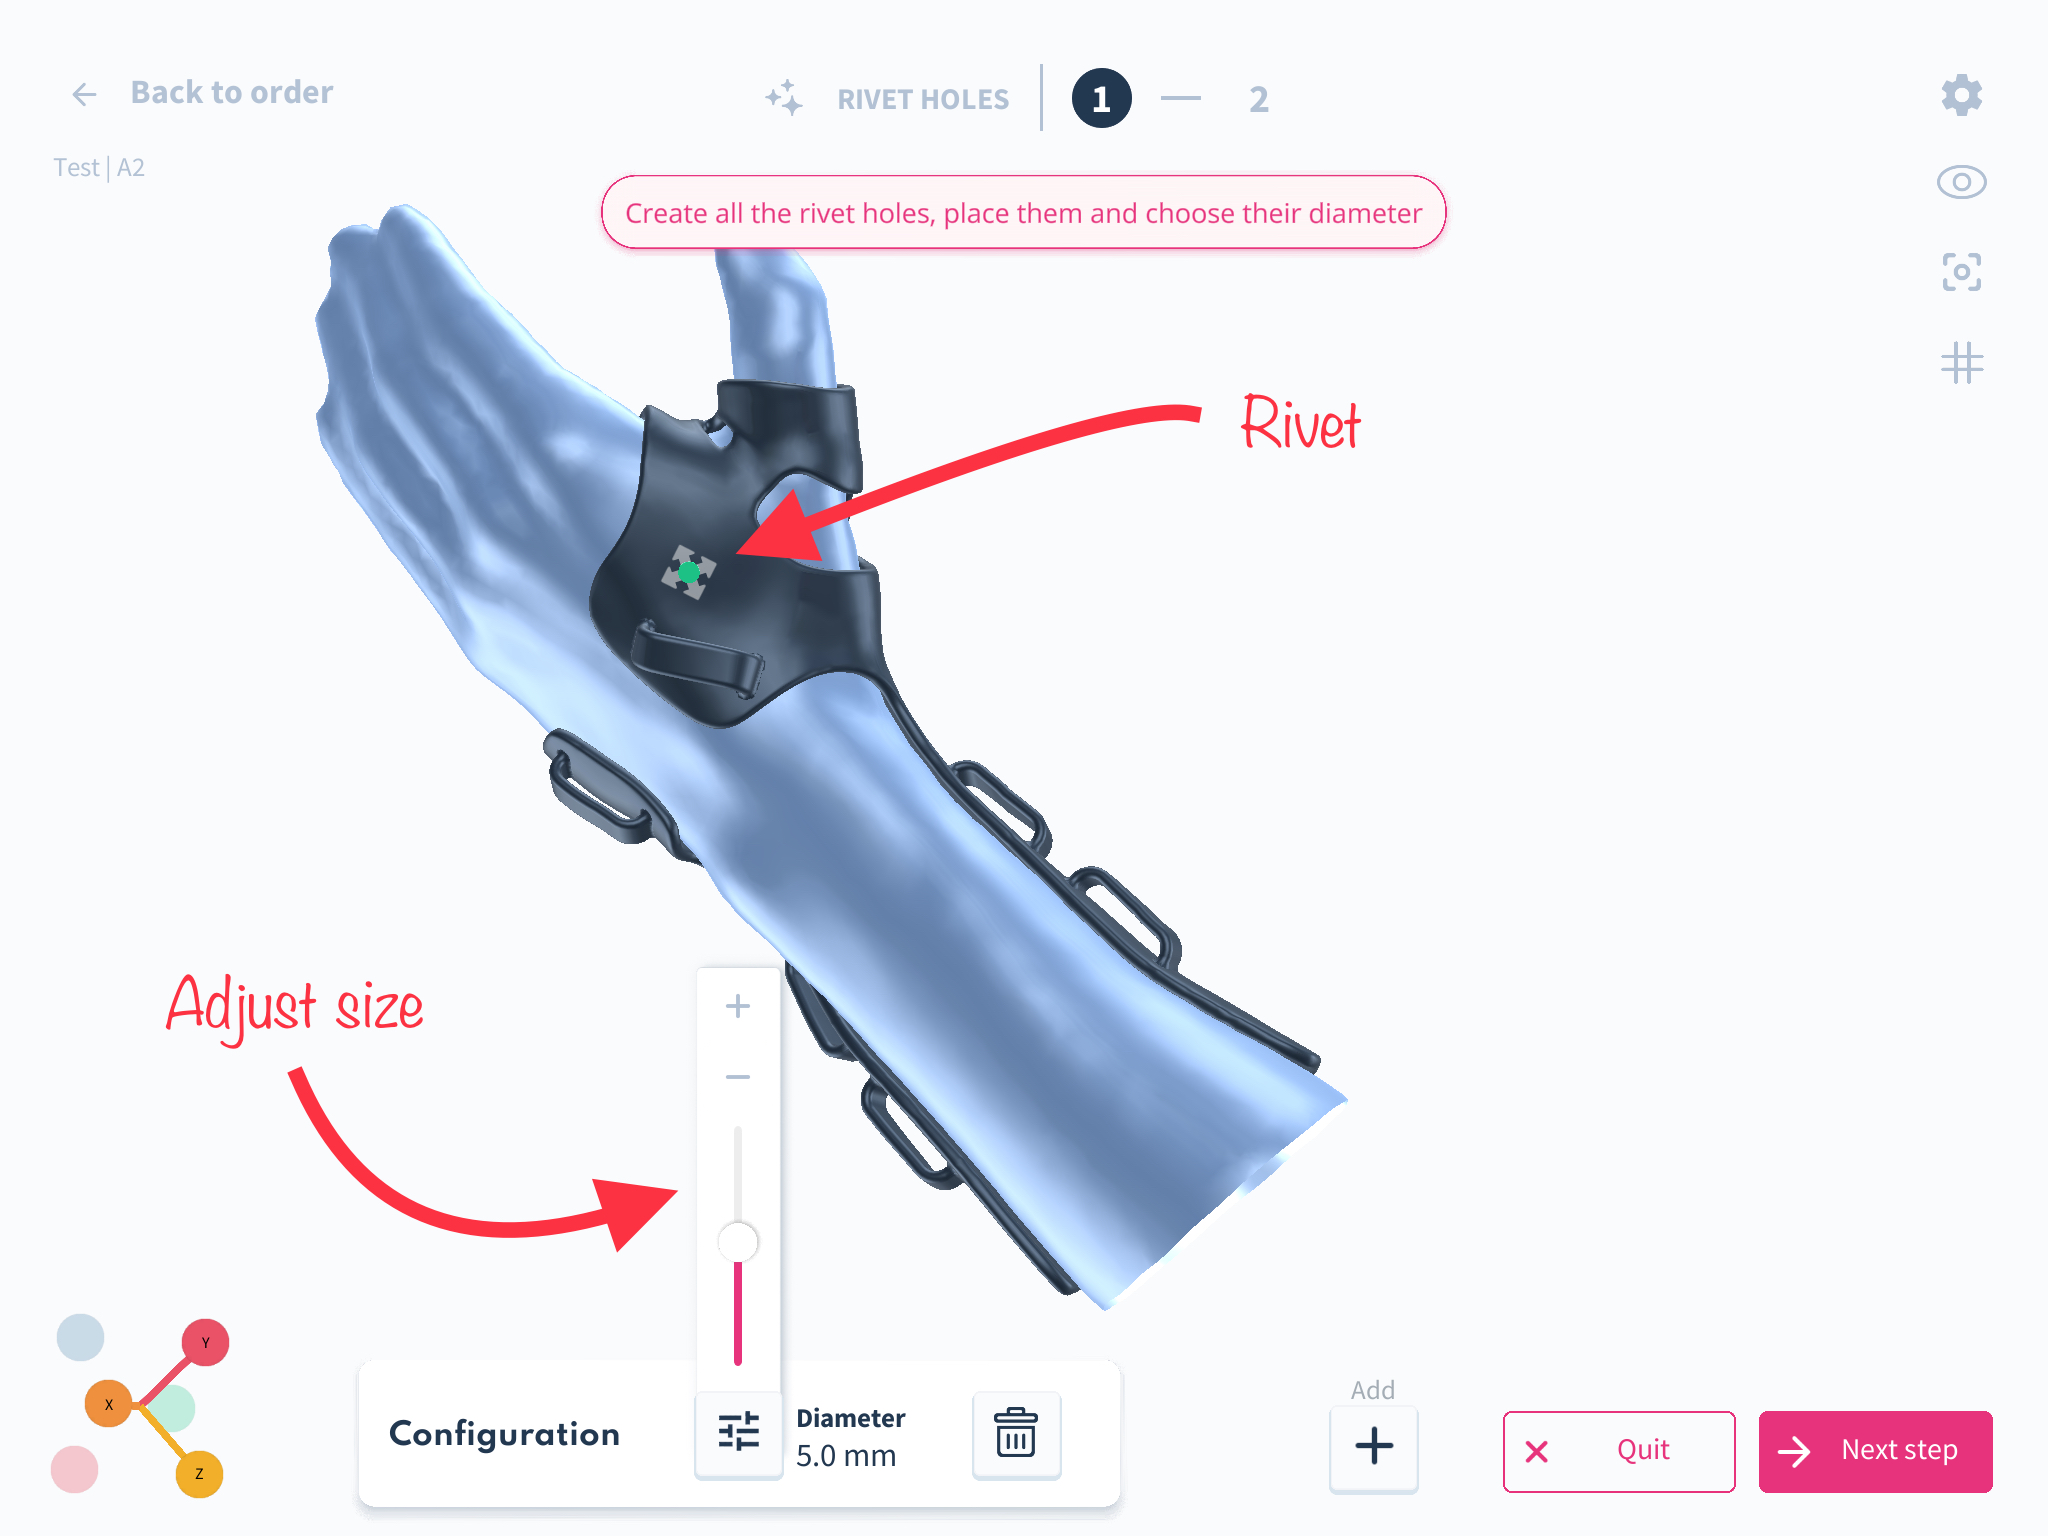
Rivets will appear automatically on the model and can be moved around to the desired area on the model. We have set boundaries along the edges of the model to restrict the rivets from being placed too near to the edge.
New: Fill in pathology as part of patient details
What Has Changed
We have updated the 'notes' feature within our system. The previous notes section found below the patient details has been rebranded as 'Pathology' to better capture the specifics of the patient's condition and the intended use of the device for treatment management.
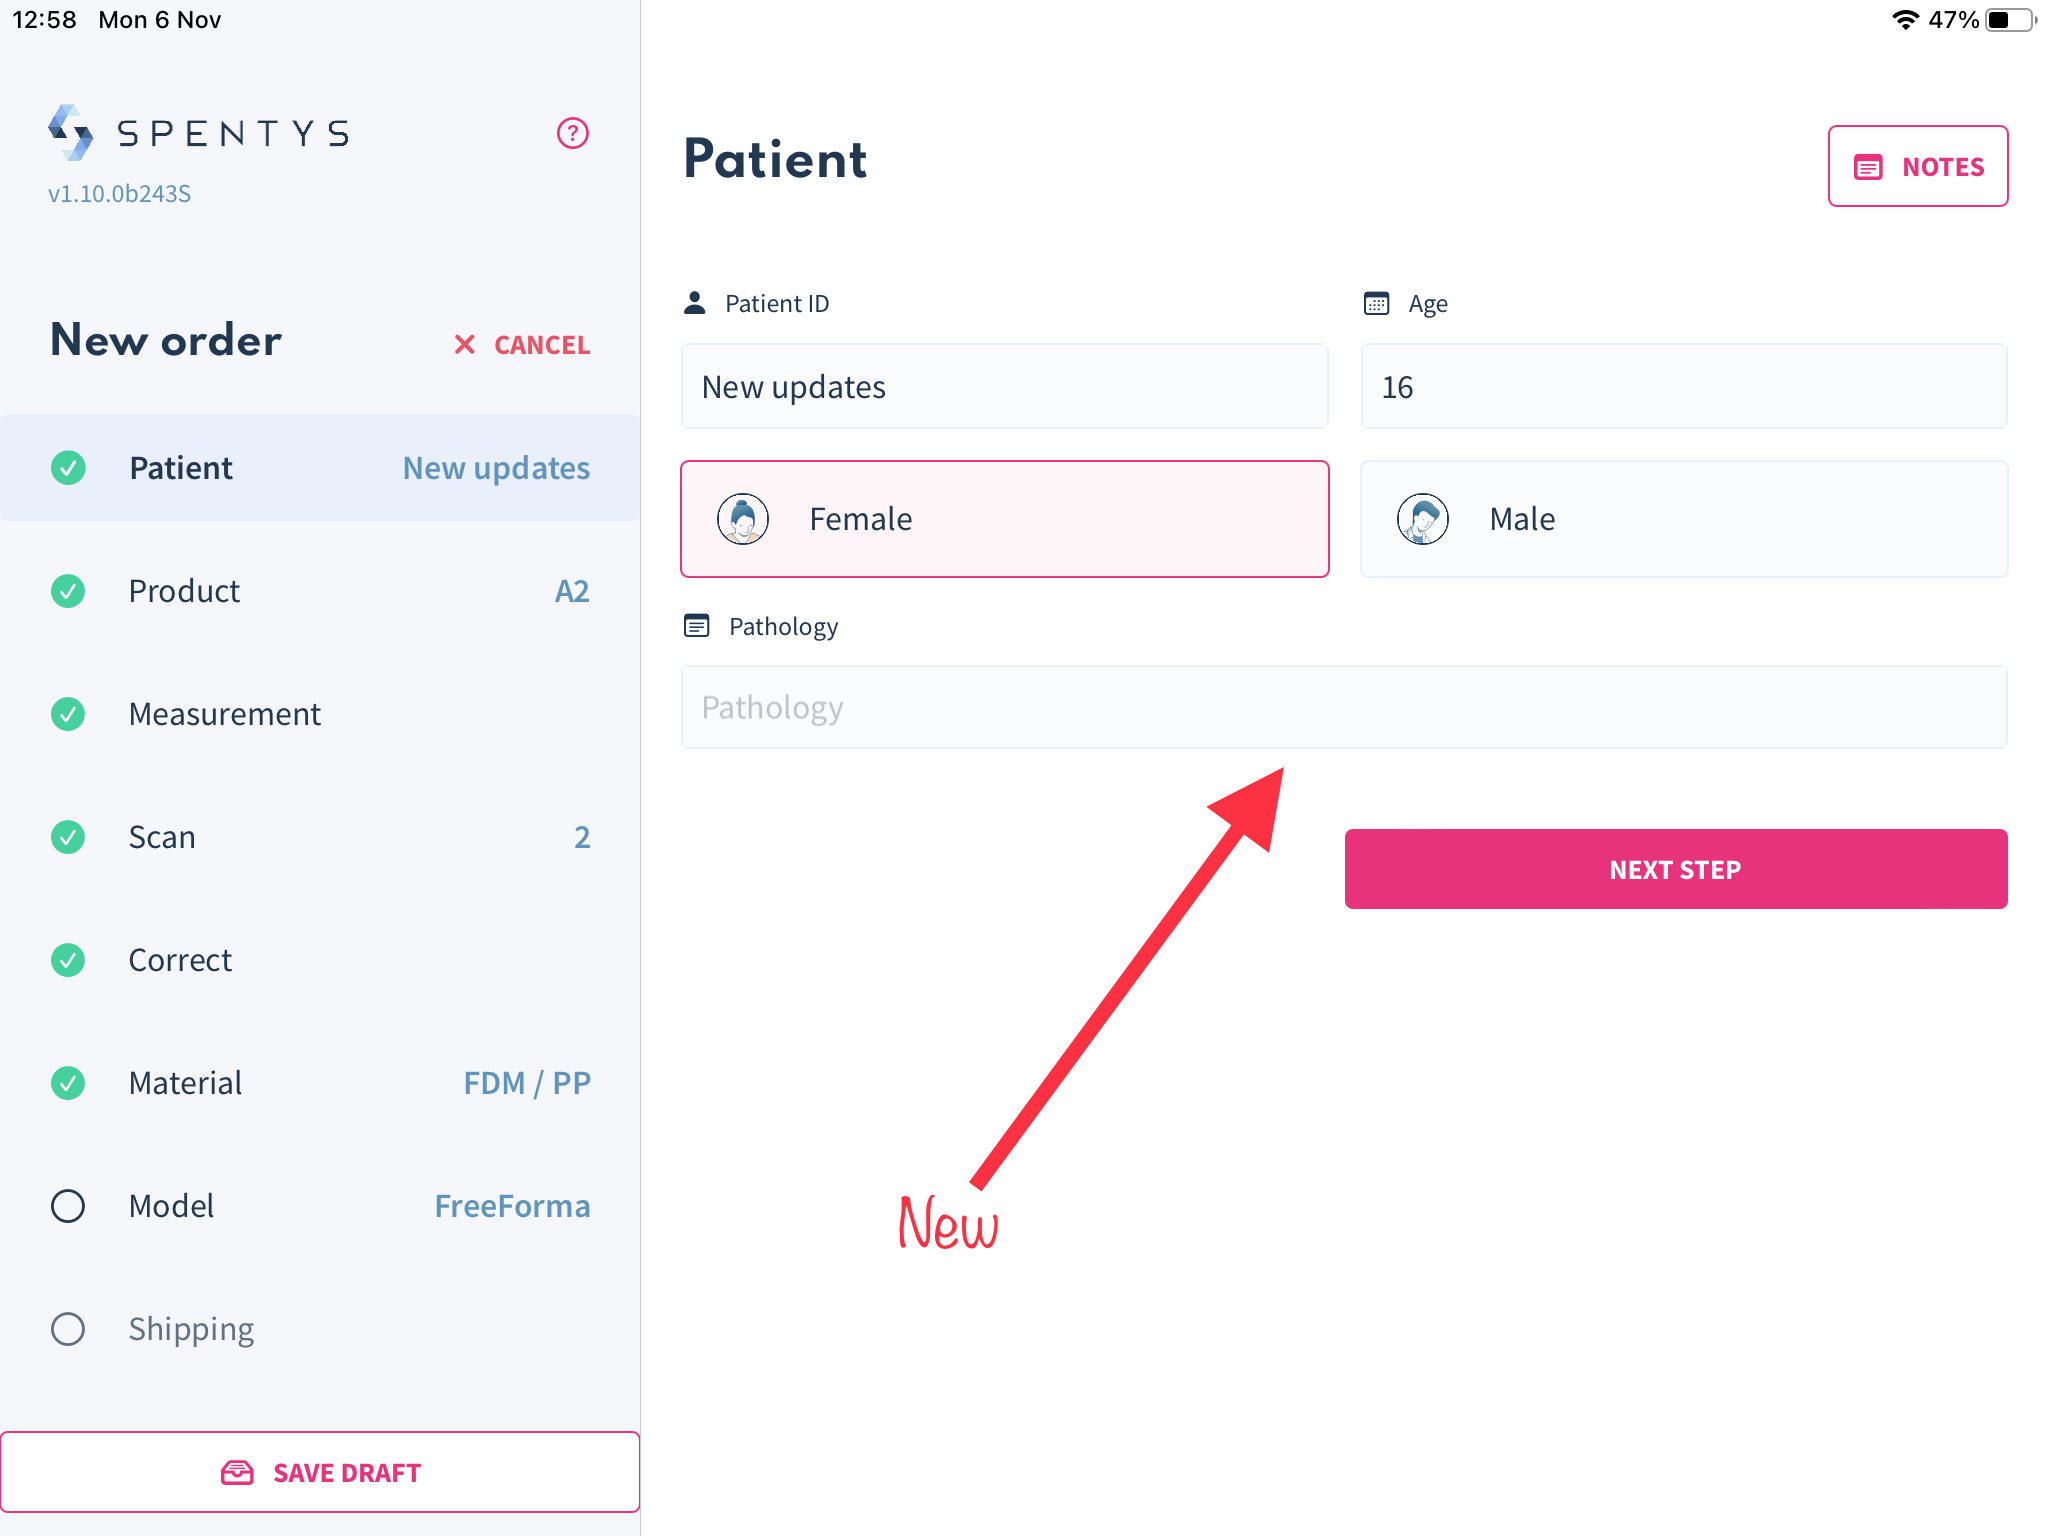
How It Affects You
This change allows you to meticulously record and review the cases where 3D-printed devices were deemed the most effective. It aids in maintaining a clear record of patient diagnoses and the corresponding device applications.
How to Use It
In the patient details step, where you previously found the note section, you will now see 'Pathology Note'. While completing this section is optional, we strongly encourage you to utilize it to ensure comprehensive patient records.
New feature: Create and manage new users on the web platform
We have given you the ability to create new users under one organization to help manage orders amongst your team more effortlessly. This new management system gives administrators of accounts with multiple users the ability to assign roles and grant specific permissions. This will ensure data protection and ensure GDPR compliance.

New Feature: Scan texture is now available
Visualizing the patient's anatomy in 3D just got better. With a high definition scan of the patient's limb you can now interact with the texture of the scan during your correction step so as to mark out areas of interest. Texture can be adjusted with an opacity slider at the top right corner of your iPad to allow you the flexibility to sculpt effectively and efficiently.
Now you can visualize the actual texture of the scan and have a realistic representation of the scan while being able to make markings of landmarks and areas of sensitivity on the scan. Modify your scans with super realistic texture representation of your patient's limb.
New feature: Image Import now available on iOS
Adding supporting images to scans is a valuable tool to keep track of your patients details. Now you can import photos from your gallery on your iPad into the Spentys app and can input some annotations to images.
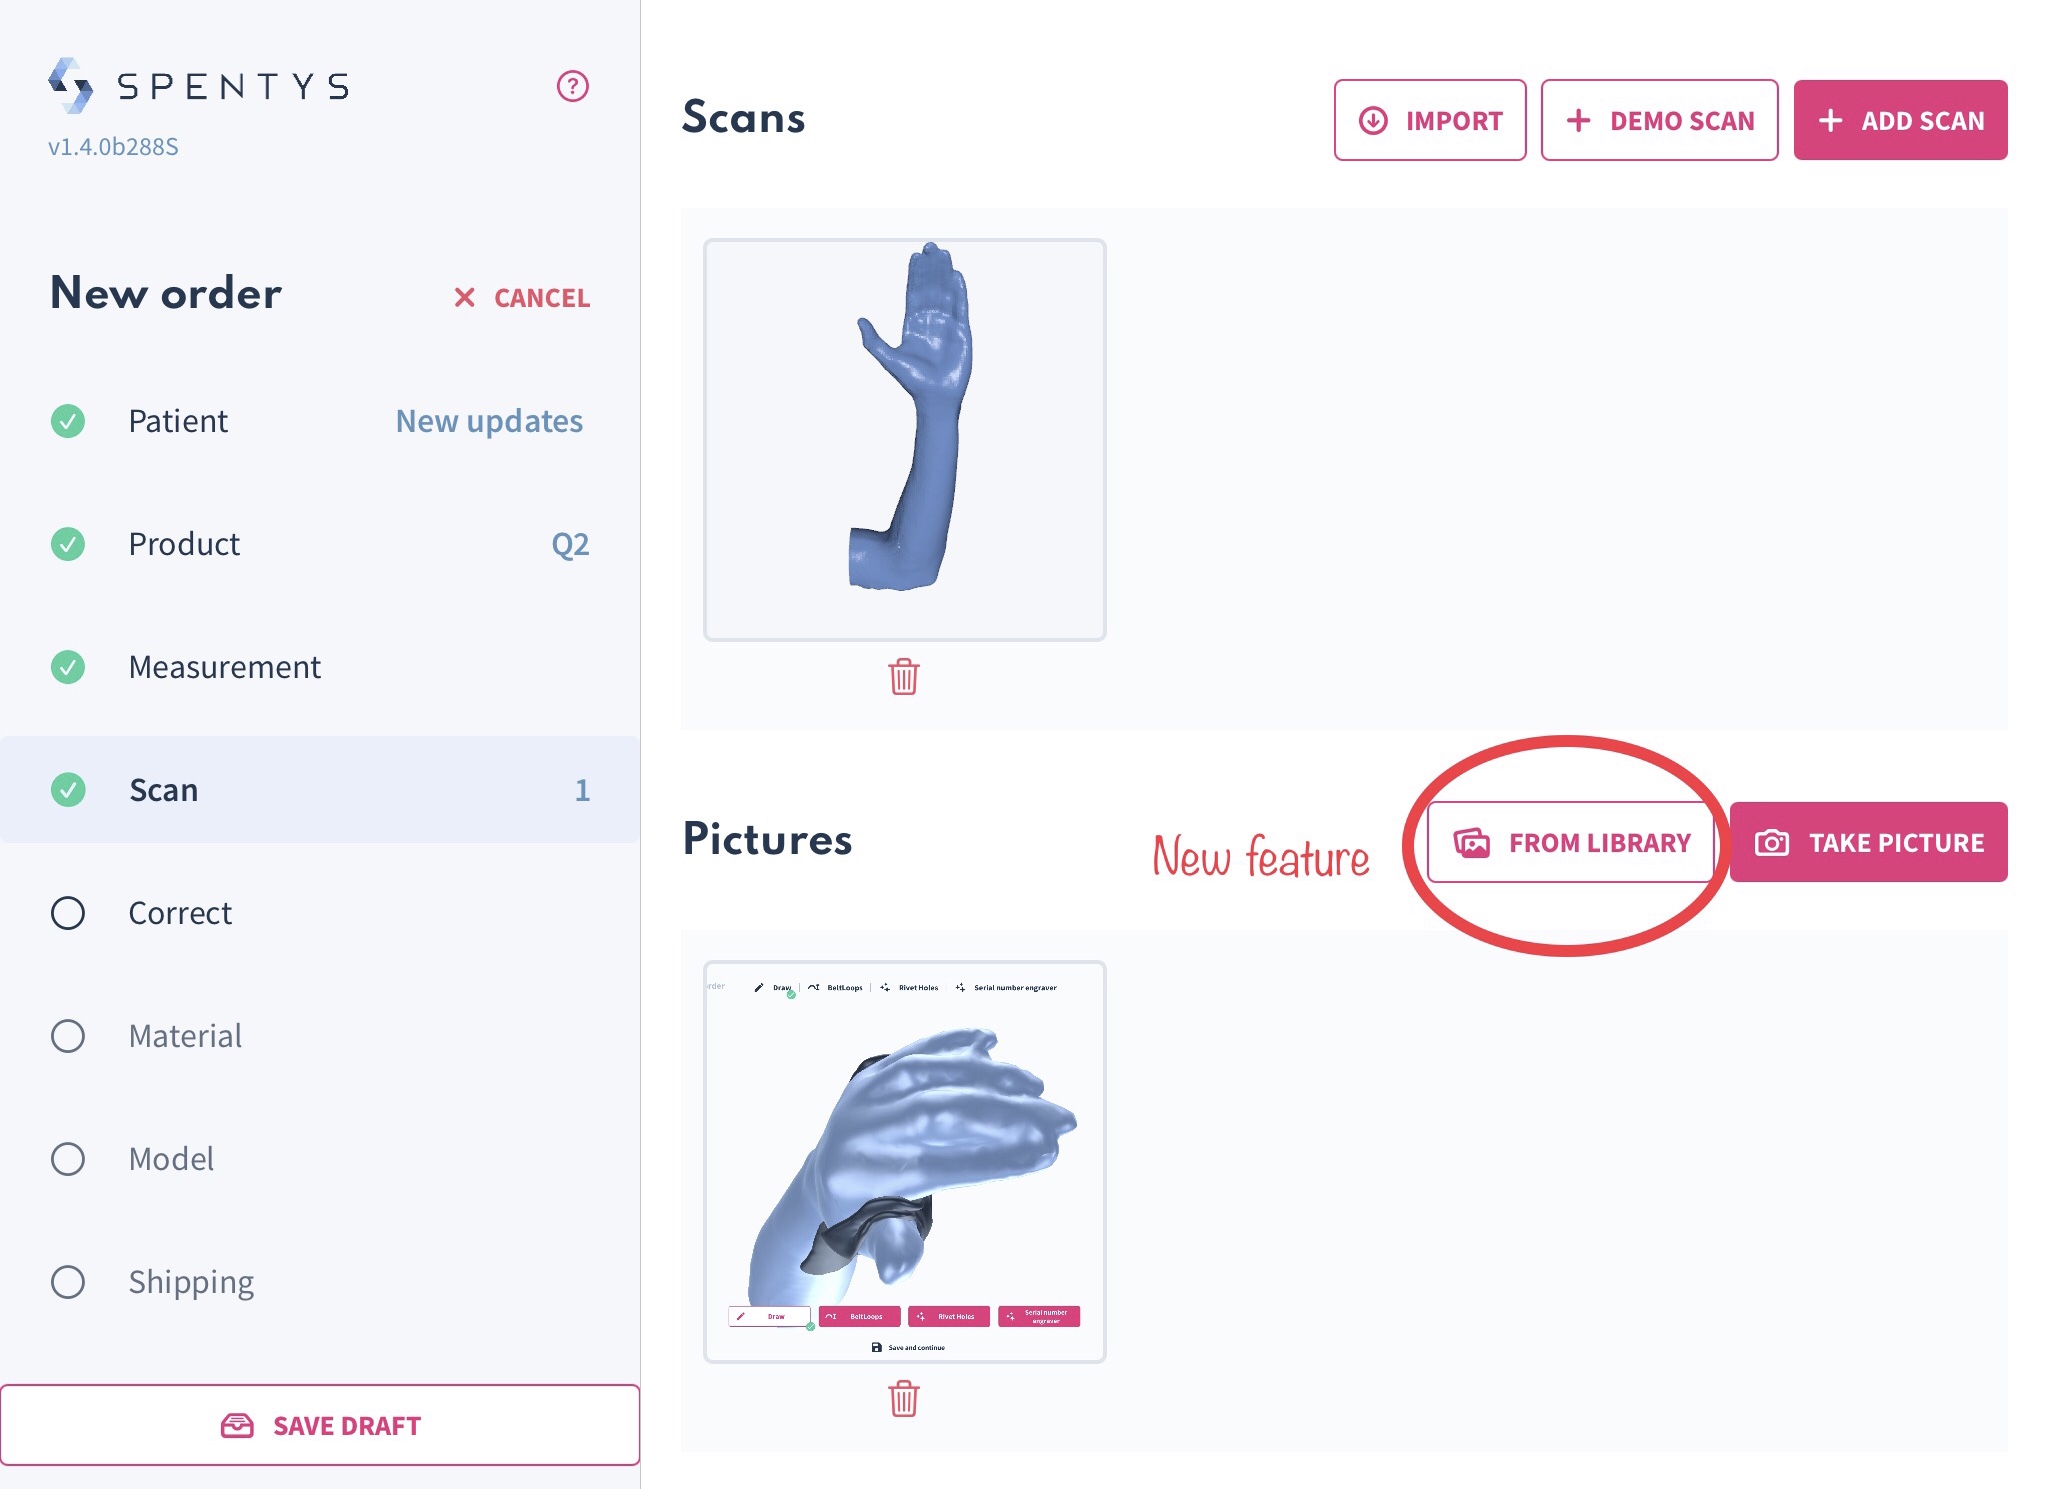
This will help you keep track of any measurements, landmarks, or important details for documentation that you would like to add to your patient's folder.
How to use the feature: step-by-step guide
Once on the Spentys app, select "FROM LIBRARY" under the scan option to access all photos saved in your photo library. Add as many images as desired.
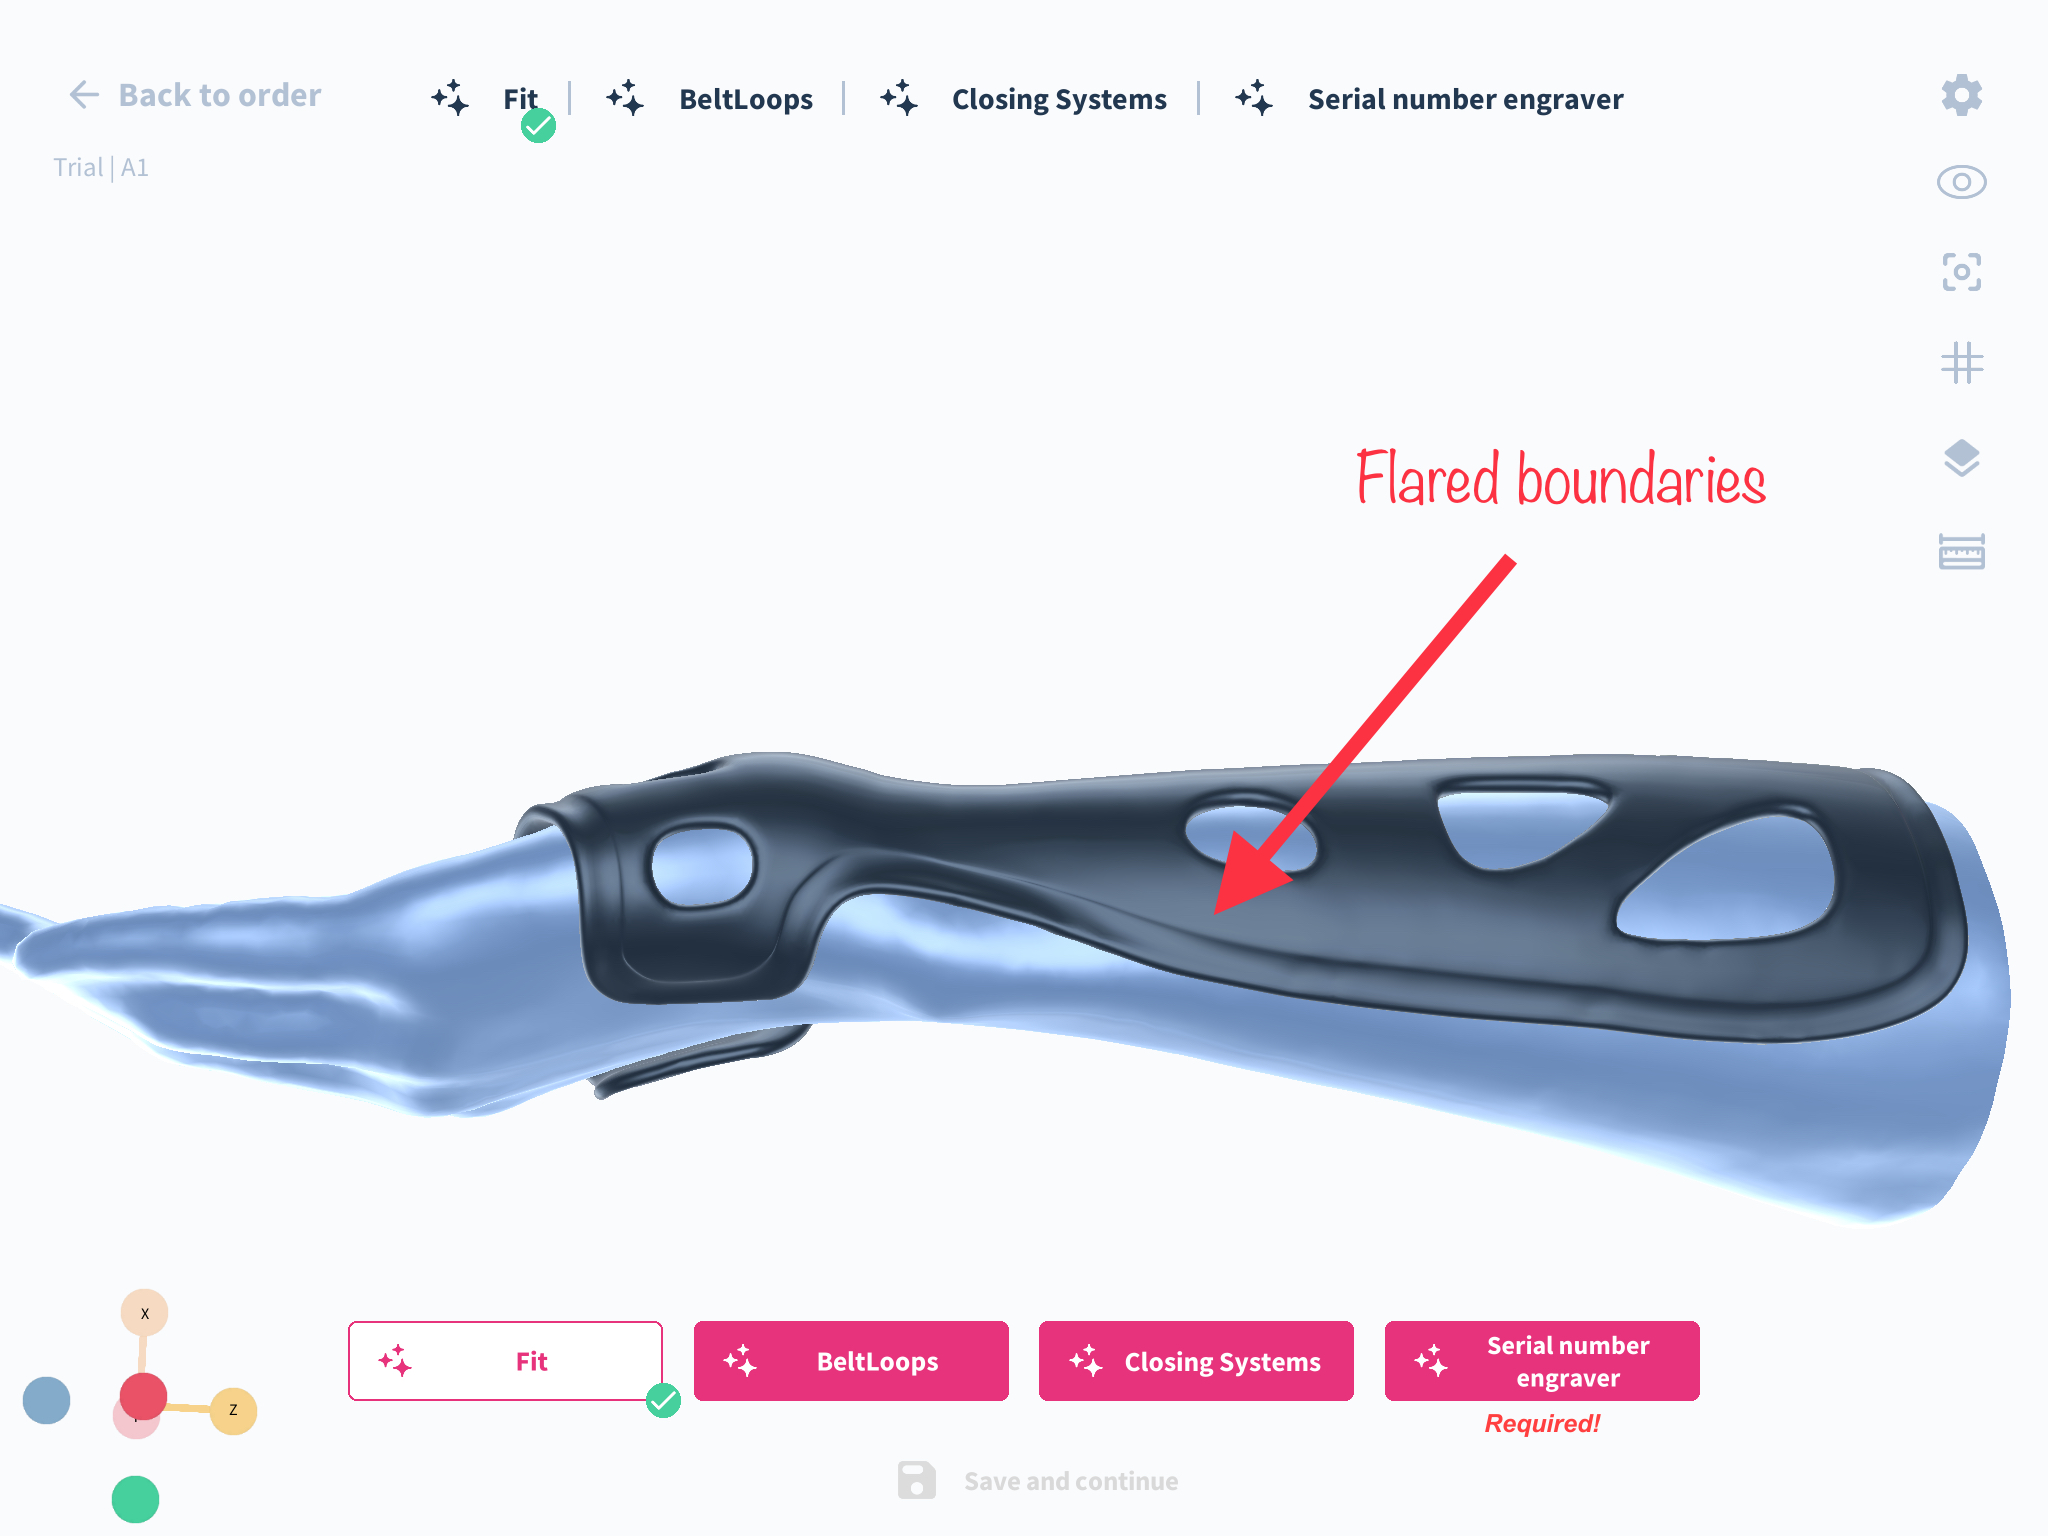
New External Boundary Controls in autoForma and freeForma
What we’ve changed
We have added new features to autoForma and freeForma that allow users to control the external boundaries of the splint. Specifically, external boundaries now have a separate control for their thickness, which can be higher or lower than the global value assigned to the rest of the splint. Additionally, external boundaries can be flared to be detached from the skin. These features are dependent on the minimum available distance that exists between the external boundaries and the closest alveoli. If this distance is not over a certain threshold, the feature will be deactivated.
How it affects you
As a user of autoForma and freeForma, these new features provide greater control over the external boundaries of the splint. By being able to control the thickness of the external boundaries separately, you can create splints that better fit the needs of each individual patient. Additionally, the ability to flare the external boundaries can improve patient comfort and reduce the risk of pressure sores.
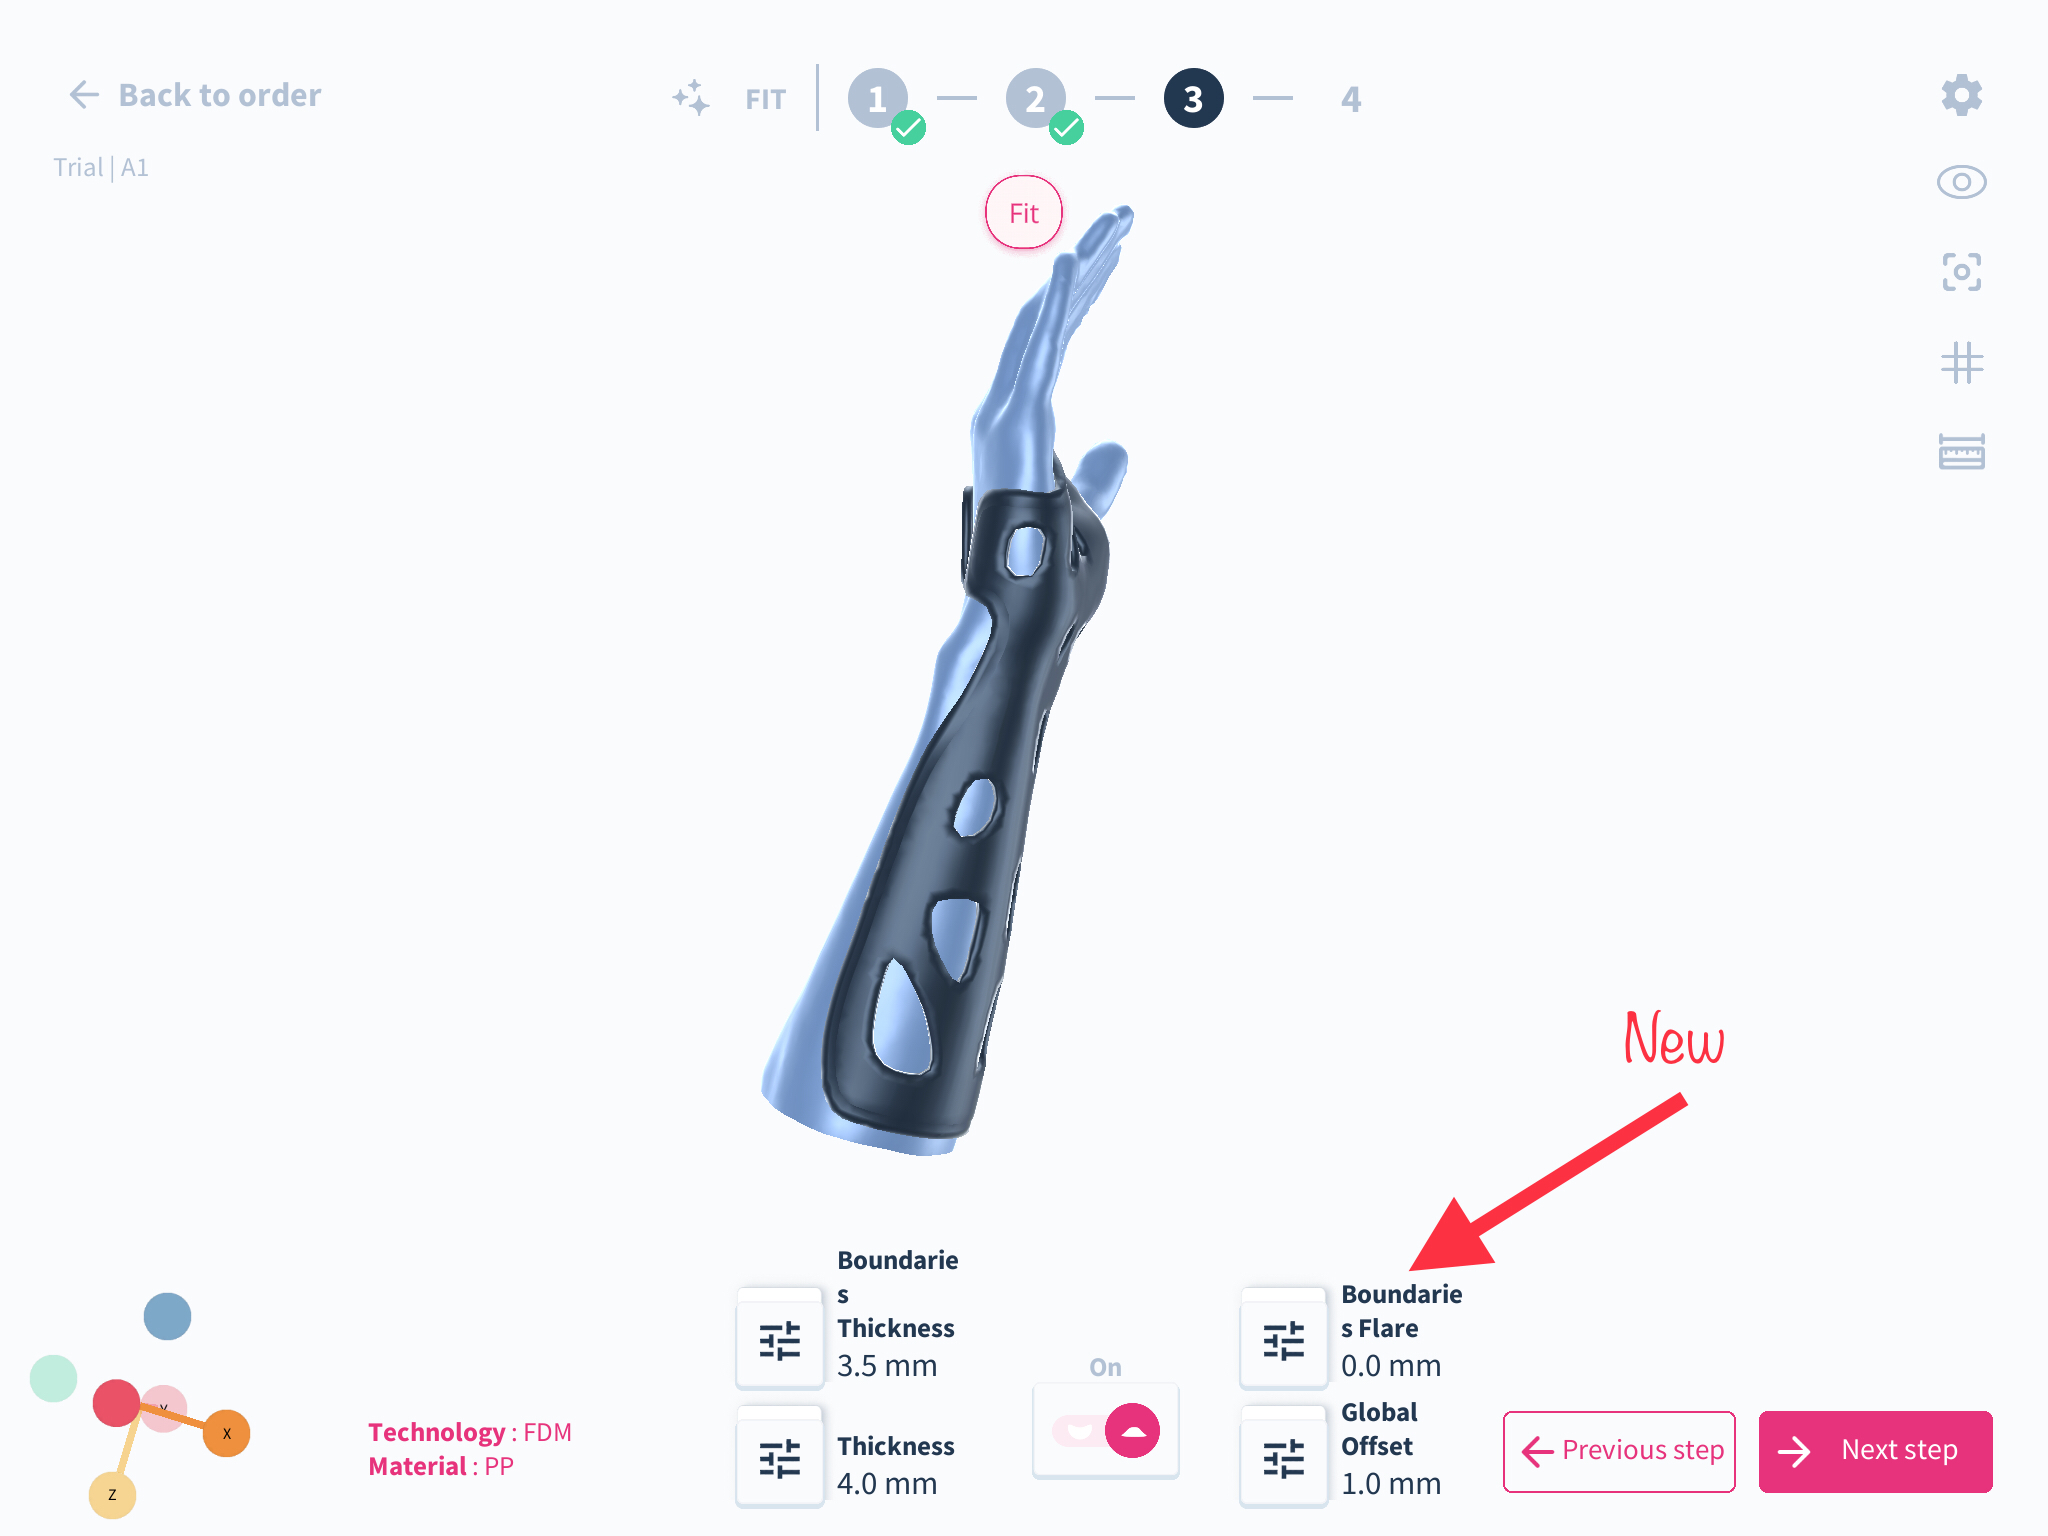
How to use it
To utilize the new external boundary controls available in both autoForma and freeForma, proceed to the fit/draw tab. After obtaining and validating your final splint design, you can adjust the boundary flares as required using a slider located at the side. It is essential to note that these features are reliant on the minimum distance available between the external boundaries and the nearest alveoli. If this distance falls below a specific threshold, the feature will become deactivated.
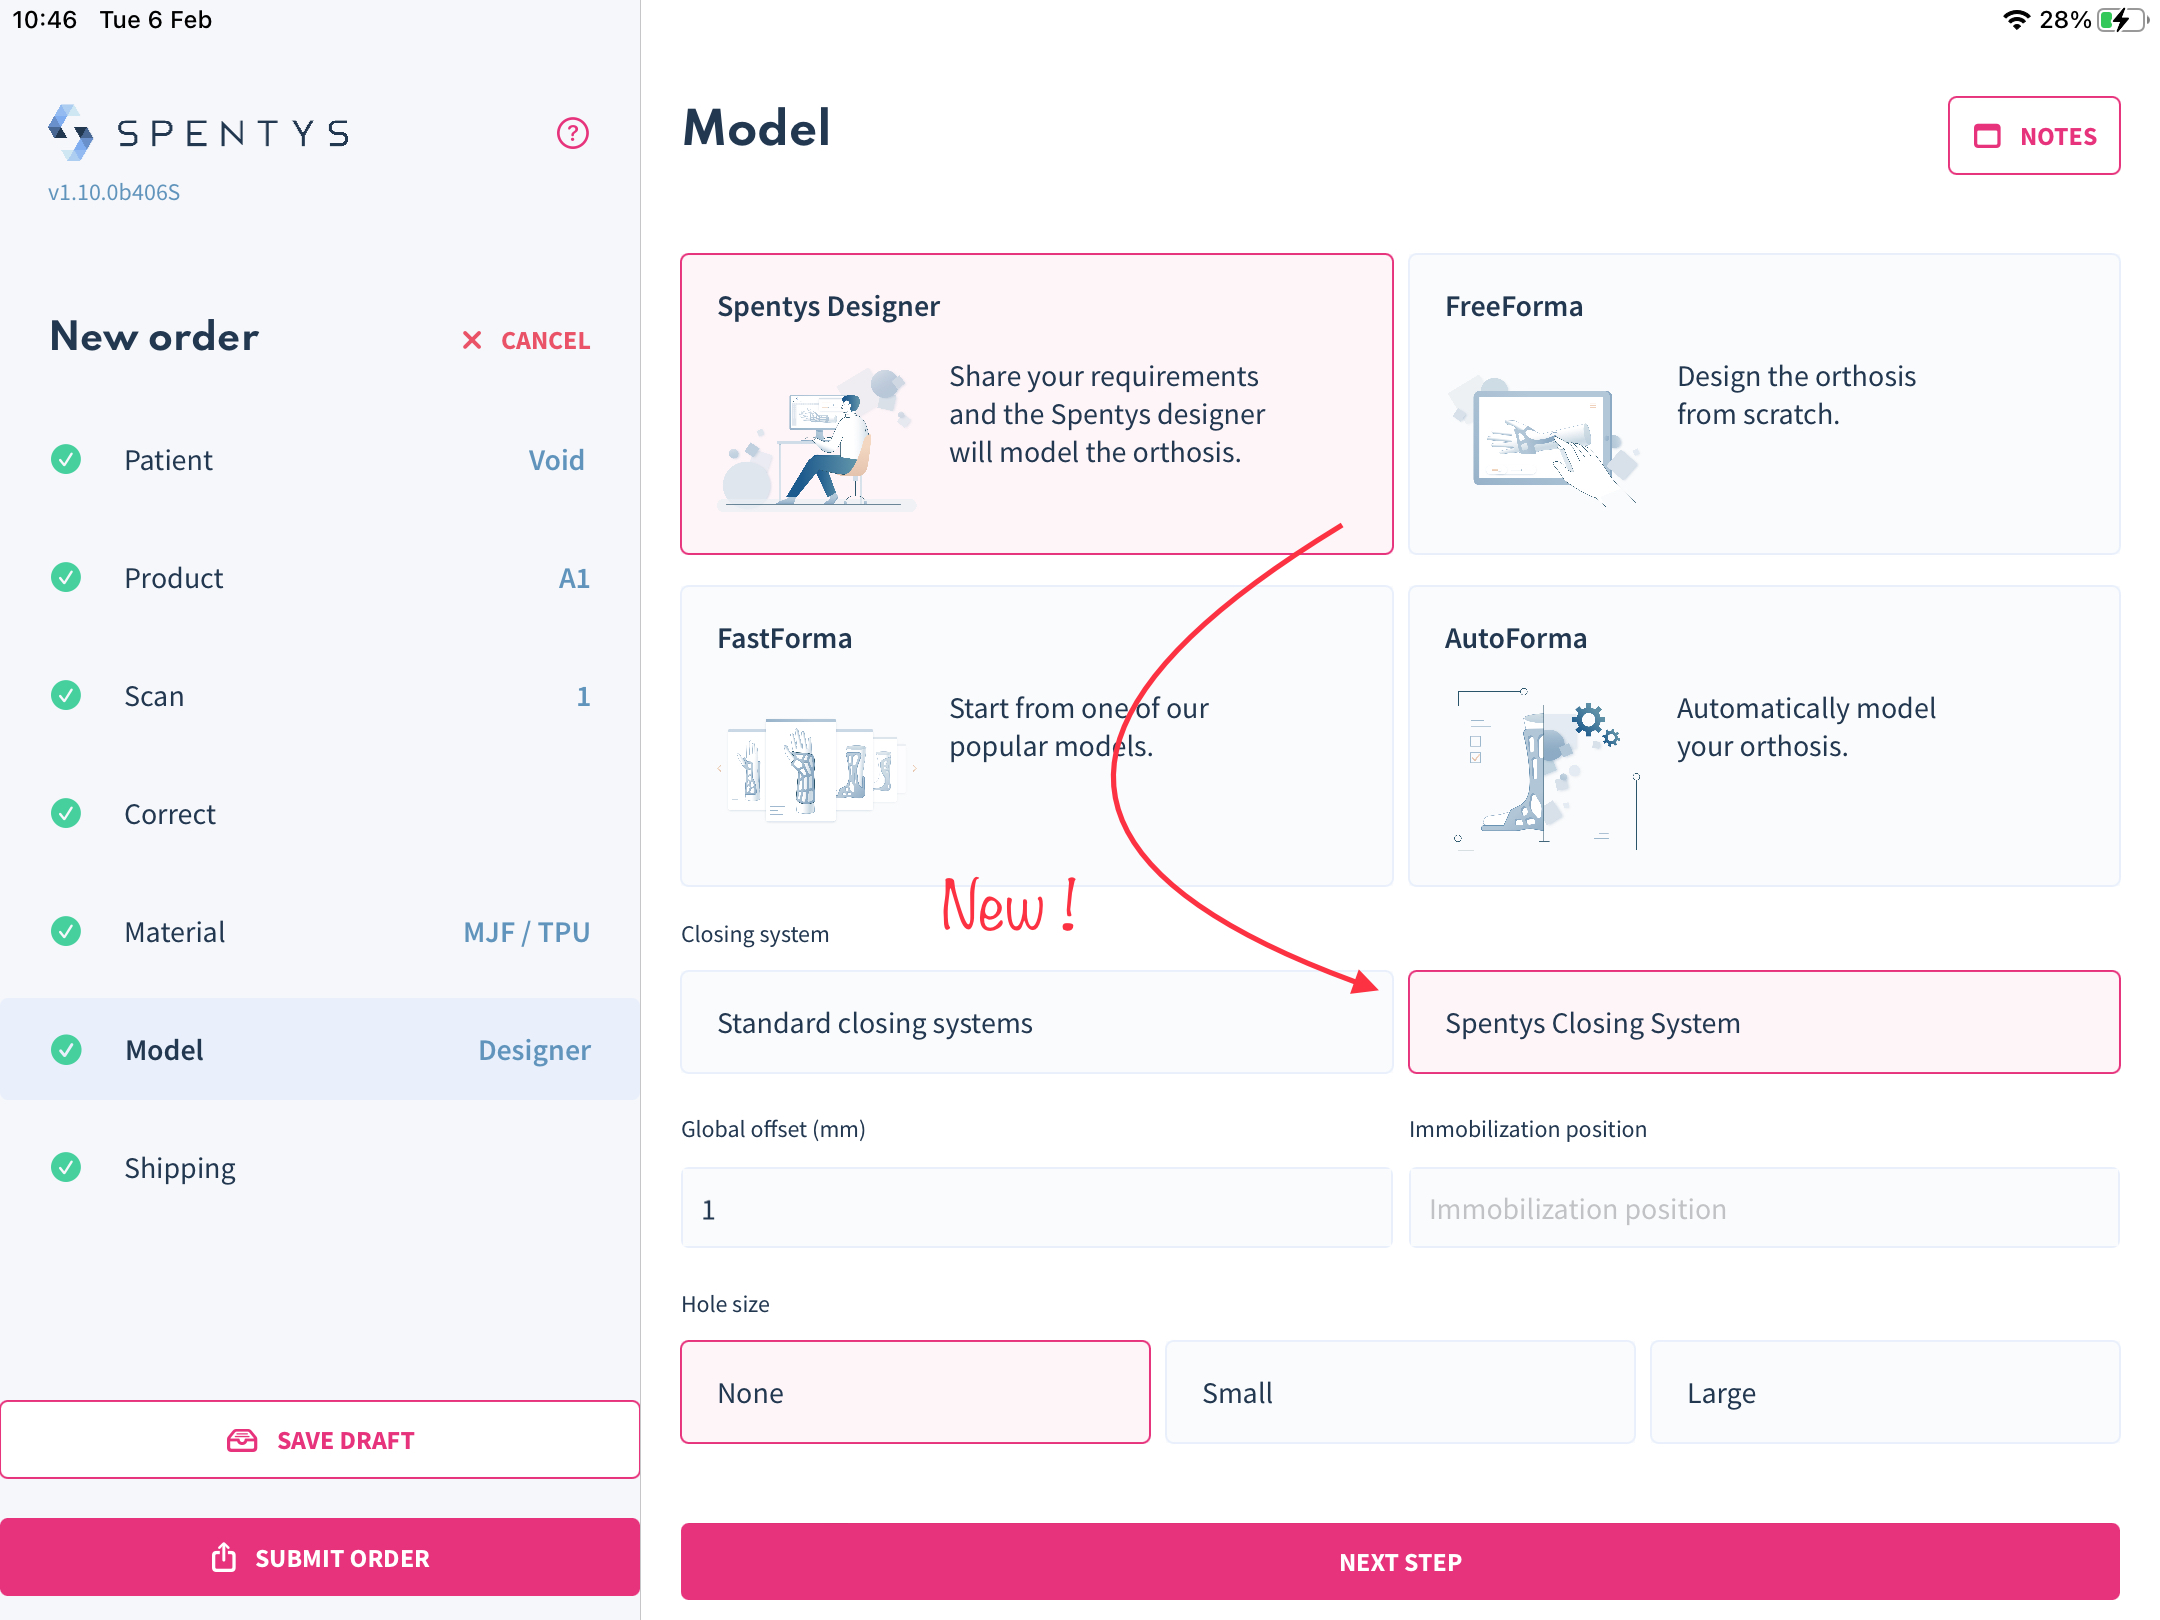
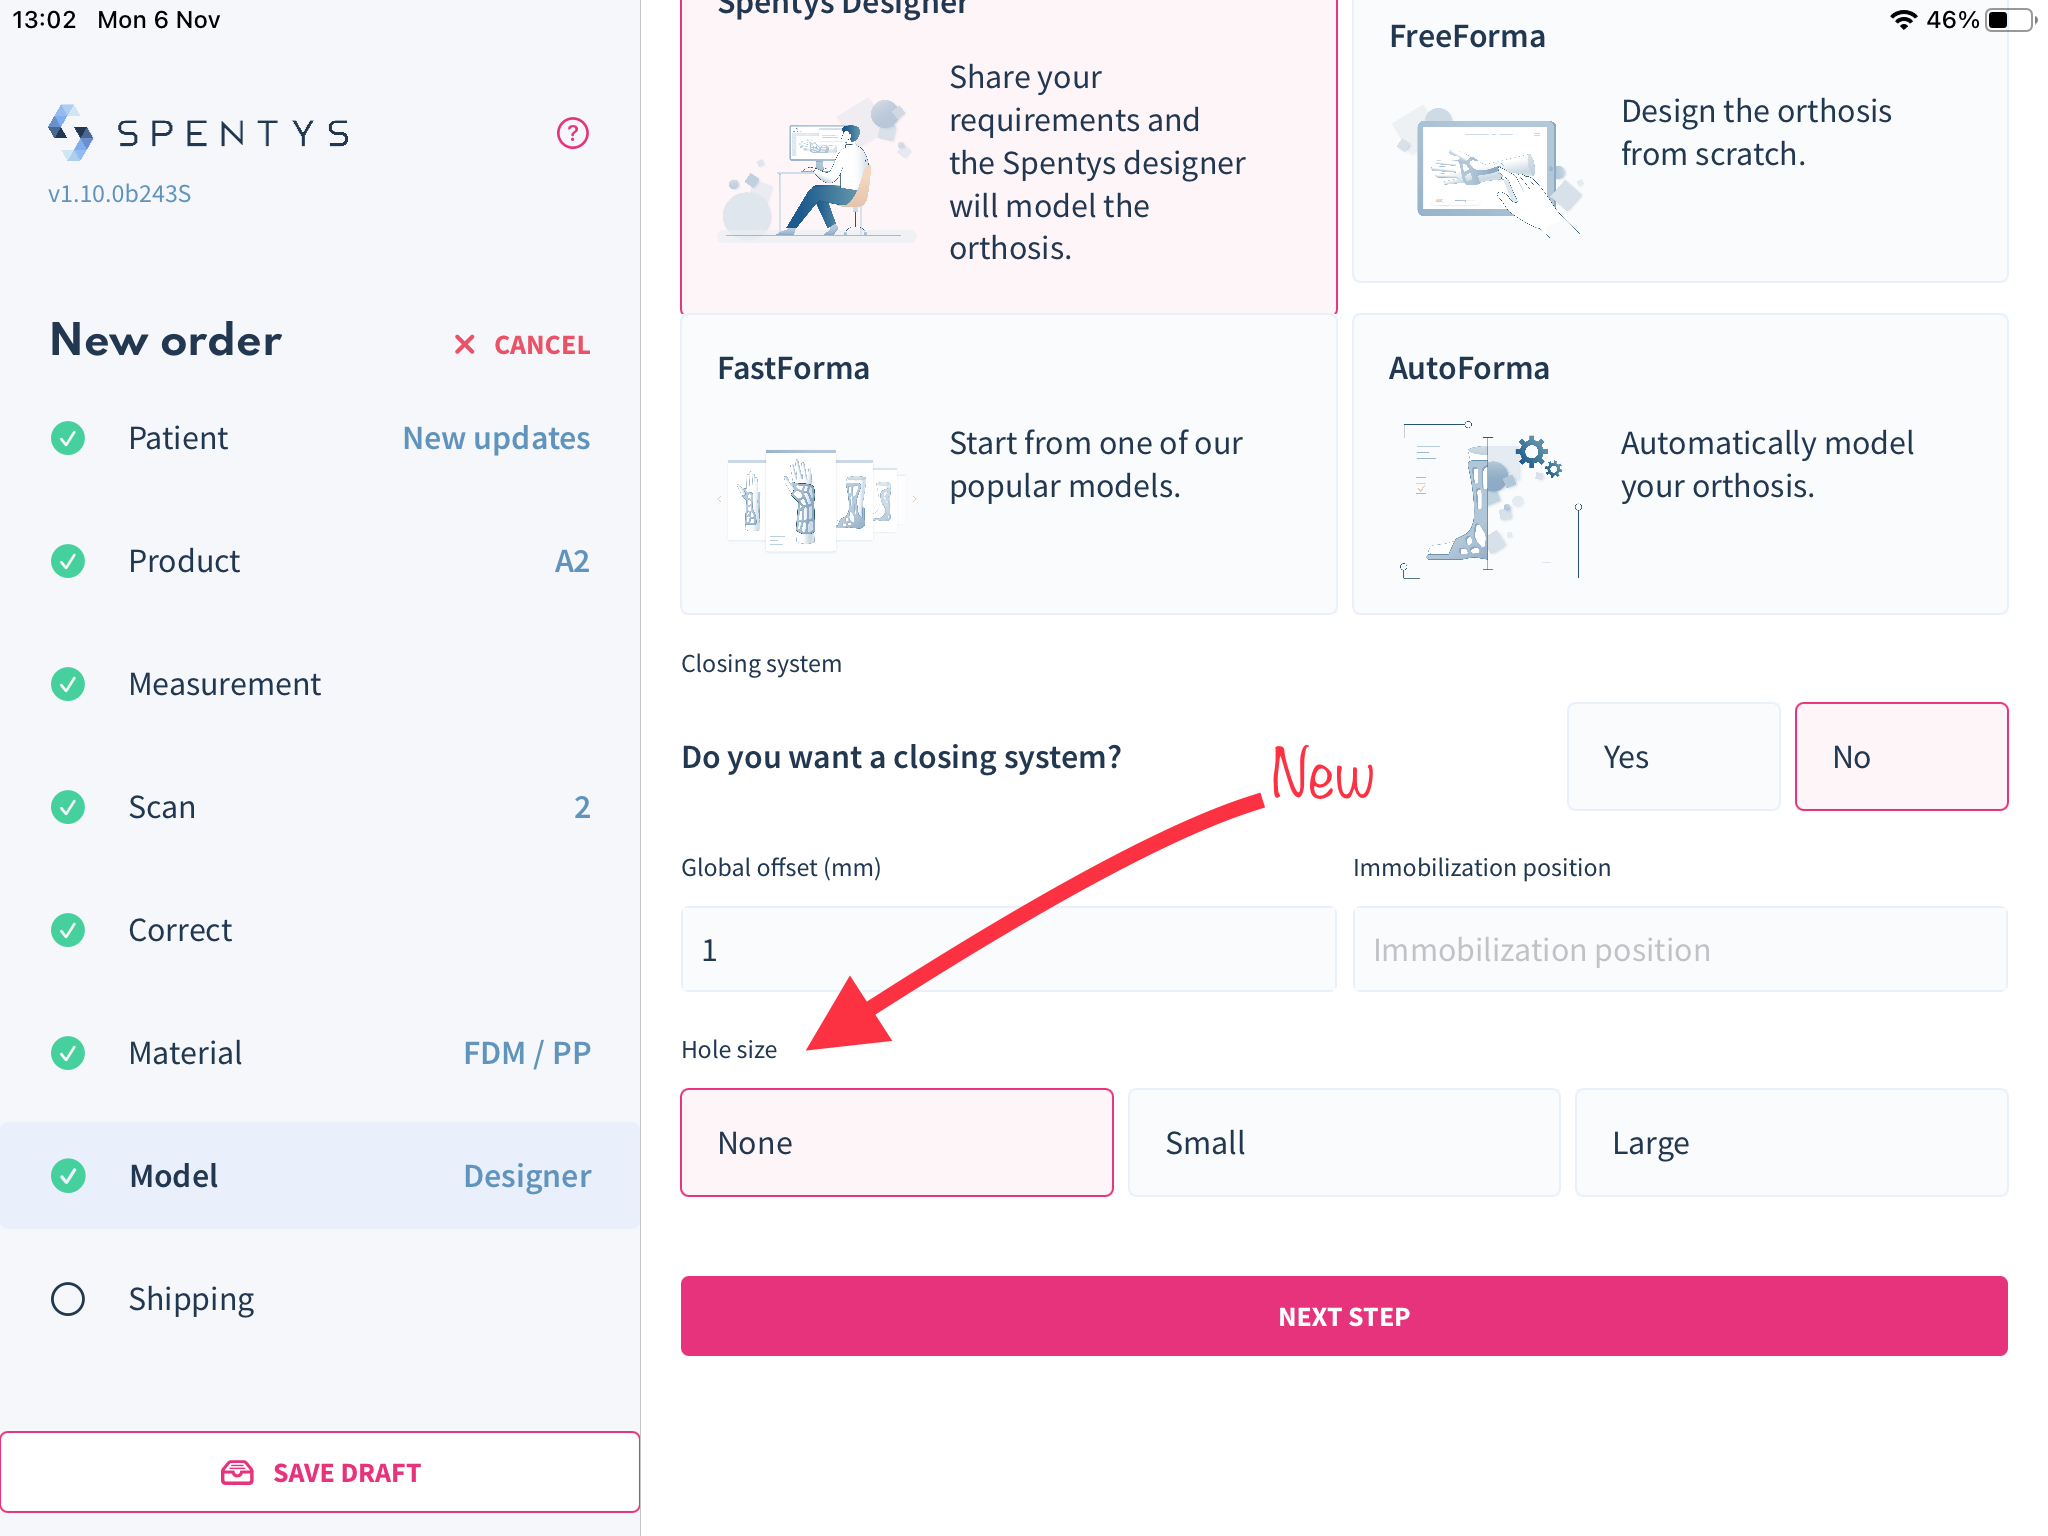
New Closing System Step for A, H, W, and Q Products
What has changed:
A, H, W, and Q products now feature an additional design step that allows users to specify the exact locations for closures and combine multiple closing system configurations, providing unprecedented customization.
How it affects you:
This update significantly enhances the ability to tailor products to individual user requirements, ensuring a perfect fit and greater functionality. The new step offers the possibility to combine different closure types and positions, accommodating a wide range of needs and preferences.
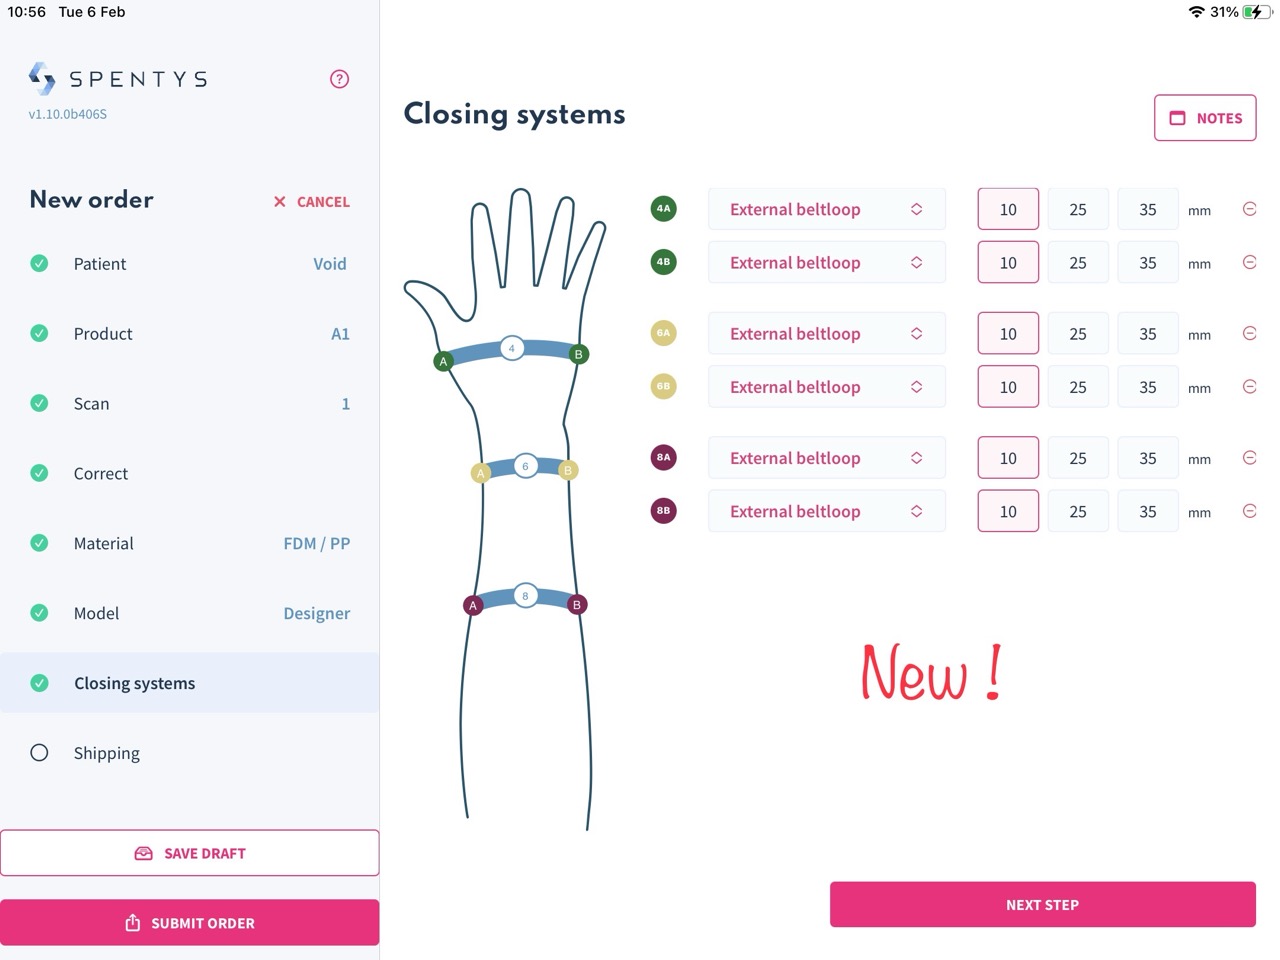
How to use it:
Only available if you select the "Spentys designer" option. For A, H, W, and Q products, you'll encounter a new step dedicated to the closing system. Here, you can specify locations for closures and select from various configurations. This step offers intuitive tools to precisely define how and where the closures will be integrated into the product, allowing for detailed customization.
New AFO workflow: Everything you need to know
We have updated our first version of the AFO workflow to enable you to do more in less time. With options for standard measurements and advanced customization, we have equipped you with the flexibility to do more.
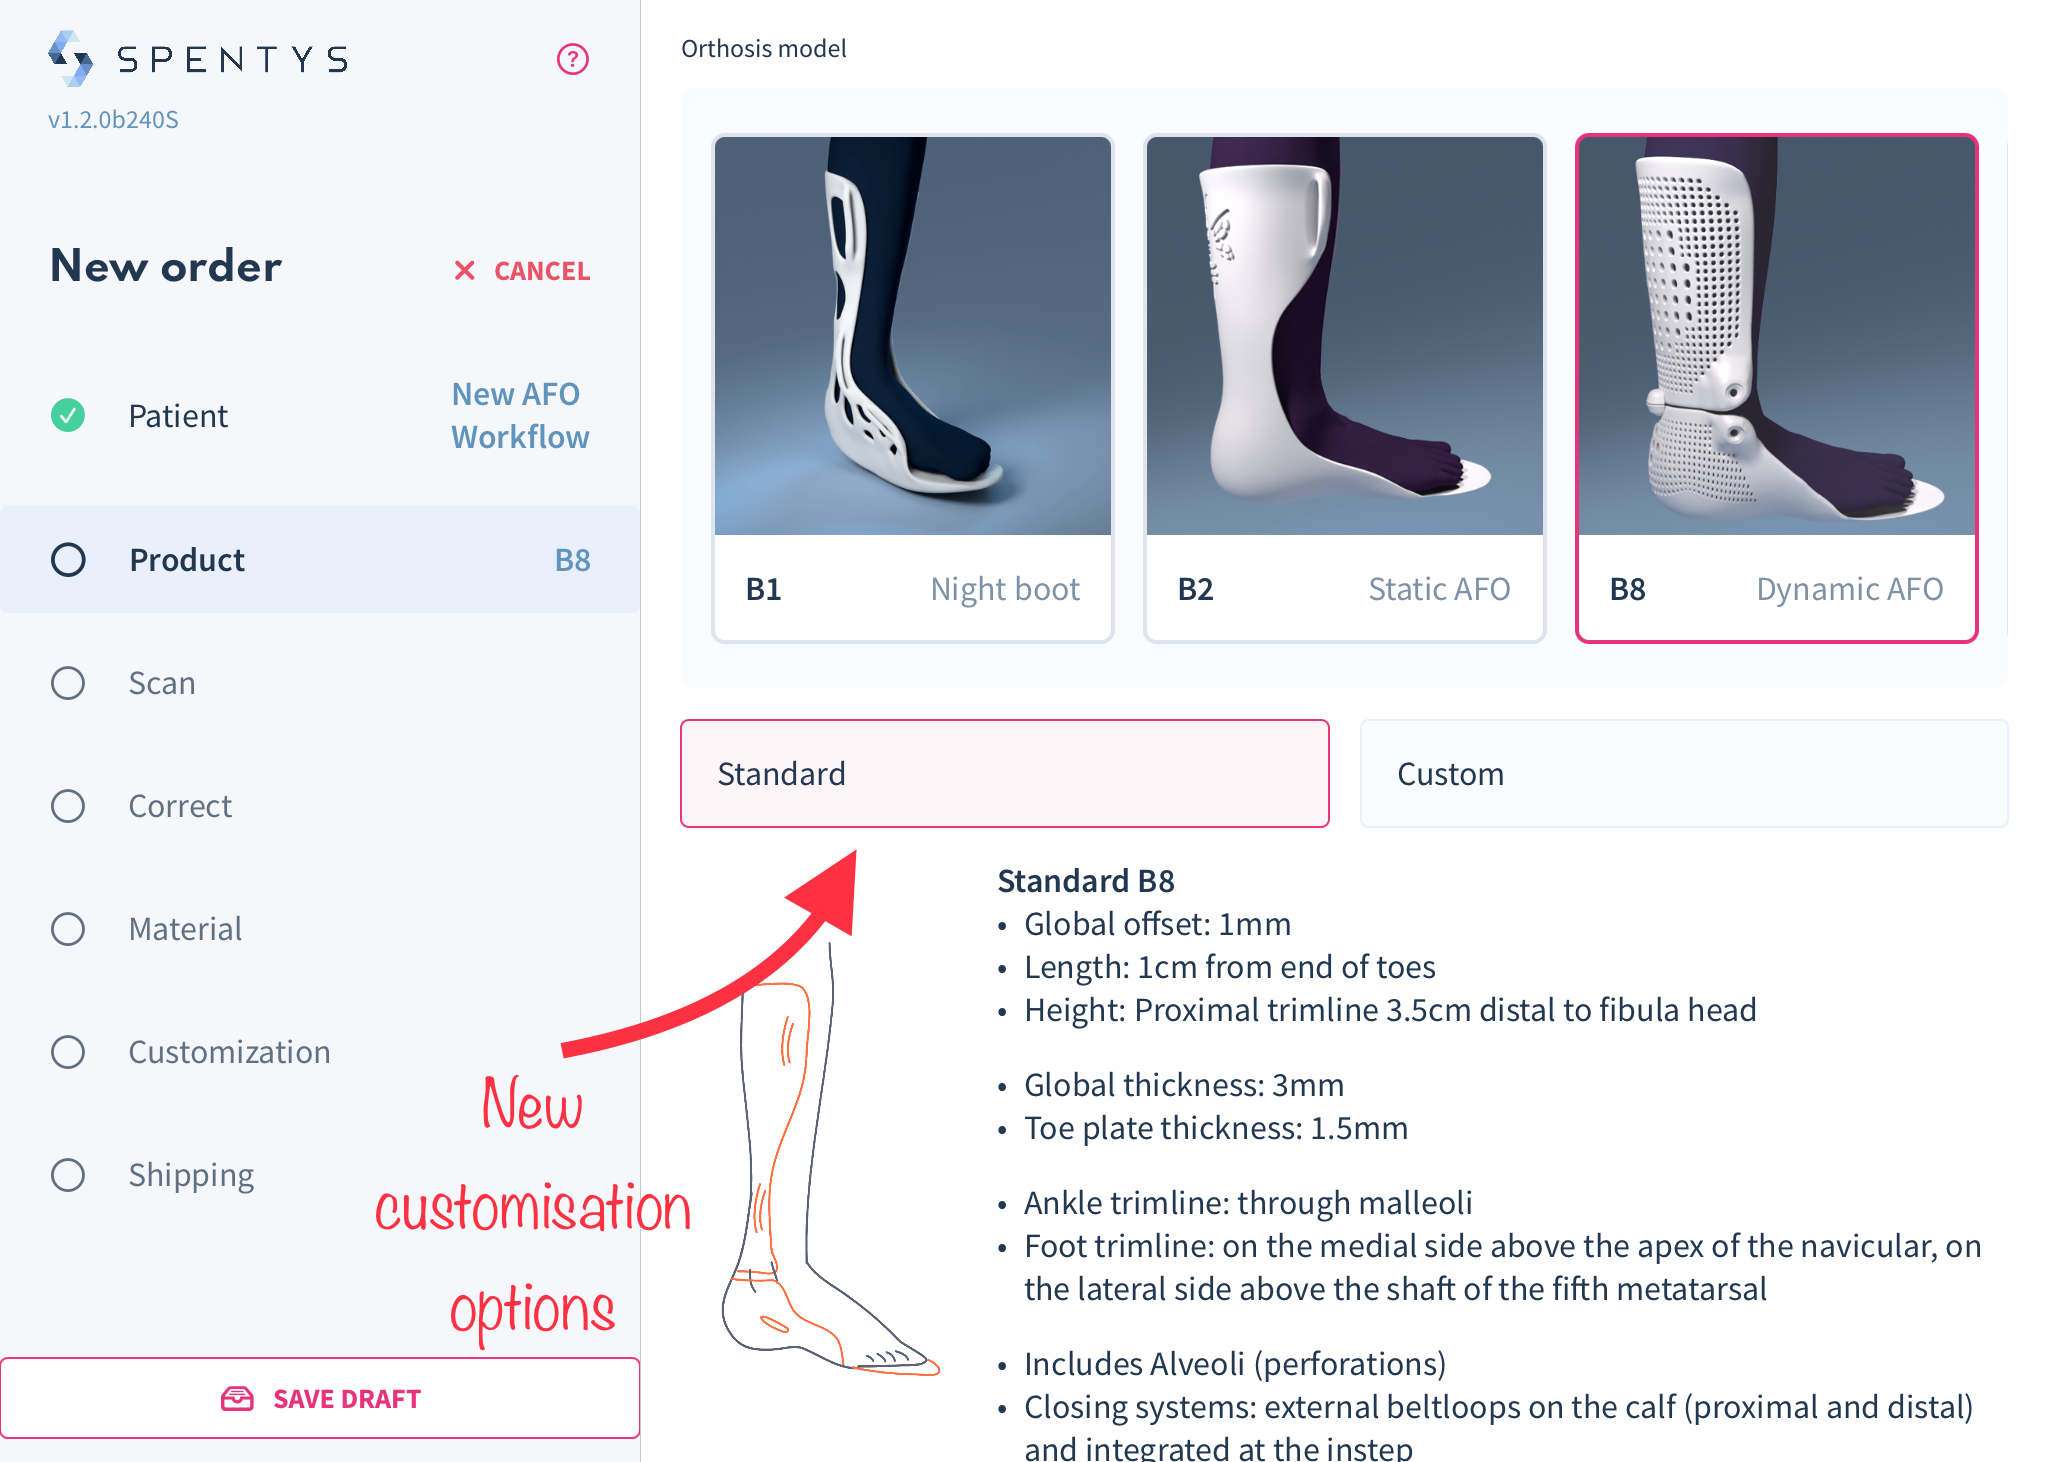
The new customization options
Standard option
With the “standard” customization option, we have set fixed values automatically applied to your AFO order. This will save you the stress of inputting measurement values and adding trim lines. This should cut your AFOorder down by 75%.
Key features:
· New TPU inlay option
· Including patient weight in the product selection step
· Selection of joint type based on joint size for either pediatric or medium
· Selection of plantar flexion range of motion
· Options to apply no correction or a standard set of correction

Customization option
The customization option mirrors the previous workflow but has been optimized with more capabilities.It now serves as an advanced tool for clinicians who want more freedom in their customization process.
Key features
· Selection TPU inlay (None, full TPU boot, HalfTPU boot)
· Selection of joint type based on joint size
· Selection of plantar flexion range
· Four scan correction selections ( No correction,Forma correction, Standard correction, custom correction)
· Three new model options available ( standard,custom, and sketch)
New feature: Bucket-fill tool for freeForma modeling
The bucket fill tool is a simple one-click colour replacement tool that enables users to fill a space within a boundary on a scan in the freeForma modelling tool. With the bucket-fill tool, you can save time by filling nested areas without having to paint over them repeatedly.
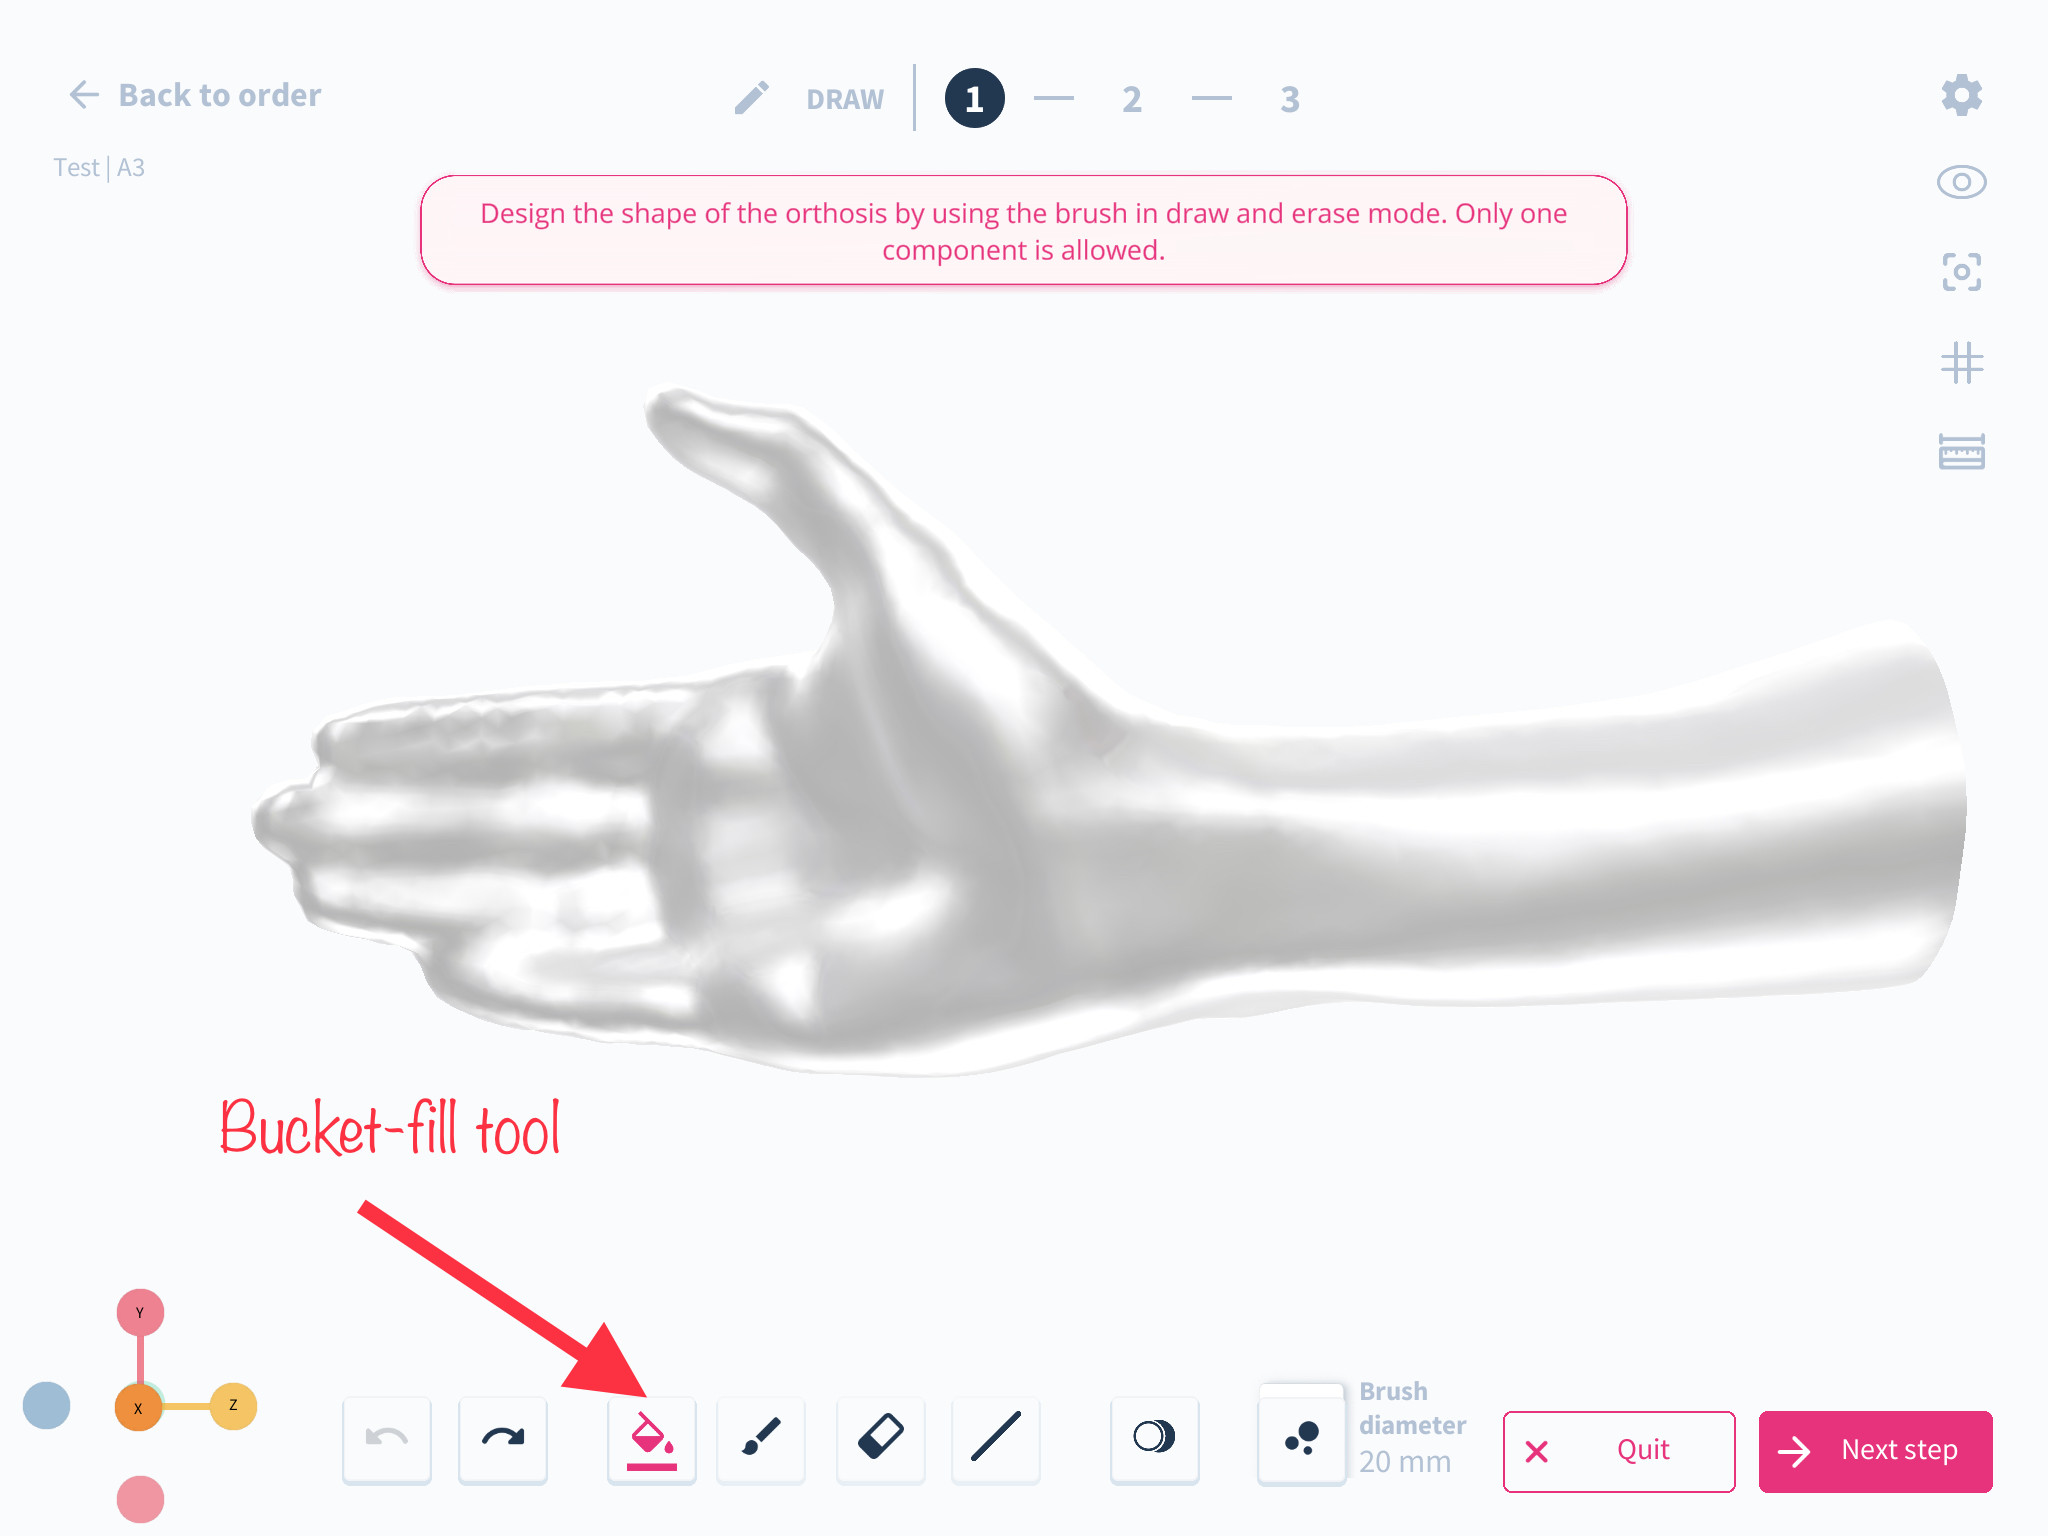
How to use the feature: step by step guide
- On the Spentys app, choose the freeForma modelling tool after you complete your scan correction
- Click the bucket fill tool to select it and click on the area you want filled.
More safety margin for placement rivet holes
What has changed?
The distance for rivet hole placement has been set to 5mm from the border and between holes.
How it affects you
This prevents placement of rivet holes in locations that could impair the quality of the splint.

How to use it?
Ensure rivet holes are placed at least 5mm apart and from any borders.
New: Automatic Photos Taken During Scanning
What we’ve changed
In this update, we have added the ability to take photos automatically during scanning. The photos are taken intelligently based on the movement of the iPad, ensuring that we get coverage from multiple angles while not taking too many.
How it affects you
As a user of our scanning feature, this update will provide you with an added benefit by capturing photos during the scanning process. This will allow you to capture details that may not be visible in the scan itself without having to put in any extra effort. Additionally, the intelligent photo-taking process ensures that the photos are taken efficiently and effectively.
How to use it
Simply update the app to the latest version to take advantage of this feature. When scanning, the app will automatically take photos based on the movement of the iPad. These photos will be saved along with the scan, providing you with additional information and detail to work with.
"Mushroom Pin" closing system renamed to "Pin"
What has changed?
The "Mushroom Pin" closing system has been renamed to "Pin".
How it affects you
This change ensures greater consistency between the app's different languages.
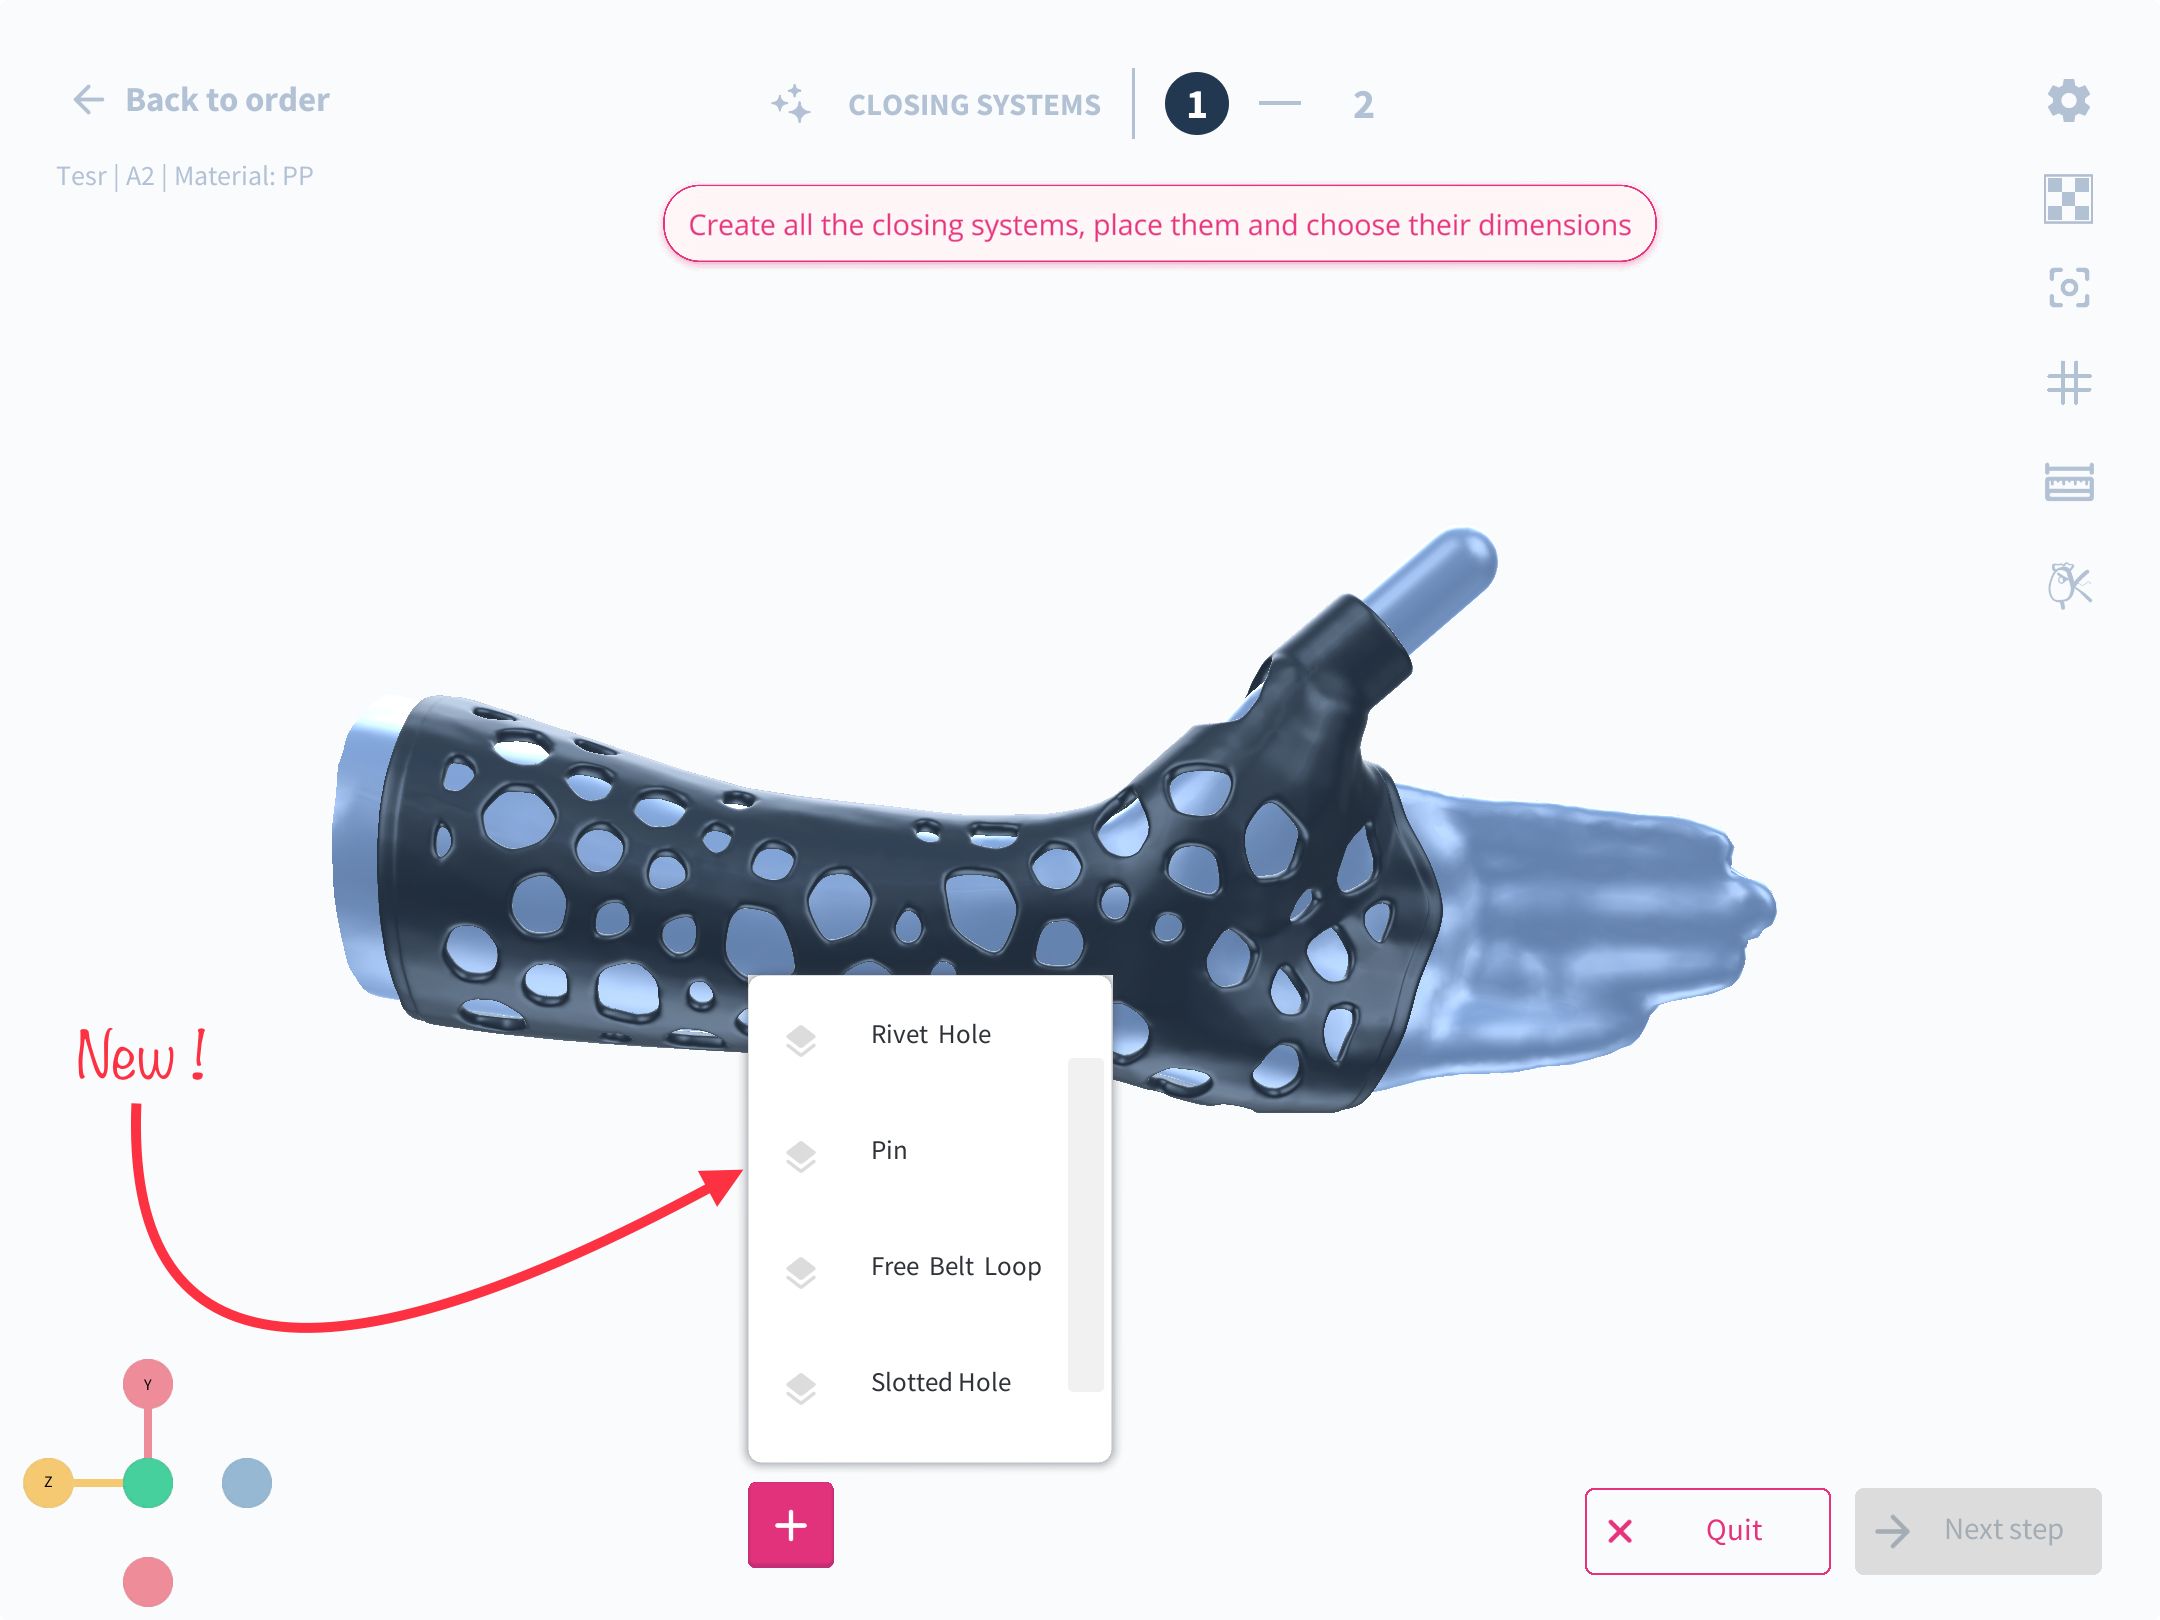
How to use it?
Simply select "Pin" from the list of closing systems as usual.
Introducing Customer Dashboard for Order Statistics
What we’ve changed
In this update, we have introduced a customer dashboard that provides order statistics to our users. The dashboard allows customers to track their order frequency, preferred materials, technologies and products, as well as the distribution of their scan quality.
How it affects you
As a customer of our platform, this update will enable you to gain valuable insights into your ordering patterns and preferences. By tracking your order frequency, preferred materials, technologies and products, and scan quality distribution, you can make more informed decisions about your future orders.

How to use it
To access the customer dashboard, simply log in to your account and click on the stat tab which is the second icon after the home tab. From there, you will be able to view all of the relevant statistics and track your order patterns across scanning, modeling, printing , post printing and delivery and preferences over time. This information can be used to improve your overall ordering experience and make data-driven decisions about future orders.
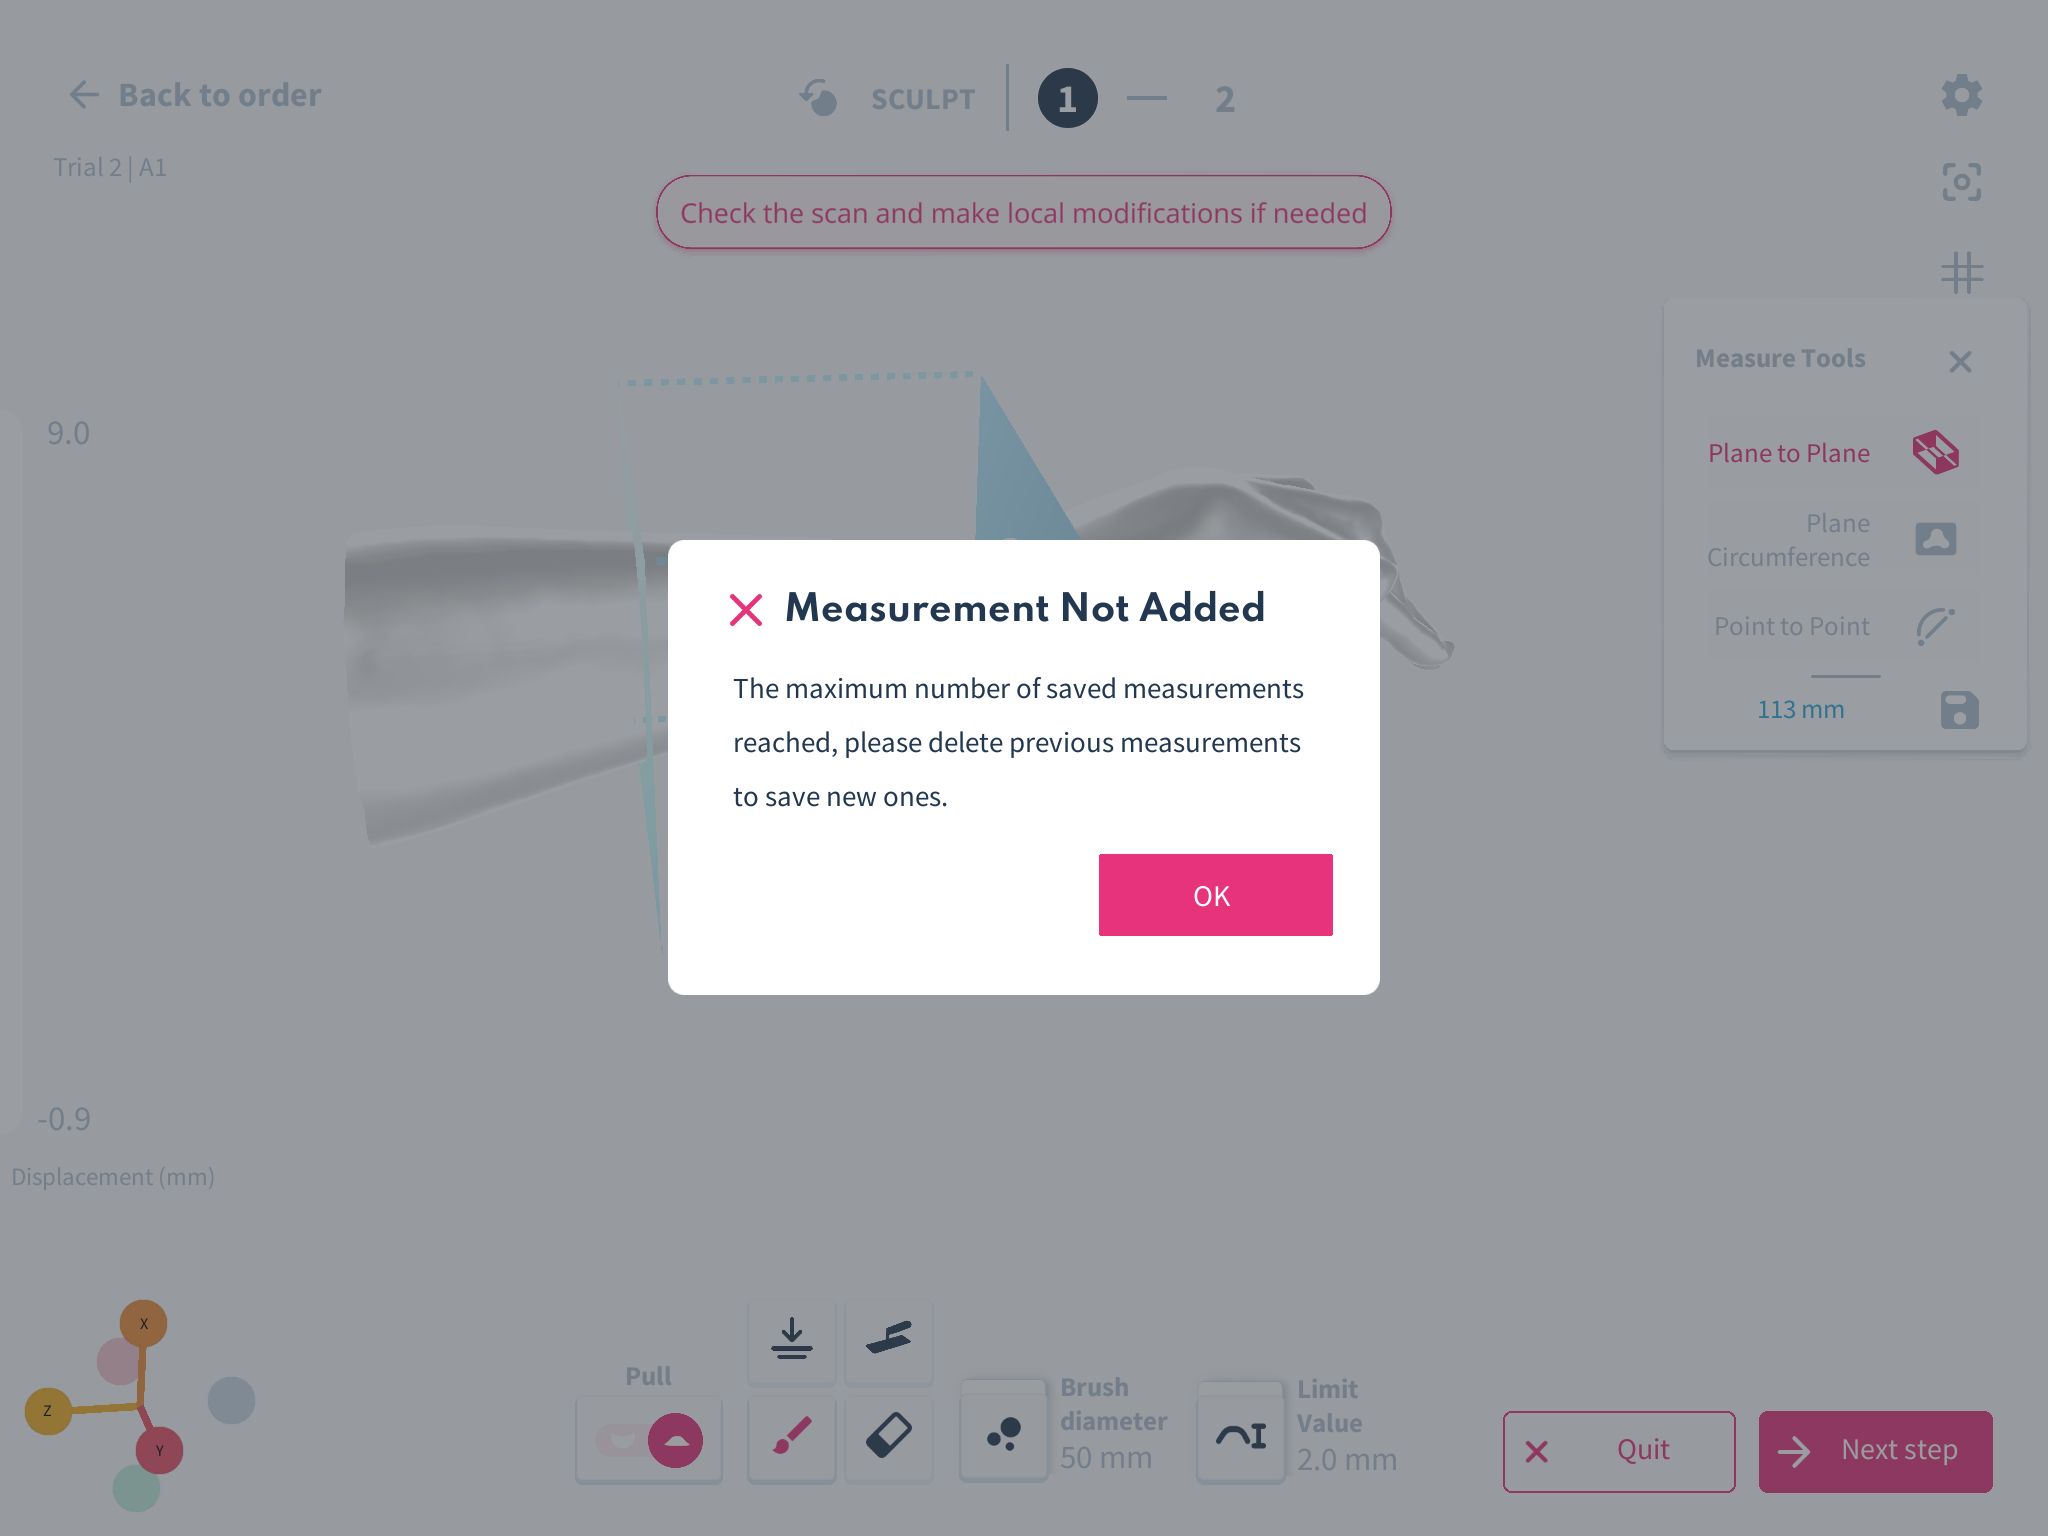
New Feature: Keep track of scan measurements by saving them
The measurement tool is essential to ensure a perfect fit. In order to verify the actual length of the limb with the scan and keep tabs on the changes made during sculpting. This tool is an extended verification that shape capturing with scanners have a higher degree of accuracy than tradition cast taking.
Clinicians who want to ensure accurate and consistent results throughout their workflow will find this very useful.
- The measurement tool can be used to take up to 10 individual measurements of your scan.
- Appropriate to take plane to plane, plane circumference and point to point measurements across the scan
- Measurements can be saved and viewed throughout the the modification and design process
.jpeg)
How do you use this feature? Step-by-step guide
- Open the Spentys app and create a new order
- Fill in the patient details
- select the orthosis and limb segment
- Take your scan and advance to the next step
- Clean up the scan
- The measurement tool becomes visible at the top right of he screen as the last icon(ruler)
- Click on the measurement tool to reveal a lists of measurement
- Select the preferred measurement and click on the save icon once done
- A pop screen with a default measurement name, ffeel free to change or proceed to save with default name
- List of saved measurements can be seen at the measurement tool as long as you have take and saved a measurement
Material Option Changes (PA11 replaced with PA12)
What Has Changed:
PA11 is no longer available; PA12 is now the material option for products requiring a MJF material.
How It Affects You:
This change ensures access to superior materials, improving the durability and finish of your products.
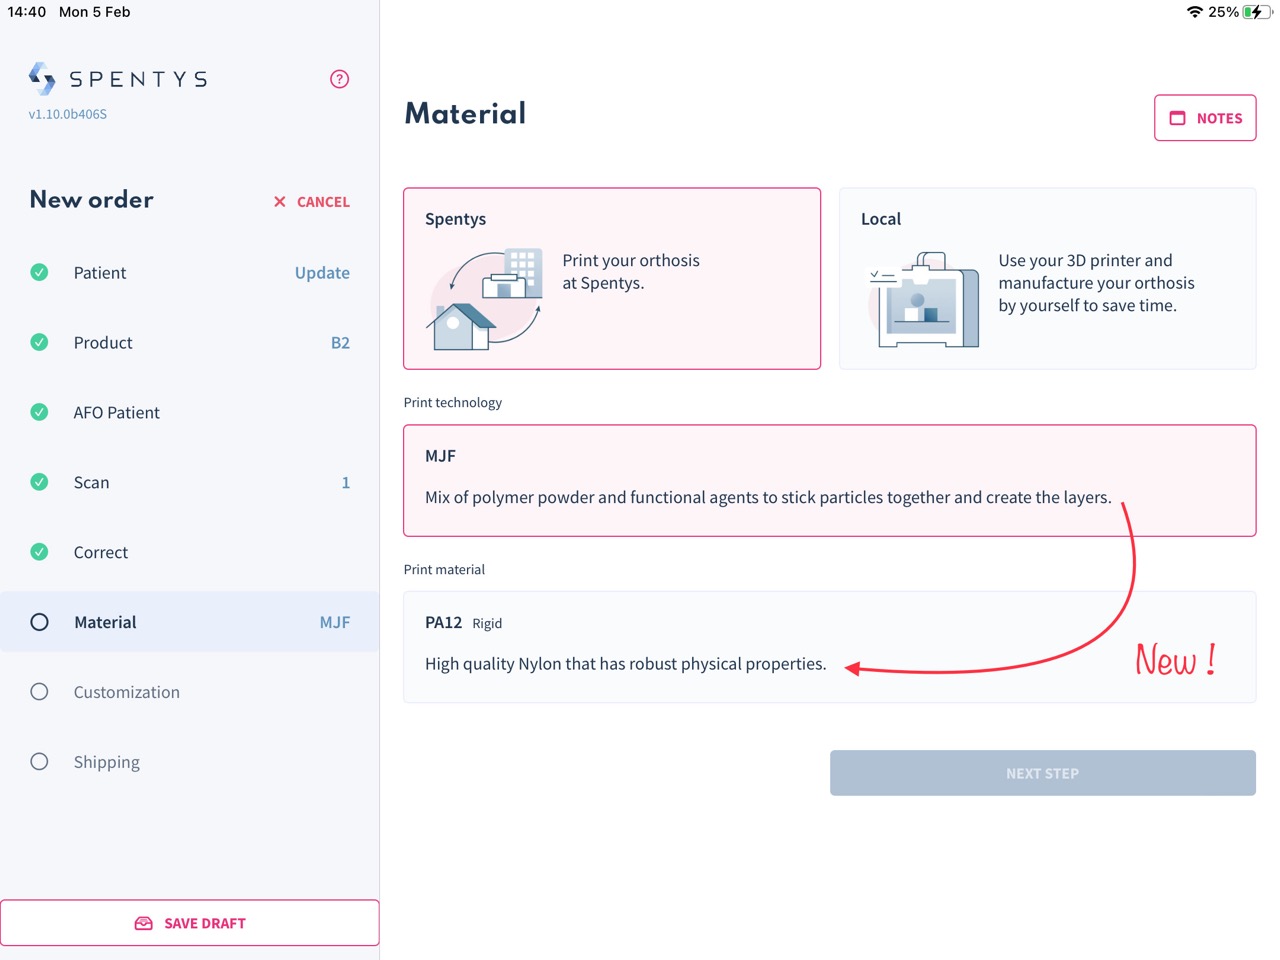
How to Use It:
No action is needed from your side. The material selection will be visible for applicable products in your design process.
Introducing the "Line tool" in Freeforma
The line tool has been introduced to enhance free-hand sketching within Freeforma. Now, you can achieve straight lines with clean edges on your scan.
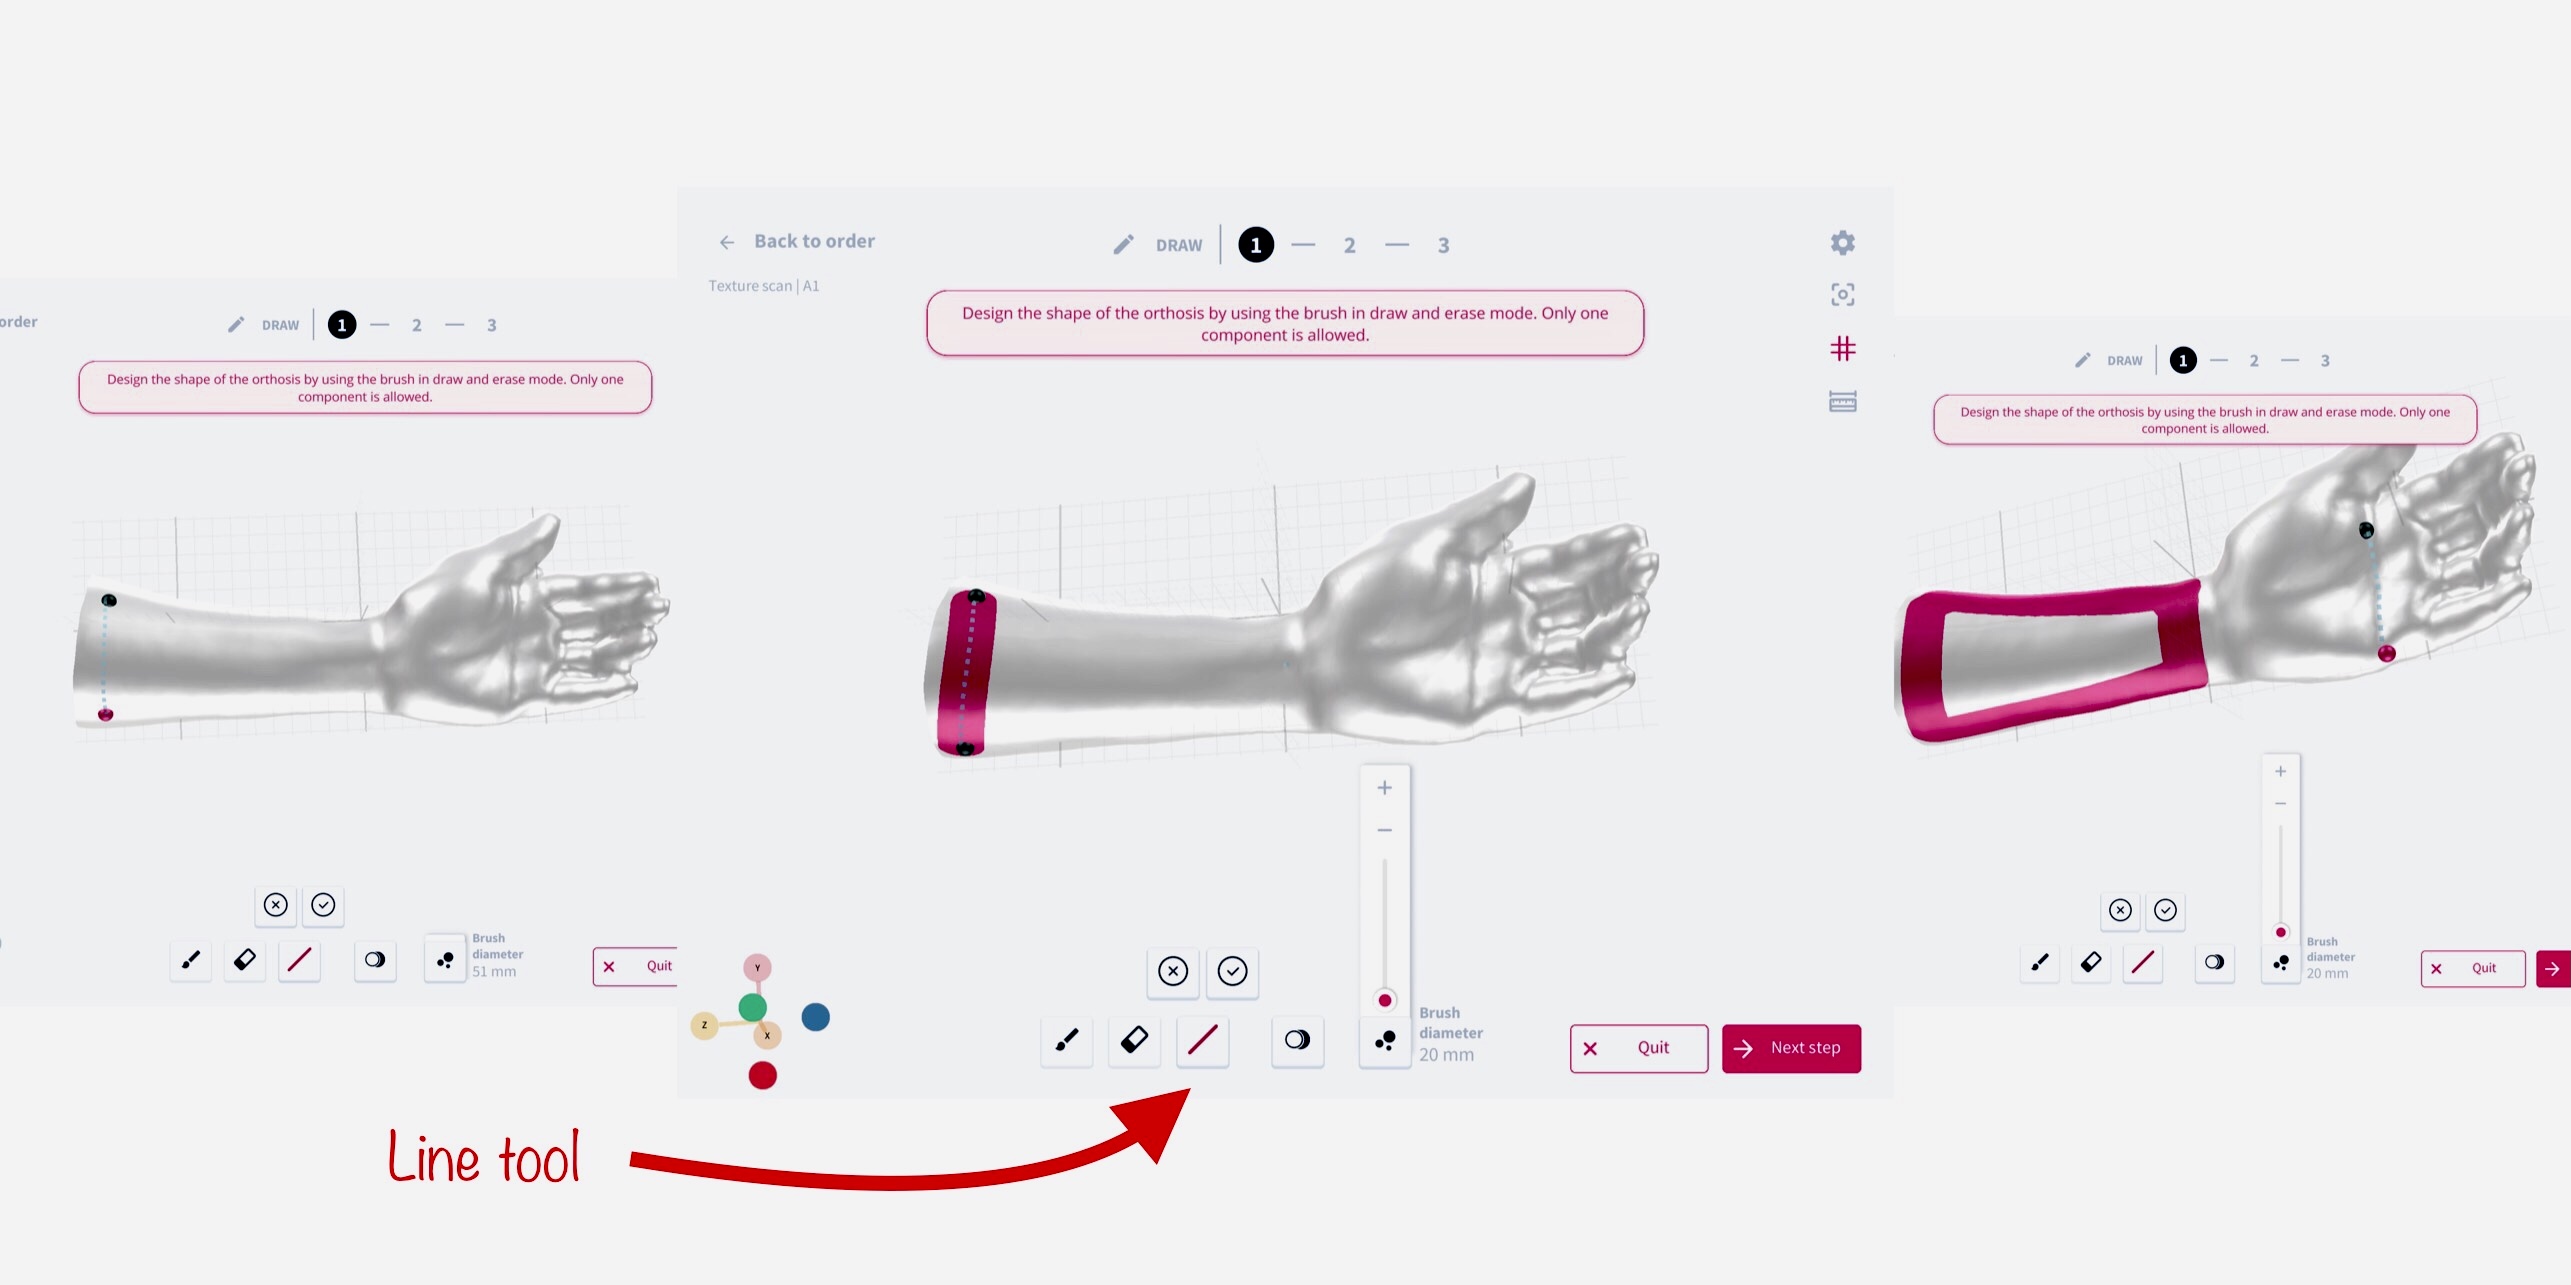
How do you use this feature? Step-by-step guide
- Once you have exported your corrected scan and chosen your preferred method of printing and material, launch the freeforma modelling tool.
- A list of tools will be displayed below the corrected scan.
- Select the line tool option and pick a start point on your scan and click the check mark to confirm. Then select another point on the scan and click the check mark, and a straight line will be created.
- To adjust the width of the line, toggle the brush size slider.
- To erase unwanted lines, use the eraser tool.
Logo Engraver
What has changed:
The capability to engrave logos or drawings directly onto prints has been introduced, streamlining the process and offering more customization options.
How it affects you:
This feature enables the personalization of prints with logos or specific designs, enhancing brand visibility or adding unique identifiers to your products.

How to use it:
Utilize the logo generation and engraving steps in the design process to input your desired logo or drawing. This solution is fast, replicable, and driven by parameters, ensuring consistency and quality across prints.
Updated UI: Link from iOS app to web platform
With our improved web platform responsiveness on your iPad, we have included a web button on the iOS app that links you to the main menu of your order management dashboard.

Limit push/pull at the sculpt level set to 15mm
What has changed?
The maximum limit for adding/removing material has been set to 15mm.
How it affects you
This allows for more precise adjustments when sculpting.
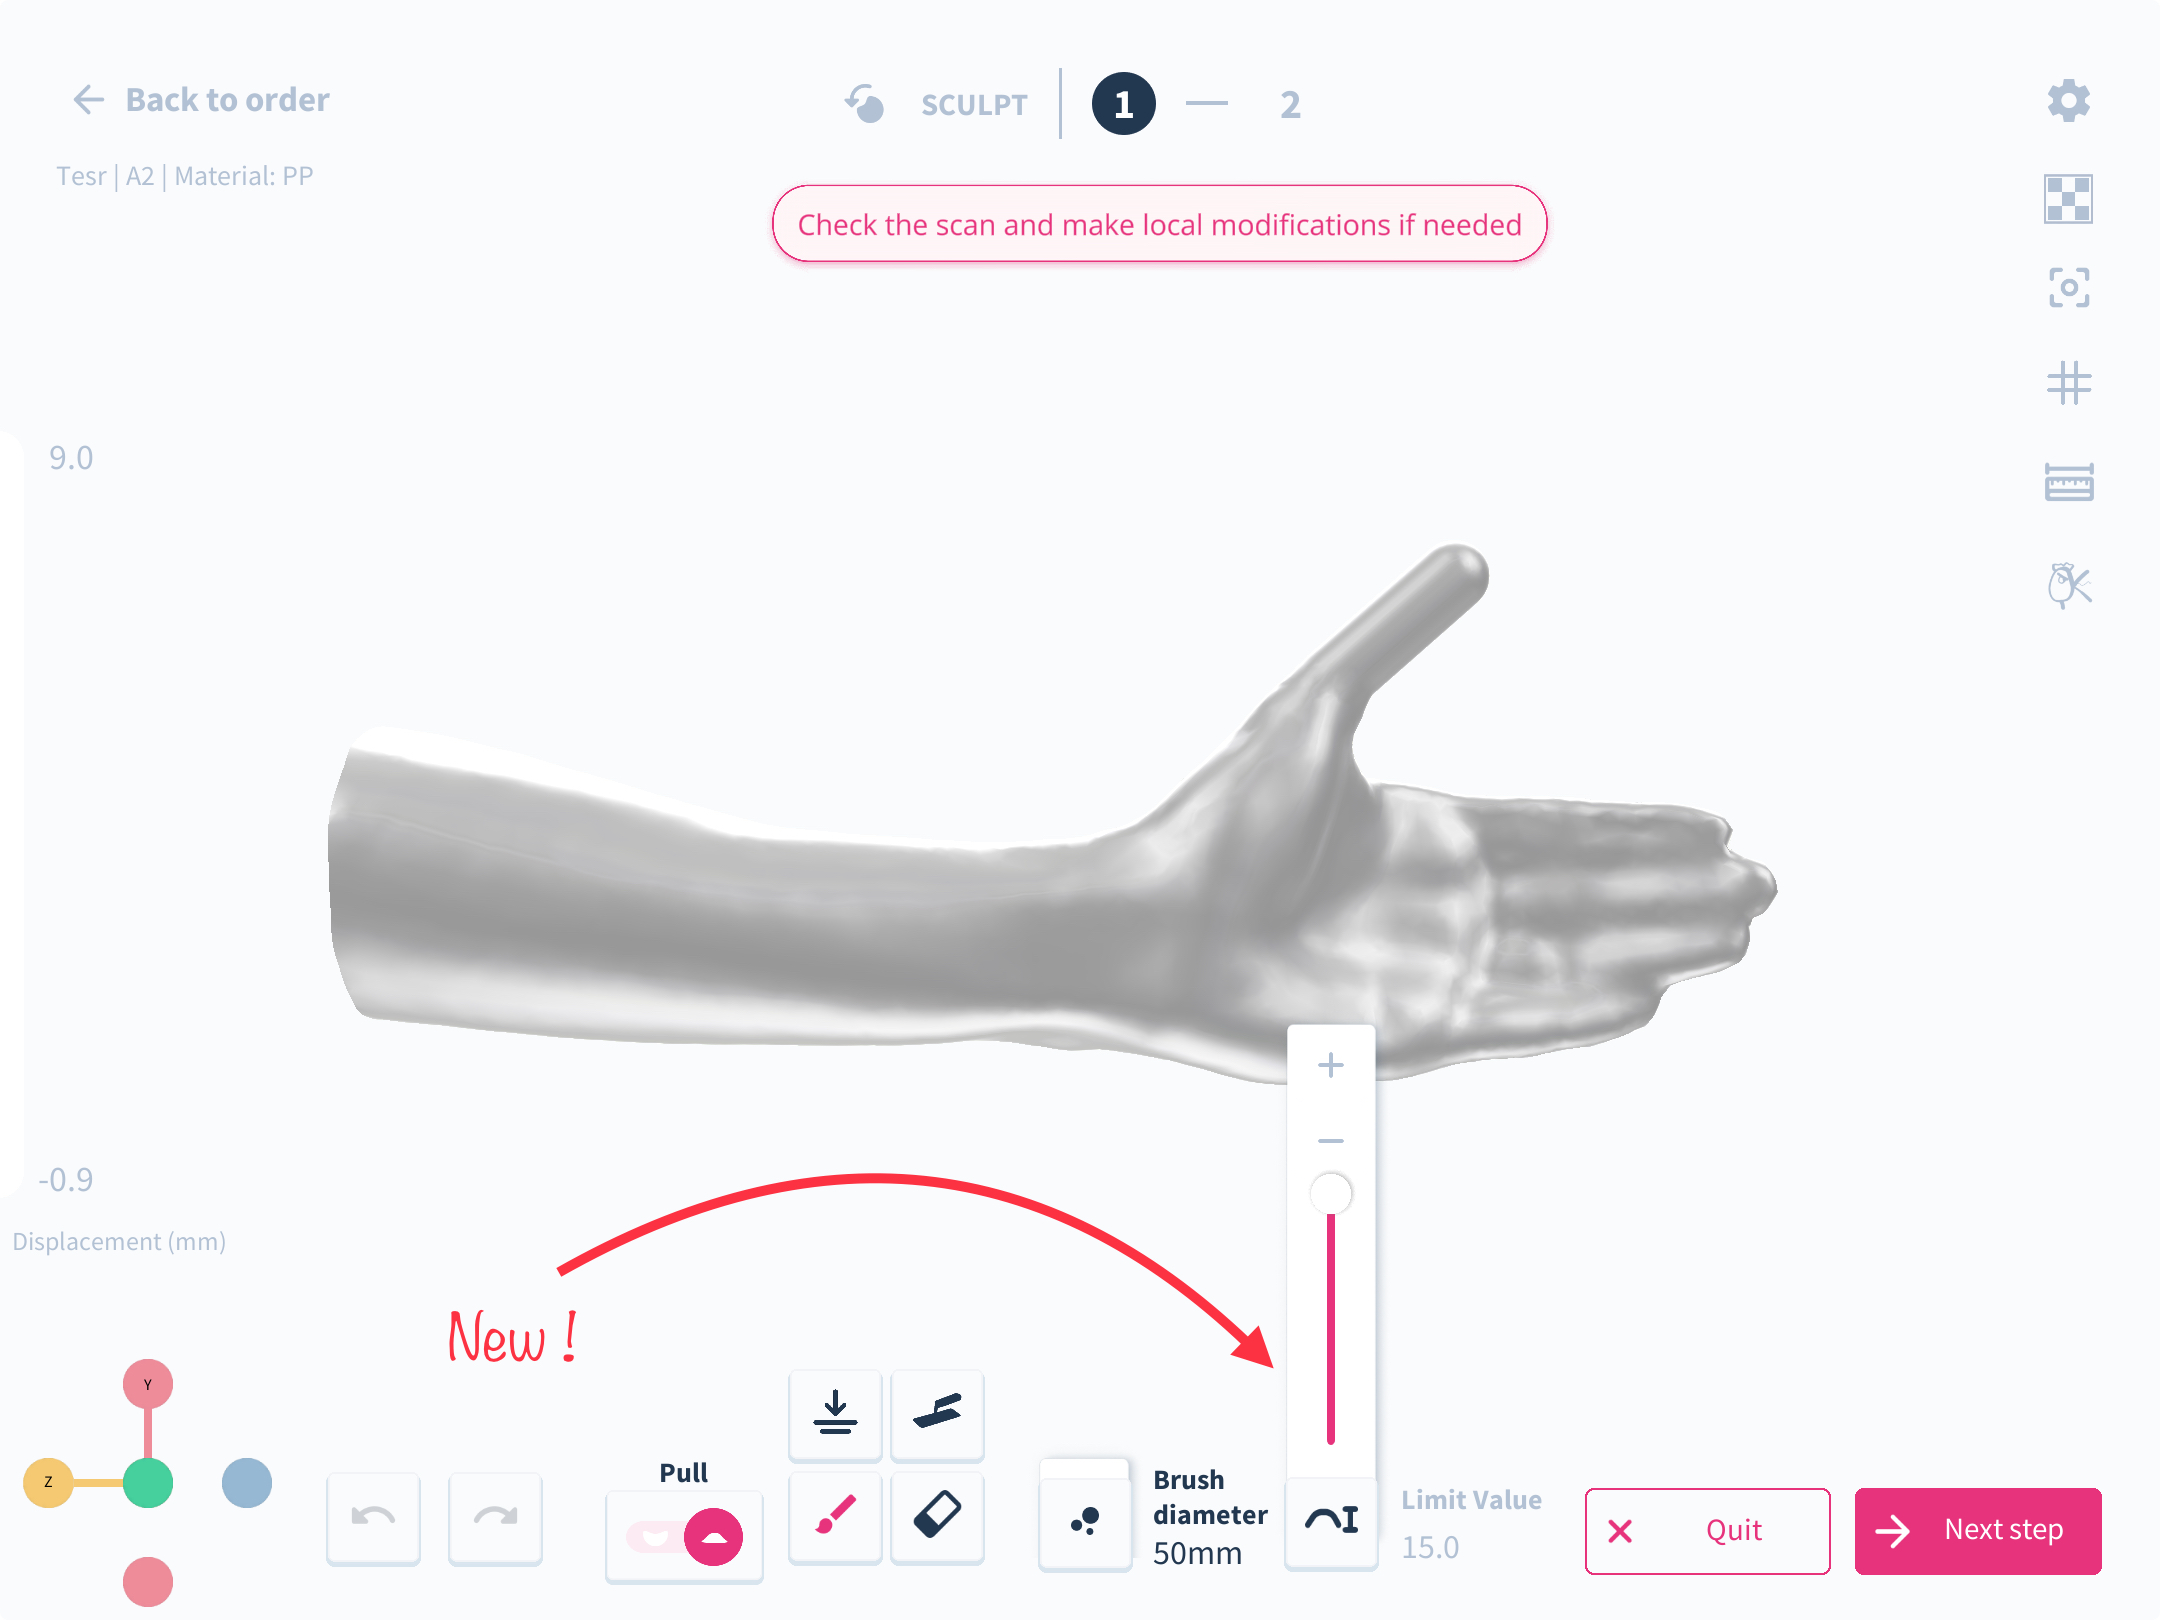
How to use it?Use the slider to add or remove material, up to a 15mm limit.
Introducing the "Levelling tool" for Scan Correction
The levelling tool is used to even out the surface of the model between two points by estimating the average surface height of the selected area on the model. It brings the lowest geometry within the area of the brush up which fills any crevice on the scanned model to the average height of the surface thus creating a more even horizontal surface. It doesn’t dig in nor reduce the model at selected region.
.jpeg)
How do you use this feature? Step-by-step guide
- In the sculpt step, the levelling tool is right beside the flatten tool at the bottom of the screen
- Once selected, you can adjust the size of the brush.
- The red areas signify an increase of 1 mm and decreases as the area shows varied shades of orange.
Improved Arm Advanced Pose
What has changed: We have incorporated a new weight computation mechanism in the Arm Advanced Pose feature, which is specifically tailored to enhance the reliability of pose deformations, with particular emphasis on wrist movements.
How it affects you: This enhancement results in a considerable improvement in the quality of the arm poses, rendering them more lifelike. This is especially notable in the depiction of wrist movements, where the realism is significantly augmented.
How to use it: When utilizing the Arm Advanced Pose feature, the new weight computation is automatically applied. This ensures the poses, particularly of the wrist, are rendered with heightened realism and quality. Simply continue to use the Arm Advanced Pose as you normally would, and benefit from the improved accuracy.

Integrated Closing System for H1/2, W1-4, and A1-4 Using MJF/TPU
What has changed:
A new integrated closing system option has been introduced for H1/2, W1-4, and A1-4 prints that use MJF/TPU materials, offering enhanced design flexibility and functionality.
How it affects you:
This addition allows for a more seamless and secure closure mechanism on these specific product models, improving the overall fit and comfort for the end-user. It's particularly beneficial for creating customized orthotic and prosthetic devices that require precise closure systems for optimal performance.
How to use it:
This feature is only available if you choose the option "Spentys designer". When choosing H1/2, W1-4, and A1-4 models, you'll find an option to select the integrated closing system in the design interface. Choose this option to implement the system into your design
Introducing a social sharing feature
The social share function is now available on the web platform to enable sharing of demos models you worked on with the Spentys app with colleagues.

Increase max Beltloop length to 55mm
What has changed?
The maximum length for Beltloops has been increased to 55mm.
How it affects you
You can now create longer Beltloops for better customization.
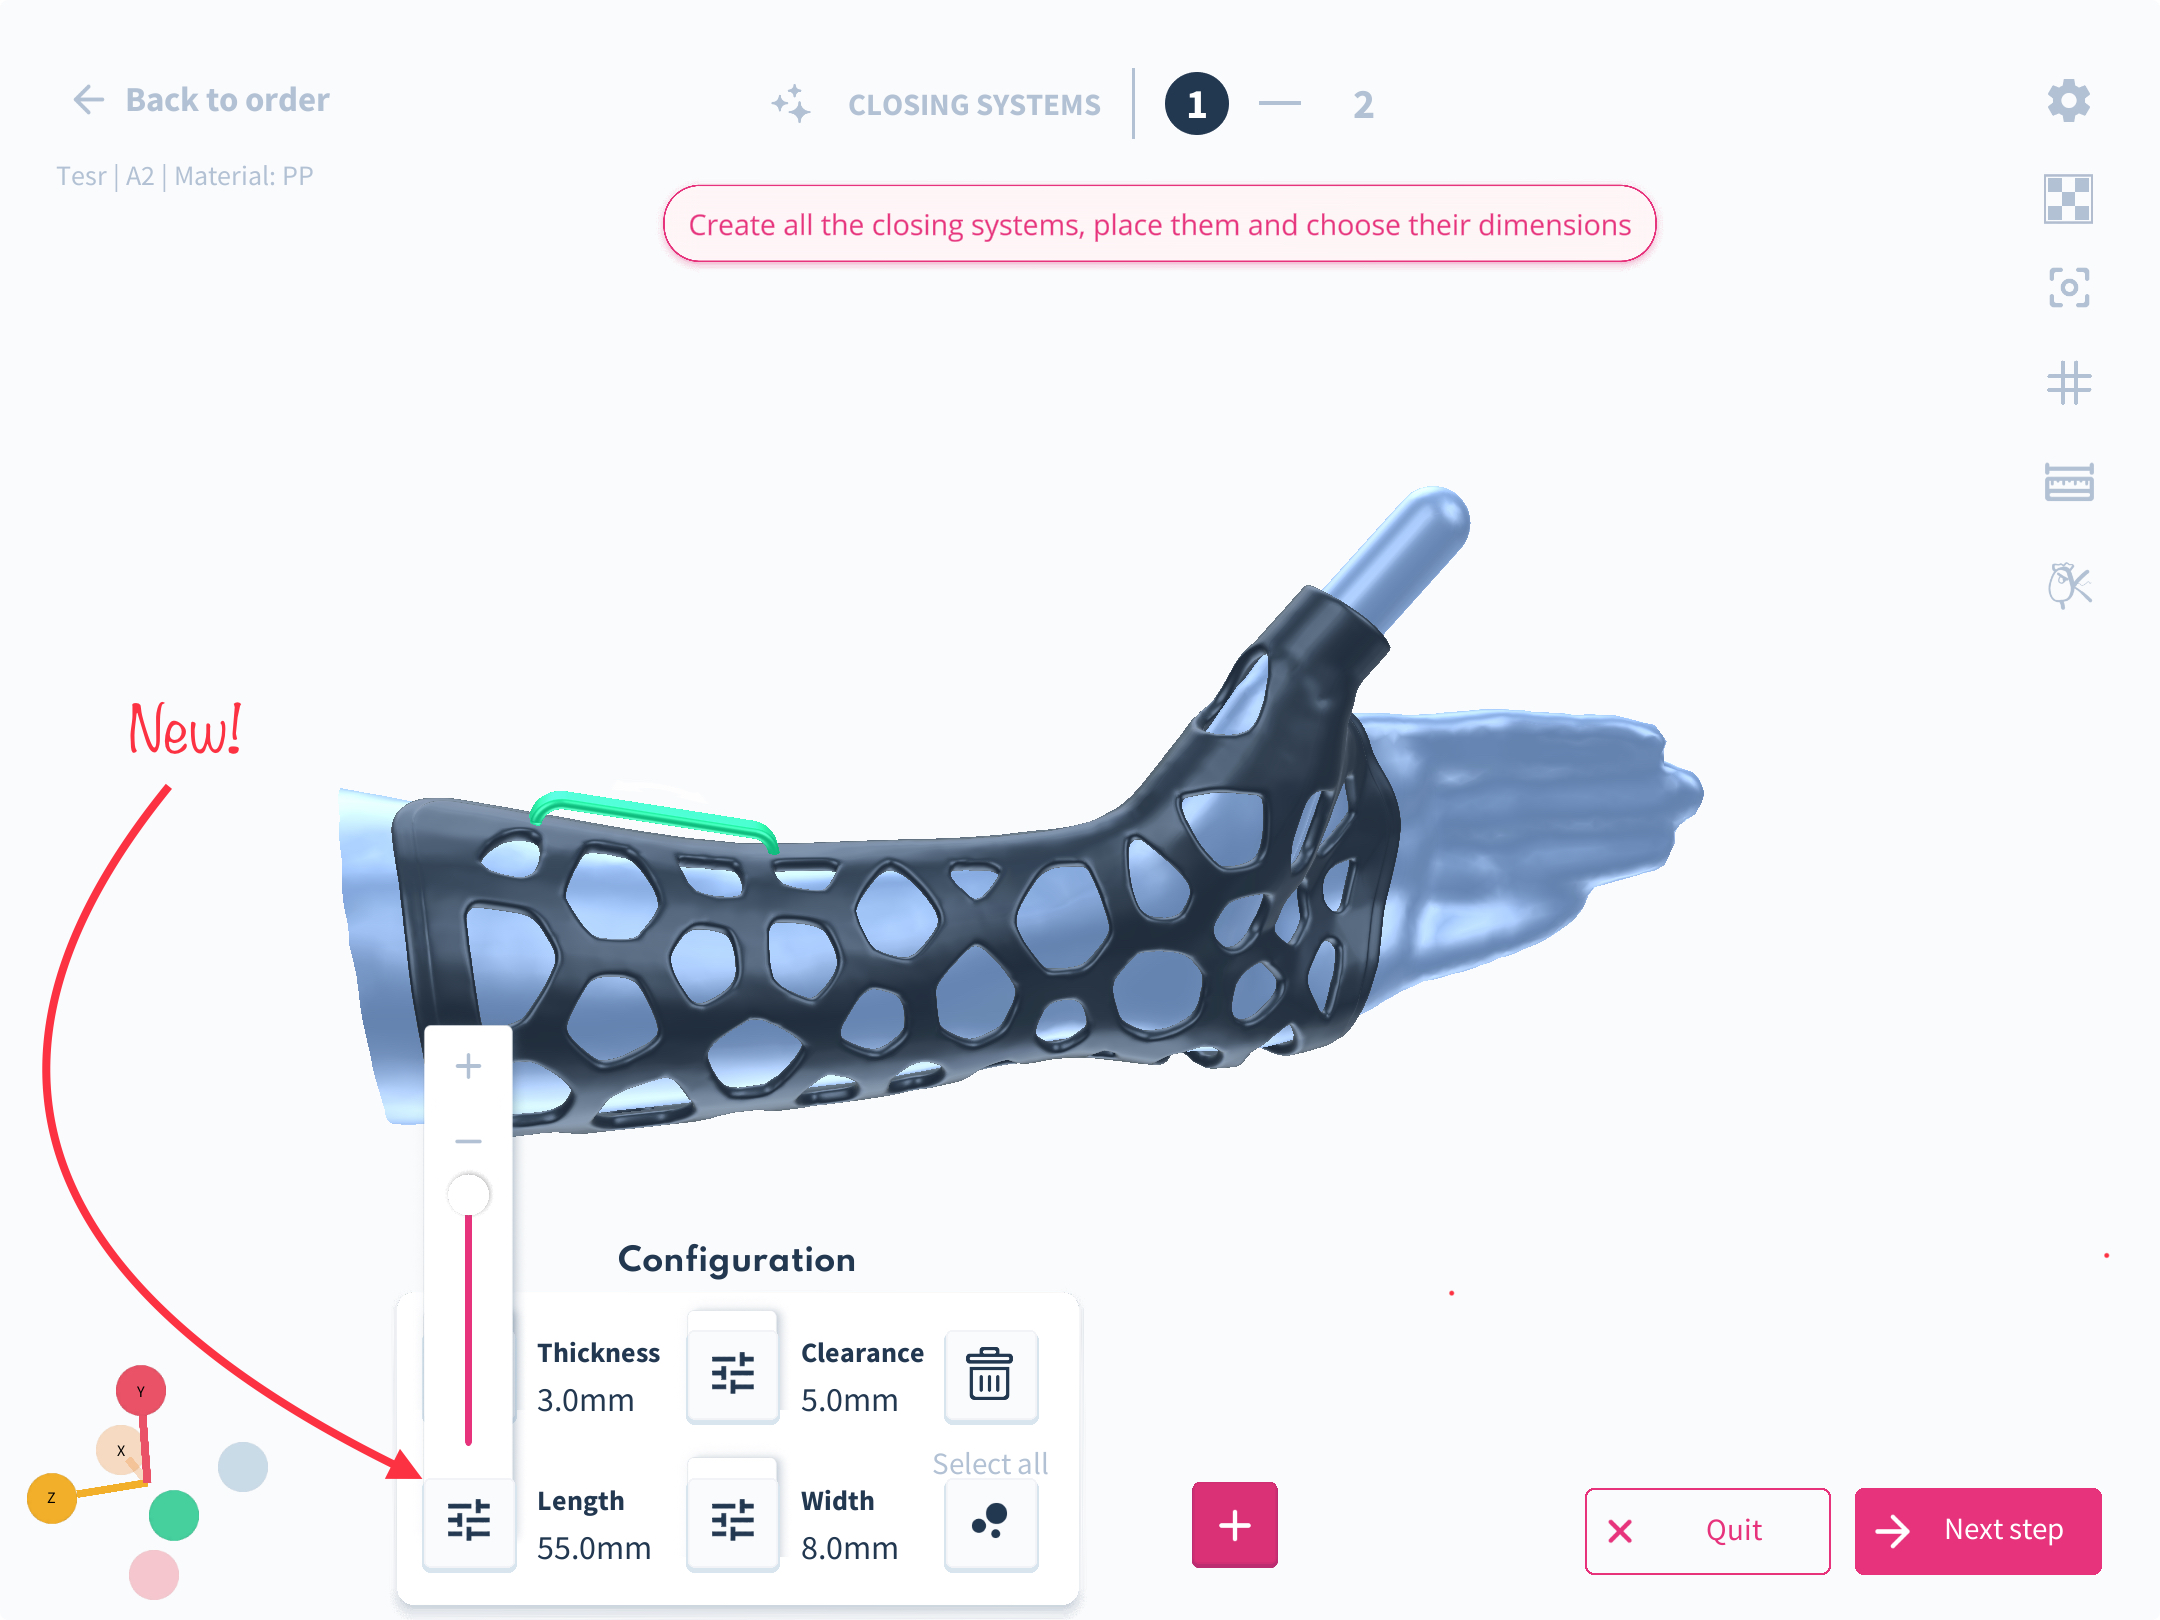
How to use it?
Modify the length of the Beltloop using the "length" slider.
Introducing Adjustable controls for the thumbs' shape placement for A2, H4, H2, and W models
We have added controls for our A2, A4, H2, and W models toallow you to select the area on the orthosis you would like the thumb part tobe placed and easily adjusted. Now you have controls for stretching up and downthe limits of the splint on the thumb in AutoForma with a new feature called "Detailedcontrols."
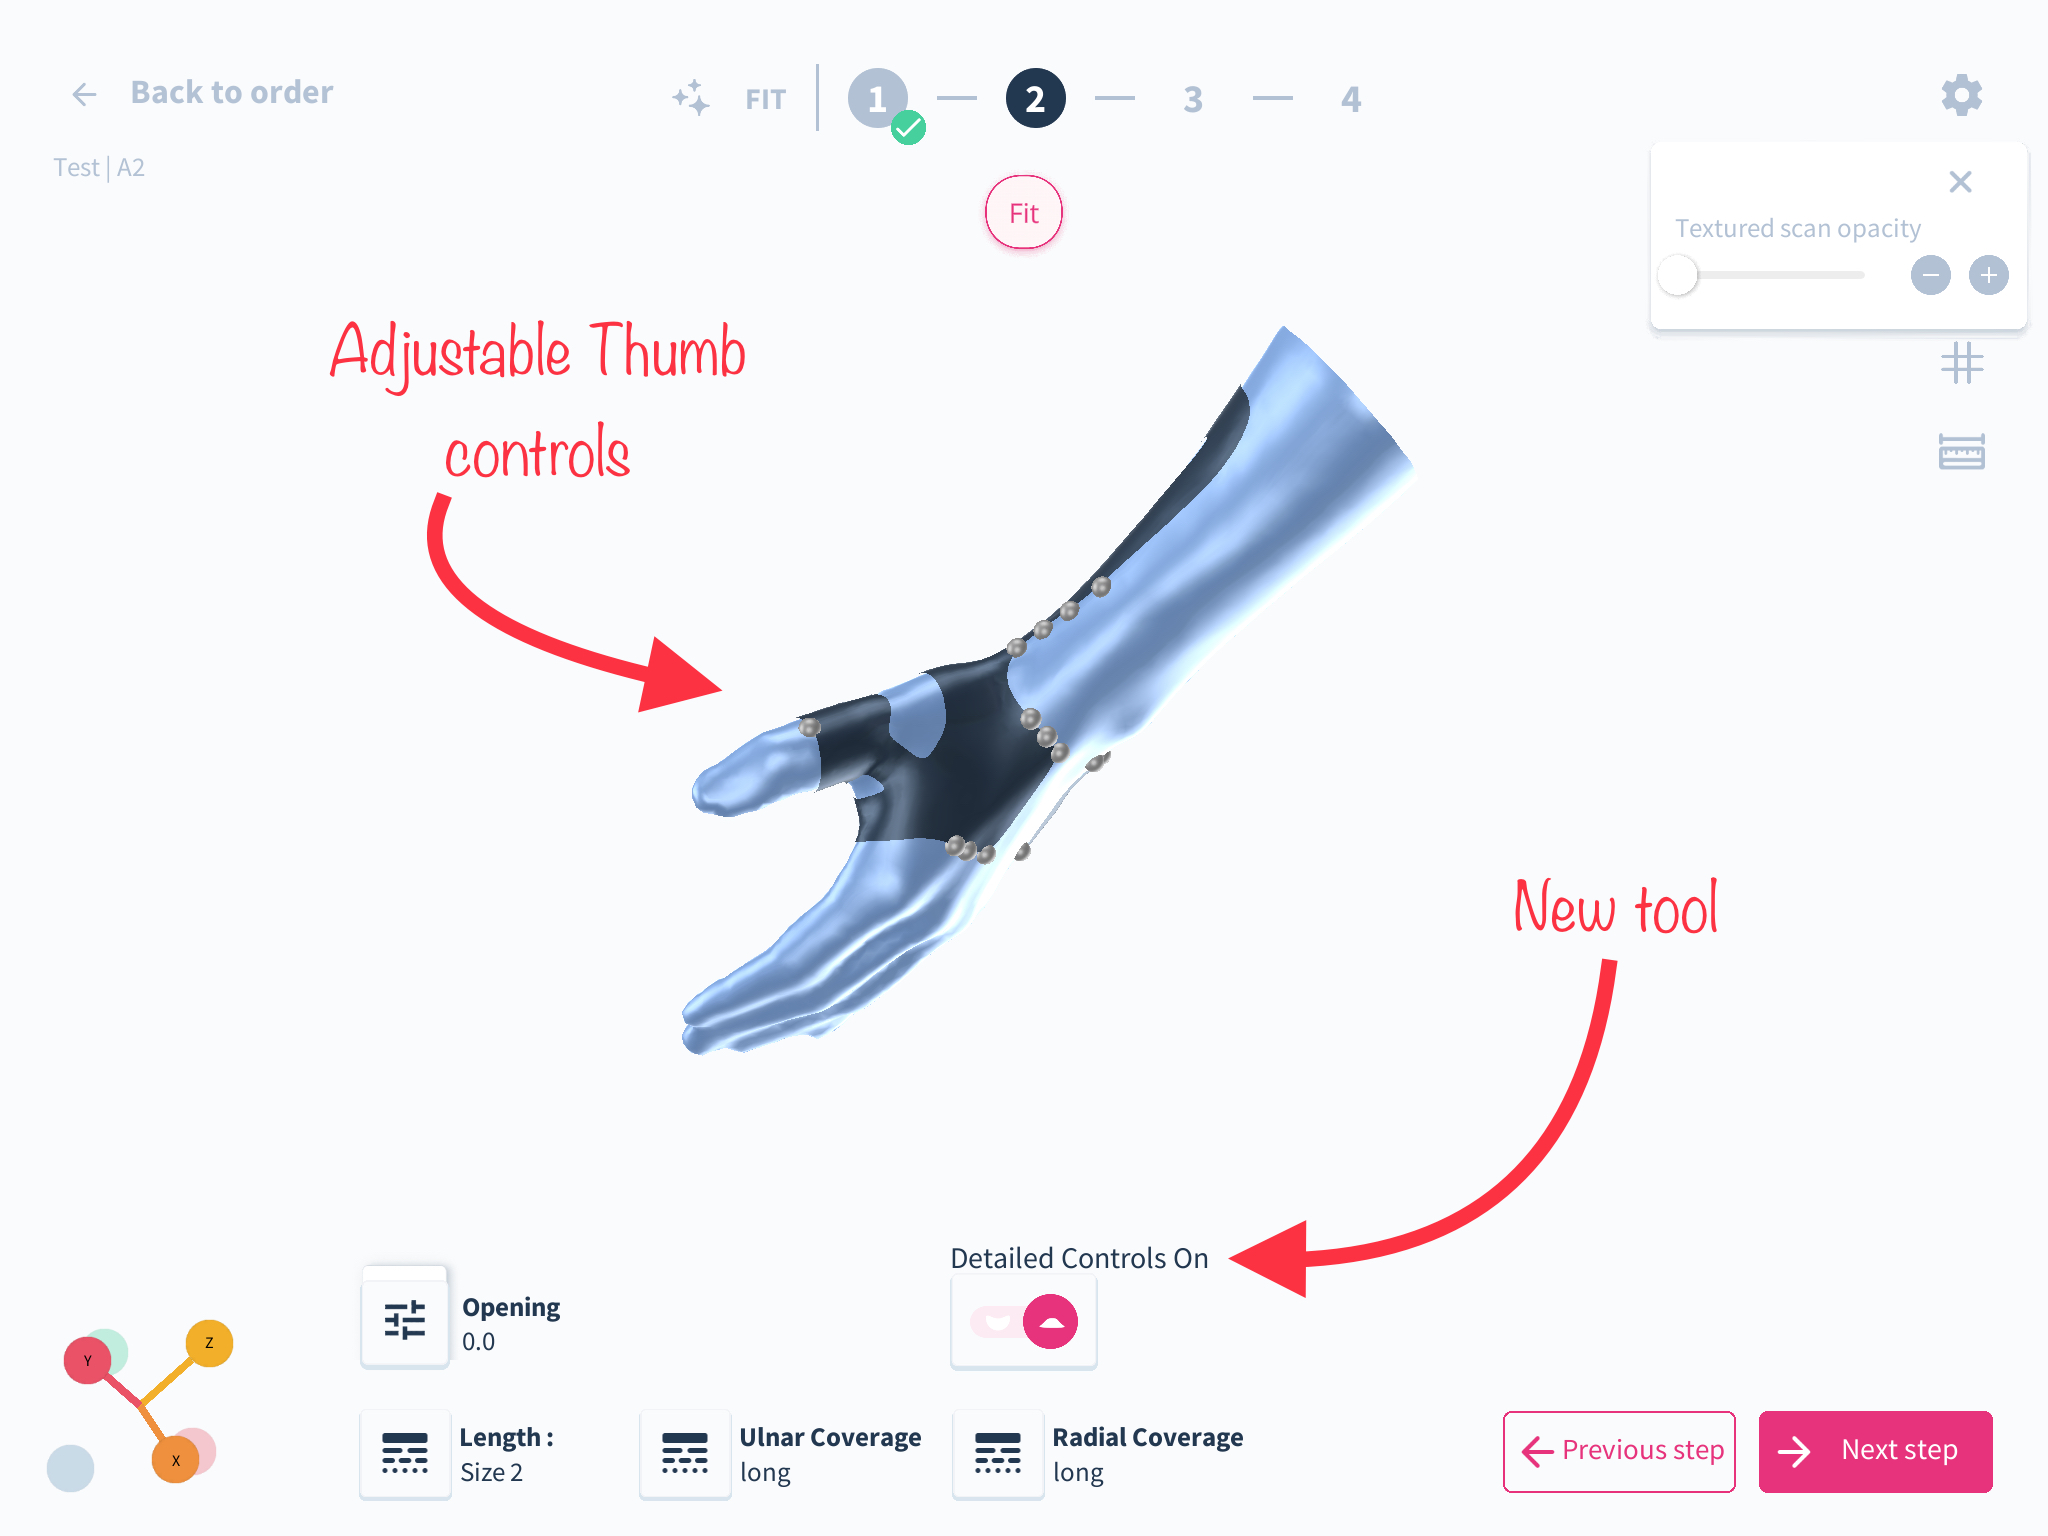
How do youuse this feature? Step-by-step guide
1. The thumb must be selected as part ofthe limb you want to immobilize
2. Select any of the A2, H4, H2, and Wmodels
3. Once you have imported/scanned the selectedlimb and done the necessary correction, launch AutoForma.
4. Within Autoforma, assign the landmarksand allow the software to generate splint
5. Turn on detailed controls and adjust thedesired area of the thumb.
Improved Viewing Experience for Large 3D Models
What we’ve changed
In our latest update, we have improved the viewing experience of large 3D models on our platform. Previously, big 3D files took a long time to download and dragged down the performance of the platform. However, with this new update, we have optimised the models, resulting in faster download times and more efficient display in the browser.
How it affects you
This update will significantly enhance your viewing experience, especially when it comes to large 3D models. You will now be able to access and view these models in a faster and more efficient manner. This will result in a smoother and more seamless experience, regardless of the device you are using.
How to use it
There is no action required on your part to use this new update. Simply access the platform as you normally would, and the improved viewing experience will be automatically implemented. You can now browse and view large 3D models with greater ease, saving time and improving productivity.
New Update: Improved Chat UI
We've recently improved our chat feature to provide a better user experience. We've redesigned the UI to make it more user-friendly and addressed previous bugs. Additionally, we now offer two versions of the chat: one for customers and one for admins, with extra features exclusive to the admin version. We've also added the ability to attach files and images, view thumbnails, and see a list of participants in the chat. Copy-pasting images into the chat is also now possible.
Improved mobile responsiveness of the Spentys web platform for you and your team.
Here's what has been improved for you.
- Responsive websites reduce the loading time for your pages. This provides a better user experience for the user.
- View and engage with the Spentys platform content easier on mobile devices
Expanded Scan Import Options to Include .STL and .PLY Formats
What we’ve changed
In our latest update, we have expanded our scan import options to include .STL and .PLY formats, in addition to .OBJ. This change will save users the trouble of converting these files to .OBJ, as well as avoiding potential issues that can arise during the conversion process.
How it affects you
As a user of our platform, this update will make it easier for you to import scans into the system. You will no longer need to worry about converting files to .OBJ or encountering issues during the conversion process. This will save you time and effort, allowing you to focus on other aspects of your work.
To import scans in .STL and .PLY formats, simply select "import" as you usually would on your iPad. You will now be able to import your scan directly in its original format, without the need for any additional conversions. This streamlined process will make it easier for you to get your scans into the Spentys app and start working with them right away.
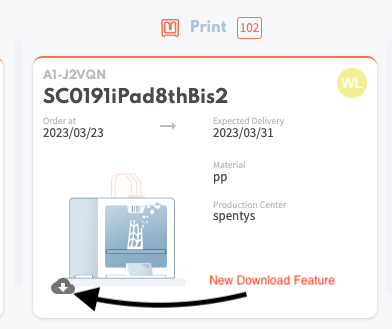
Download 3D files directly from your kanban board
What we’ve changed
In our latest update, we have made it possible for users to download the latest modelling files for an order directly from the Kanban board. This improvement eliminates the need for users to navigate into the order's details to access the files, streamlining the workflow for Forma users who print themselves.
How it affects you
As a Forma user who prints themselves, this update will significantly enhance your workflow. You will no longer need to navigate through multiple pages to access the latest modelling files for an order. Instead, you can now simply download the files directly from the Kanban board, making the process more efficient and less time-consuming.
How to use it
To download the latest modelling files for an order, simply navigate to the Kanban board and click on the order. From there, you will be able to download the files directly without having to navigate into the order's details. This streamlined process will save you time and effort, allowing you to focus on the task at hand.
Grid Activation Across Levels
What has changed: We've introduced a button to enable/disable the background grid at every level.
How it affects you: You now have more control over the interface, with the ability to enable or disable the grid at your convenience in any level.
How to use it: Simply click the button to toggle the grid on or off at any level.
Free Beltloop Feature
What has changed:
The introduction of configurable beltloops that users can add anywhere on the AutoForma or FreeForma model.
How it affects you:
Provides the flexibility to enhance the functionality and wearability of designs by adding beltloops precisely where needed.

How to use it:
Within the AutoForma or FreeForma model design interface, select the option to add beltloops, and then choose their preferred locations and configurations to customize the model to your or your client's requirements.
Introducing the "Flatten tool" for Scan Correction
This tool is used to raise the geometry of the surrounding area around where it has been clicked to create a flat surface. Thus it adds on material without digging into the model.
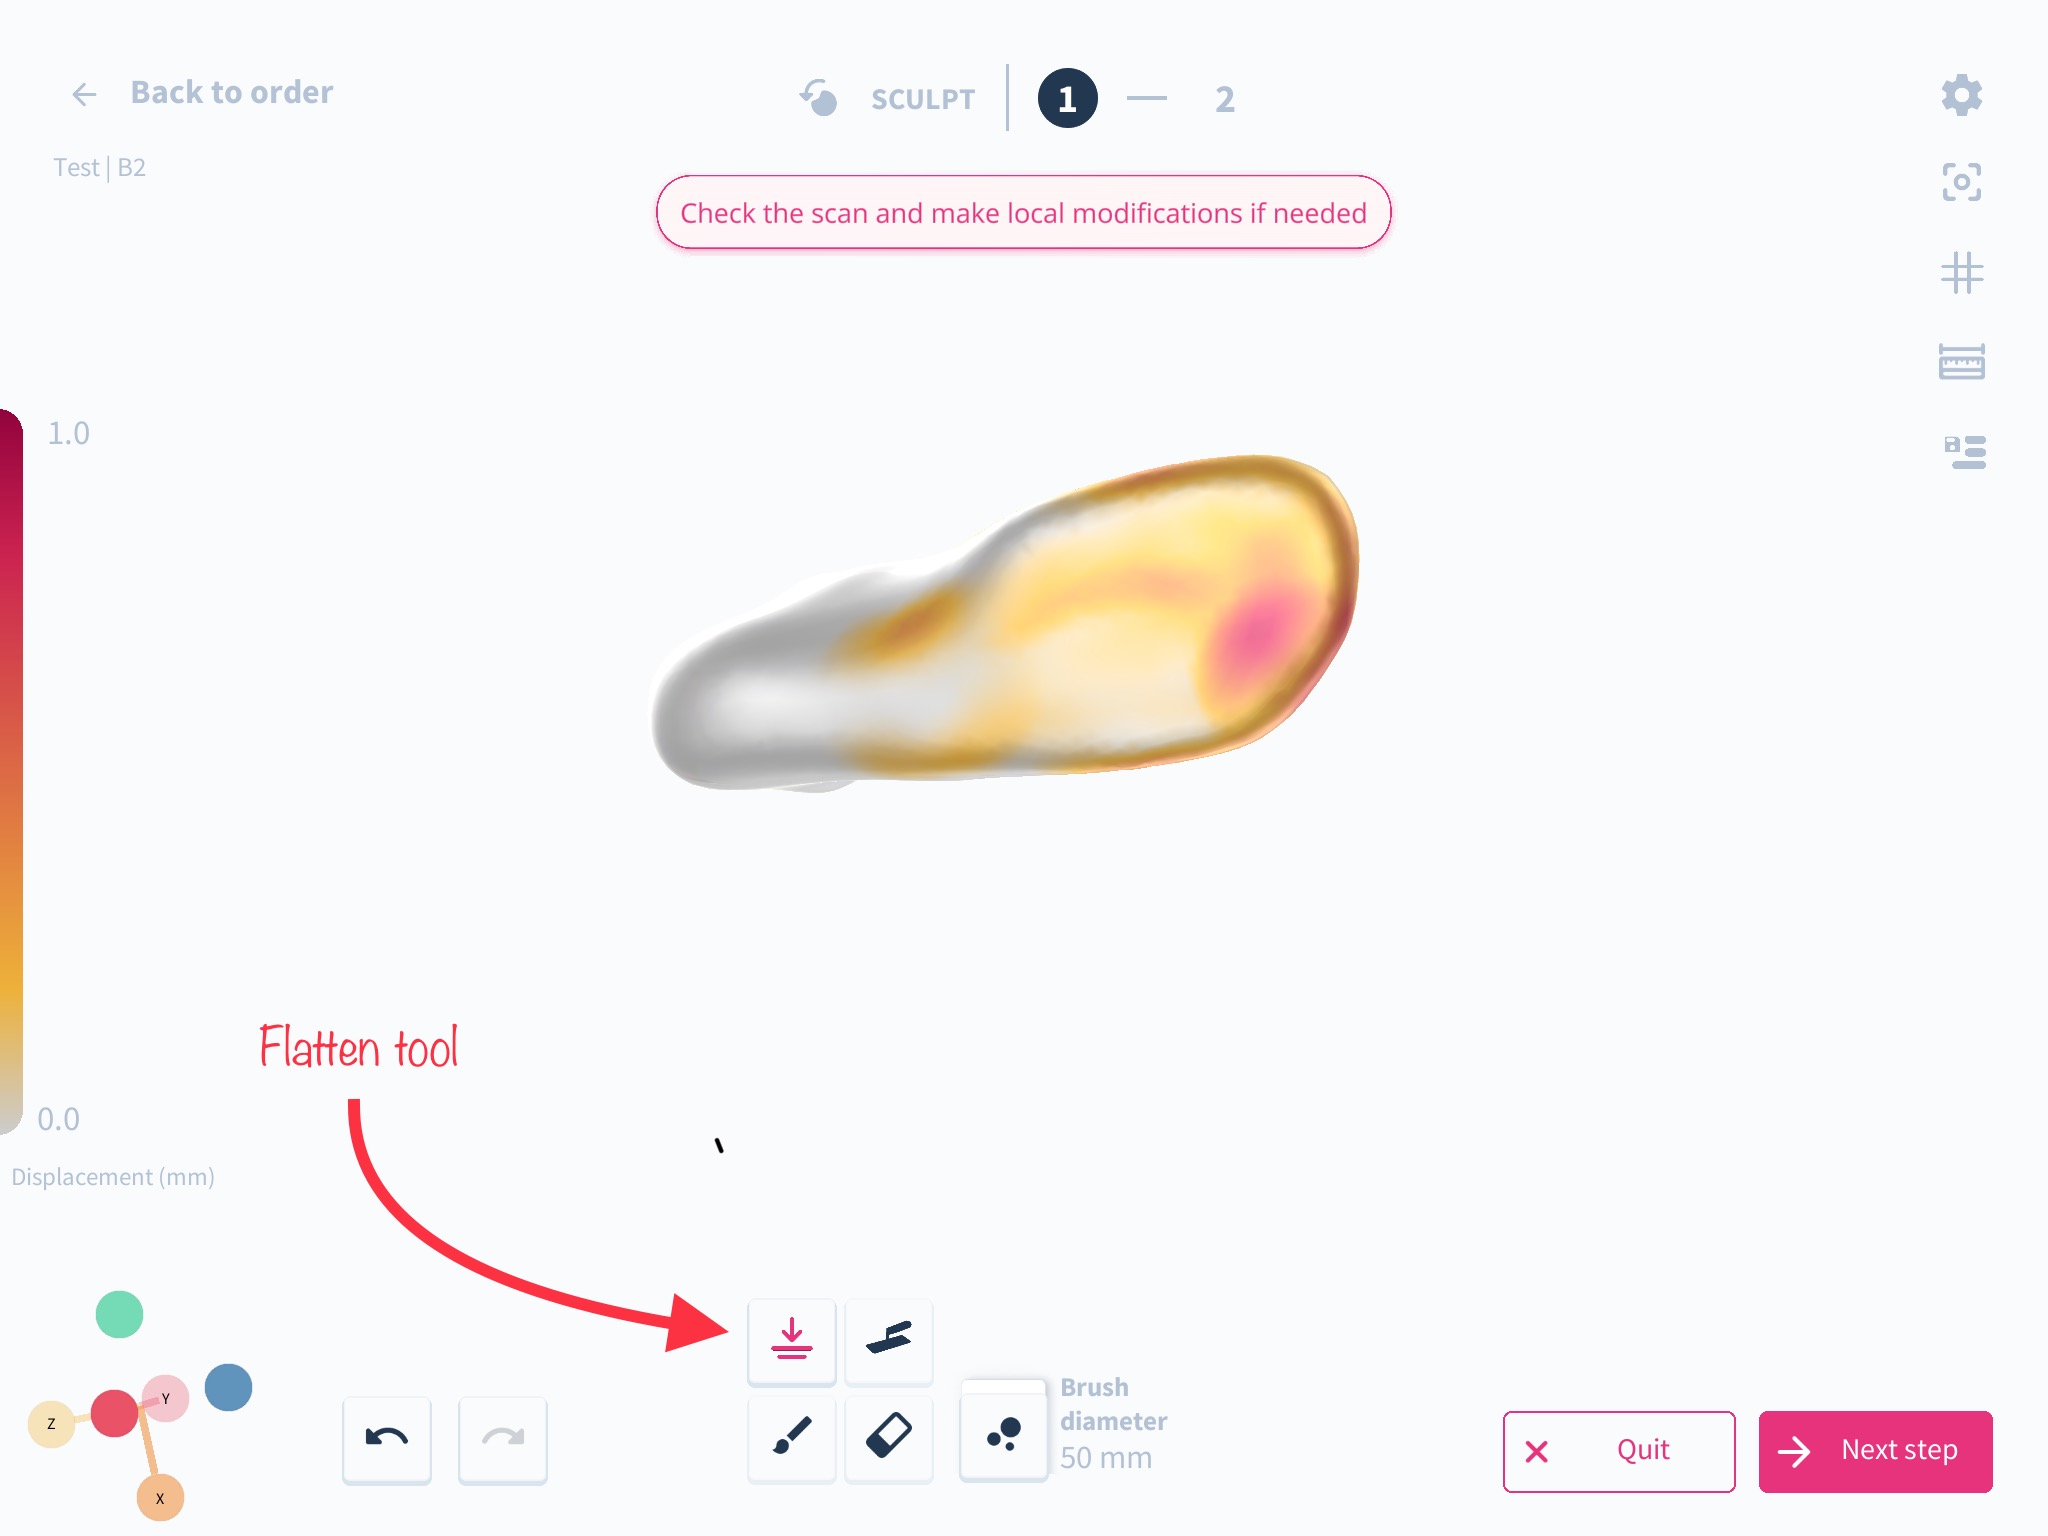
This tool is synonymous to adding material to smoothen out the cast and can be used to bring the surface geometry to an even plane.
How do you use this feature? Step-by-step guide
- On your spentys app, in the sculpt section, you can access the flatten tool the bottom of the screen just above the paint brush.
- Once selected, you can adjust the size of the brush.
- The red areas signify an increase of 1mm and decreases as the area shows varied shades of orange.
FreeForma: Straight Line Erase Tool Added
What we've changed
We have added a new tool called Straight Line Erase to FreeForma. This tool allows users to erase in a straight line, similar to the draw line tool. Additionally, we have restyled the tool palette for a better user experience.
How it affects you
If you are a user of FreeForma, this update provides you with a more efficient way to erase on the platform. With the Straight Line Erase tool, you can now erase in a straight line and save time. The restyled tool palette also enhances the user experience by providing a more visually appealing and easy-to-use interface.
How to use it
To utilize the Straight Line Erase tool in freeForma mode, select the tool from the options provided and choose two points on the area that you wish to erase. The tool functions in the same way as the draw line tool, except that it erases instead of drawing. You can access the redesigned tool palette by clicking on the tool icon on the left-hand side of the screen.
Draggable thumb trimline
What has changed?
The method for adjusting the thumb trimline has been simplified.
How it affects you
It is now easier and more user-friendly to modify the thumb trimline.
How to use it?
Place your finger on the node and move it to the desired position.
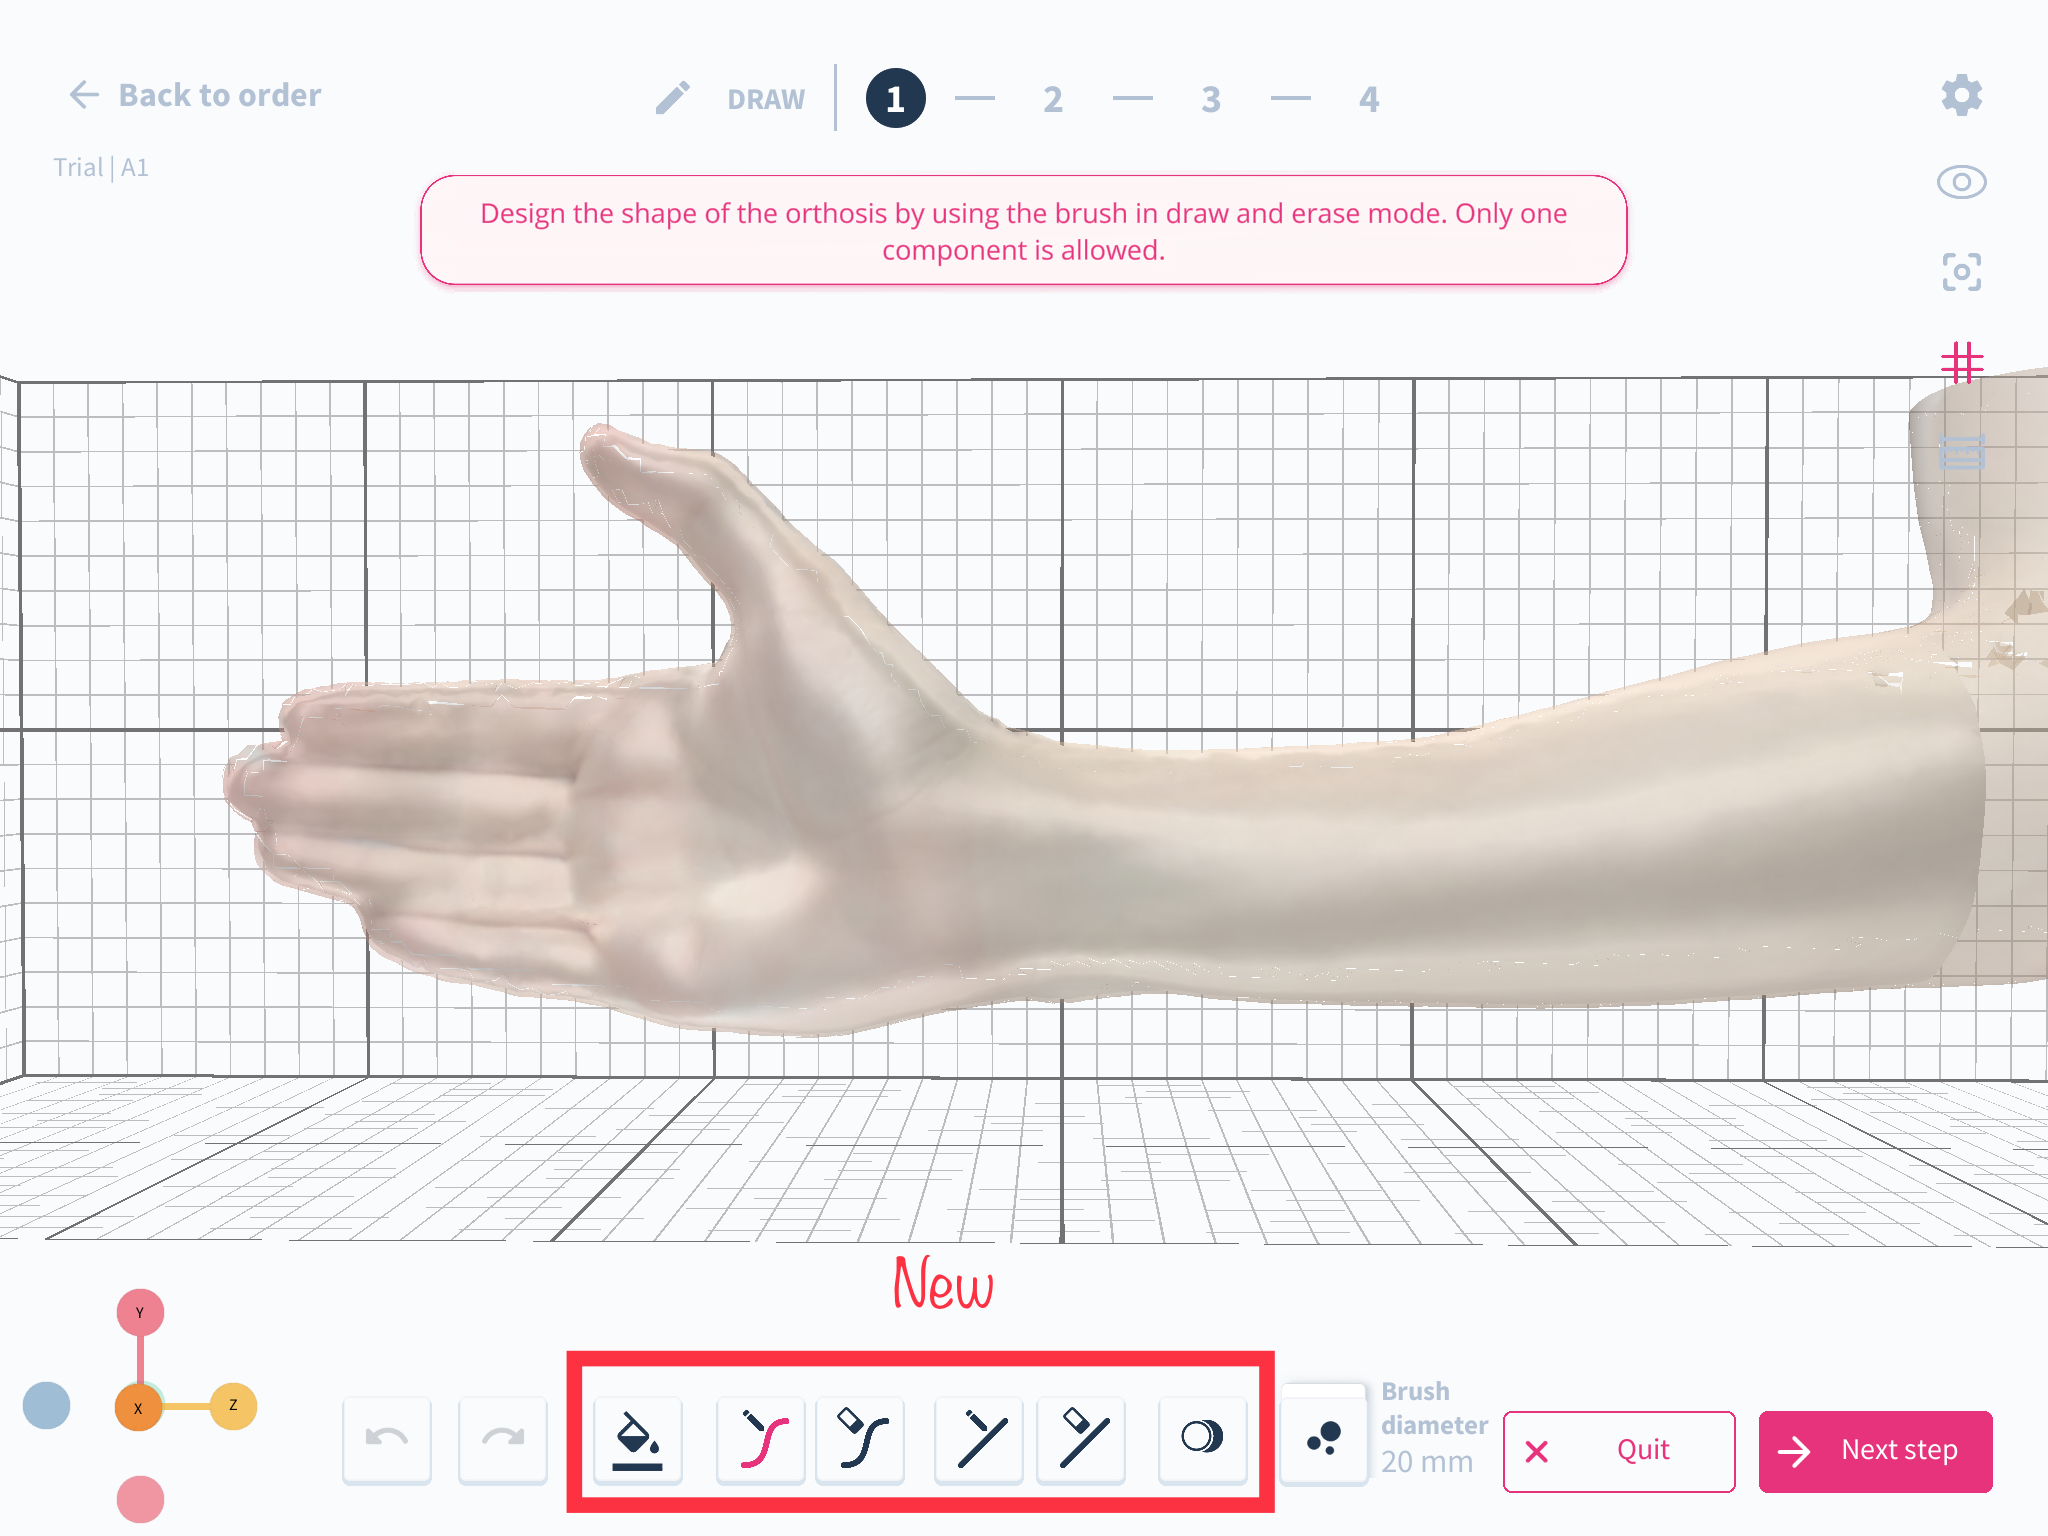
Default brush diameter in FreeForma set to 20mm
What has changed?
The default brush diameter in FreeForma is now set to 20mm.
How it affects you
This prevents the need to reduce the brush diameter from 50mm each time.
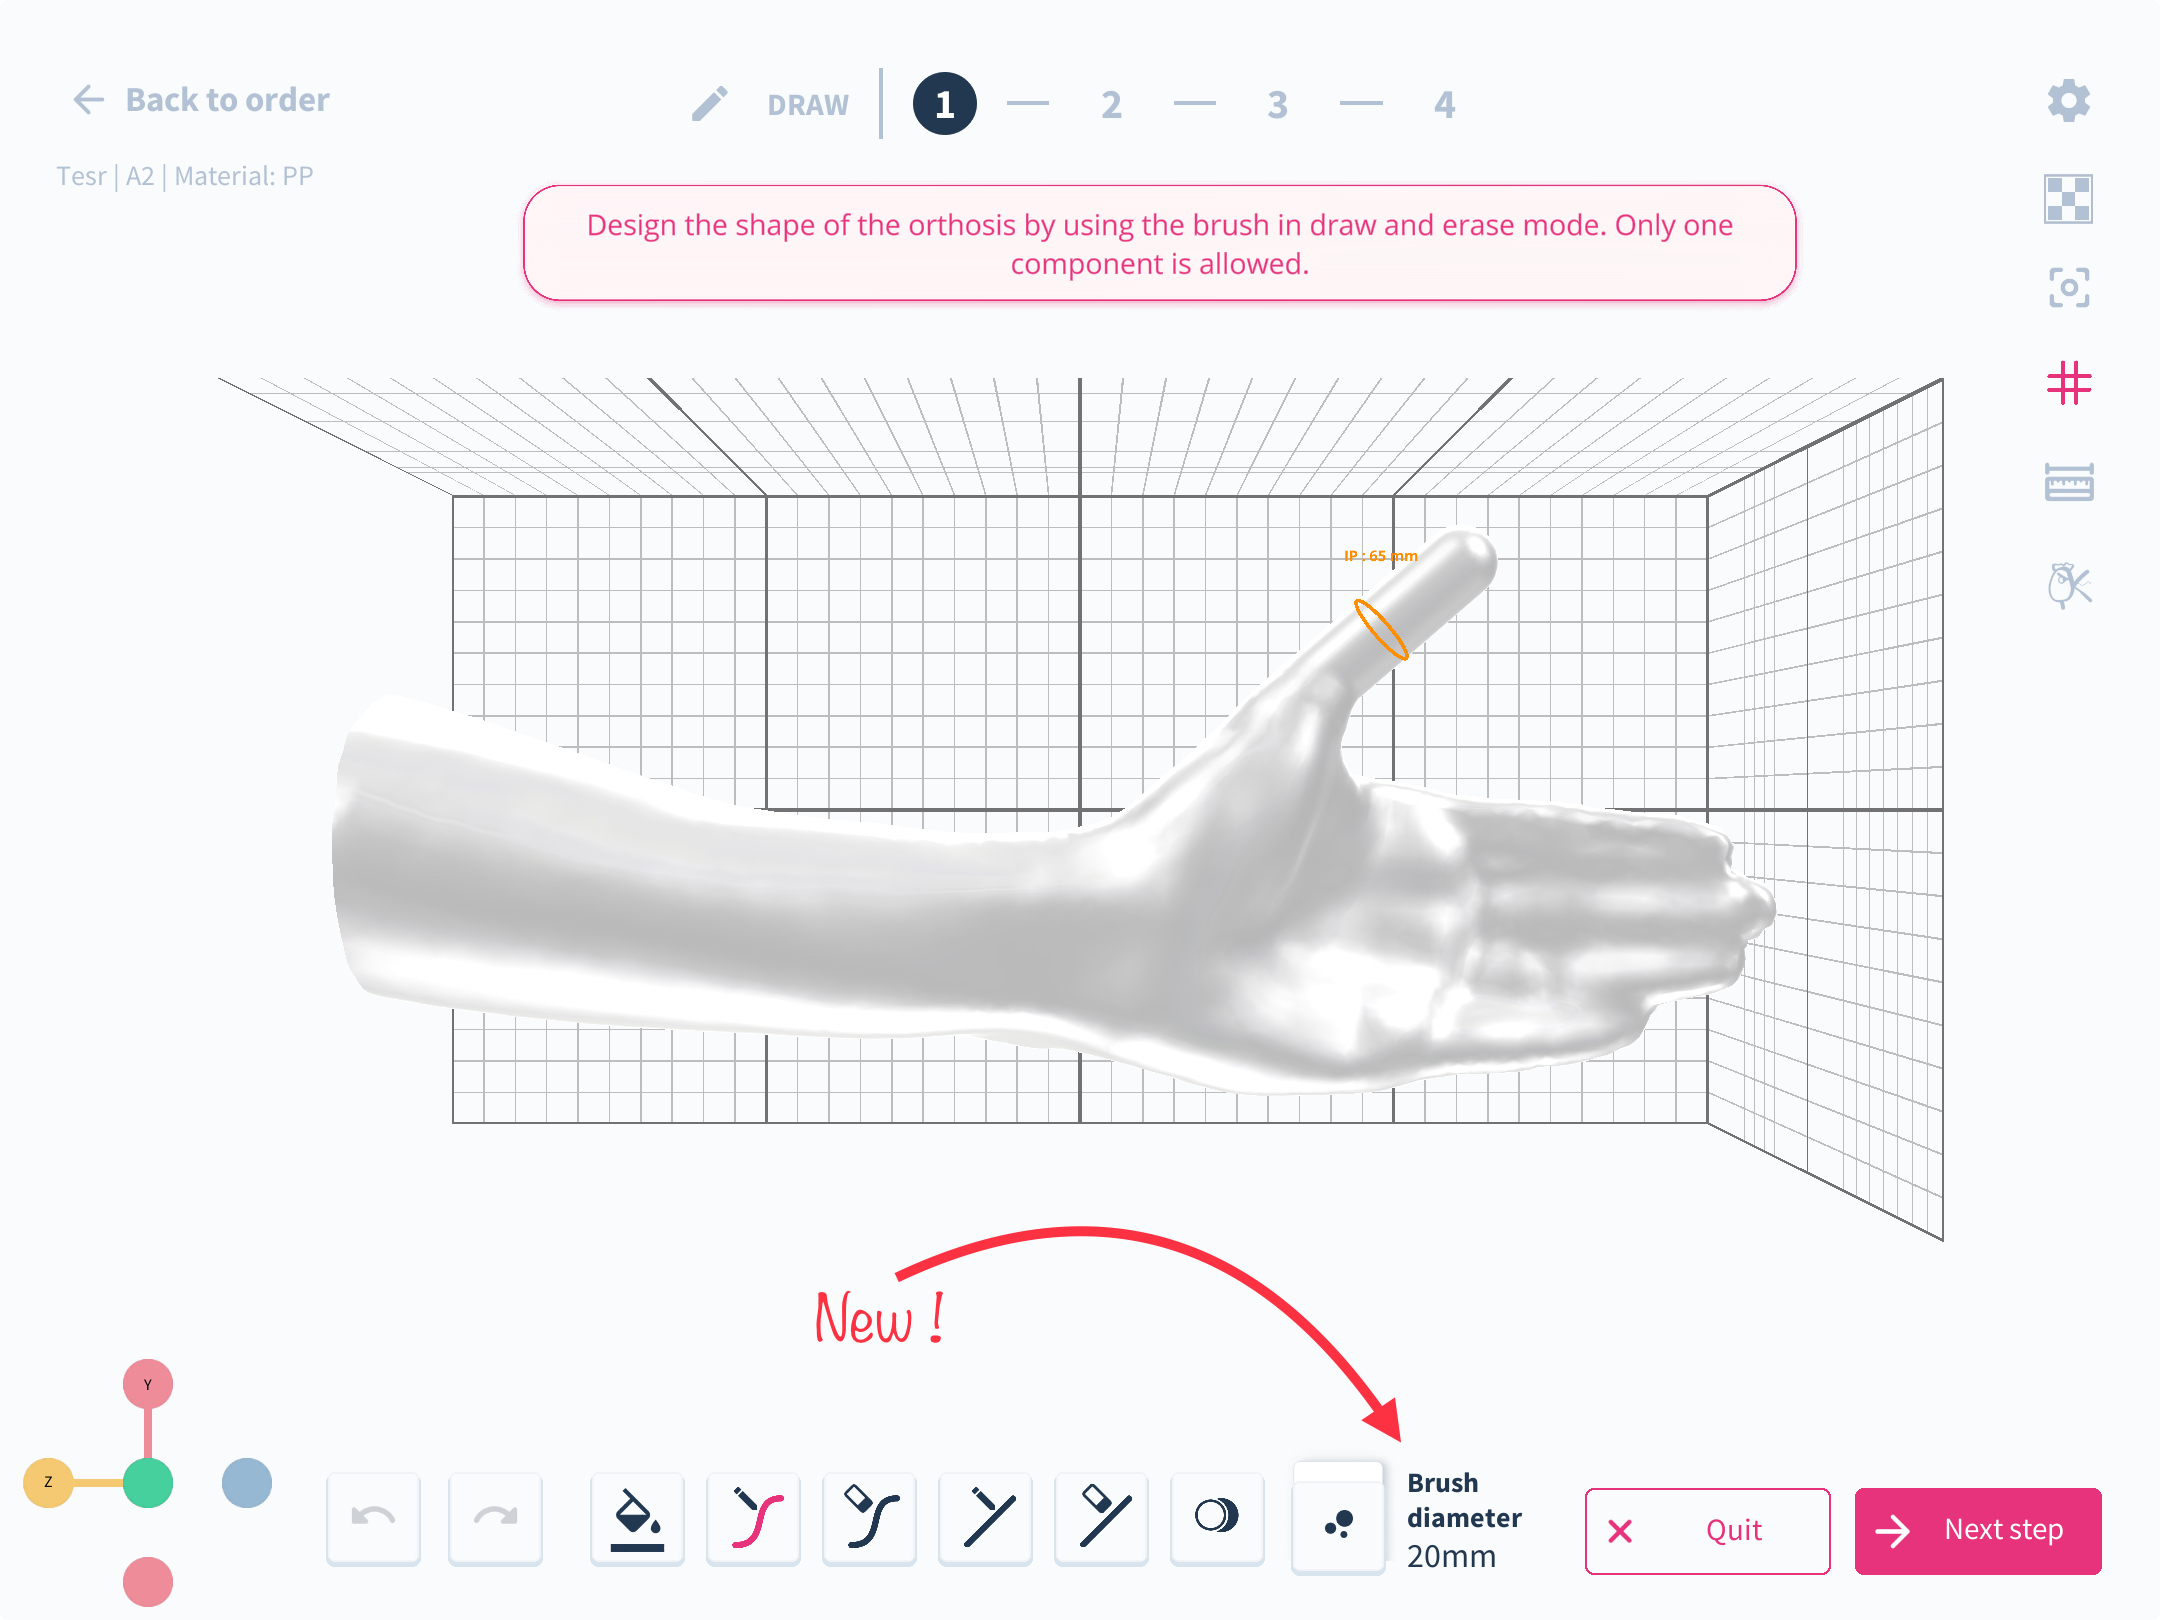
How to use it?
Start using the brush in FreeForma; it will default to 20mm diameter.
Demo Scan of a Foot
What has changed:
A demo scan of a foot is now accessible when selecting B products on the right lower limb.
How it affects you:
Provides a realistic preview to help in designing and fitting orthotics more accurately.
How to use it:
Access the demo scan through the product design interface for B products to enhance your design process.
Bug Fix: Improved measurement tool
Bug fixes to improve saving measurements to a maximum of 10 and prevent users from having two measurements with the same name.

Comb3D Import Scan
What has changed:
Integration with Comb3D scan technology has been introduced, allowing users to import 3D scans directly via an API. Comb3D technology offers easy-to-use 3D scanning capabilities, using the iPhone's front-facing camera to capture detailed scans of patients' anatomy for custom orthotic and prosthetic design.
How it affects you:
This integration with Comb enhances the orthotic creation process by leveraging Comb's Iphone-based 3D scanning technology. By importing accurate 3D scans from Comb directly into Spentys design software, you gain a streamlined workflow that saves considerable time and resources.
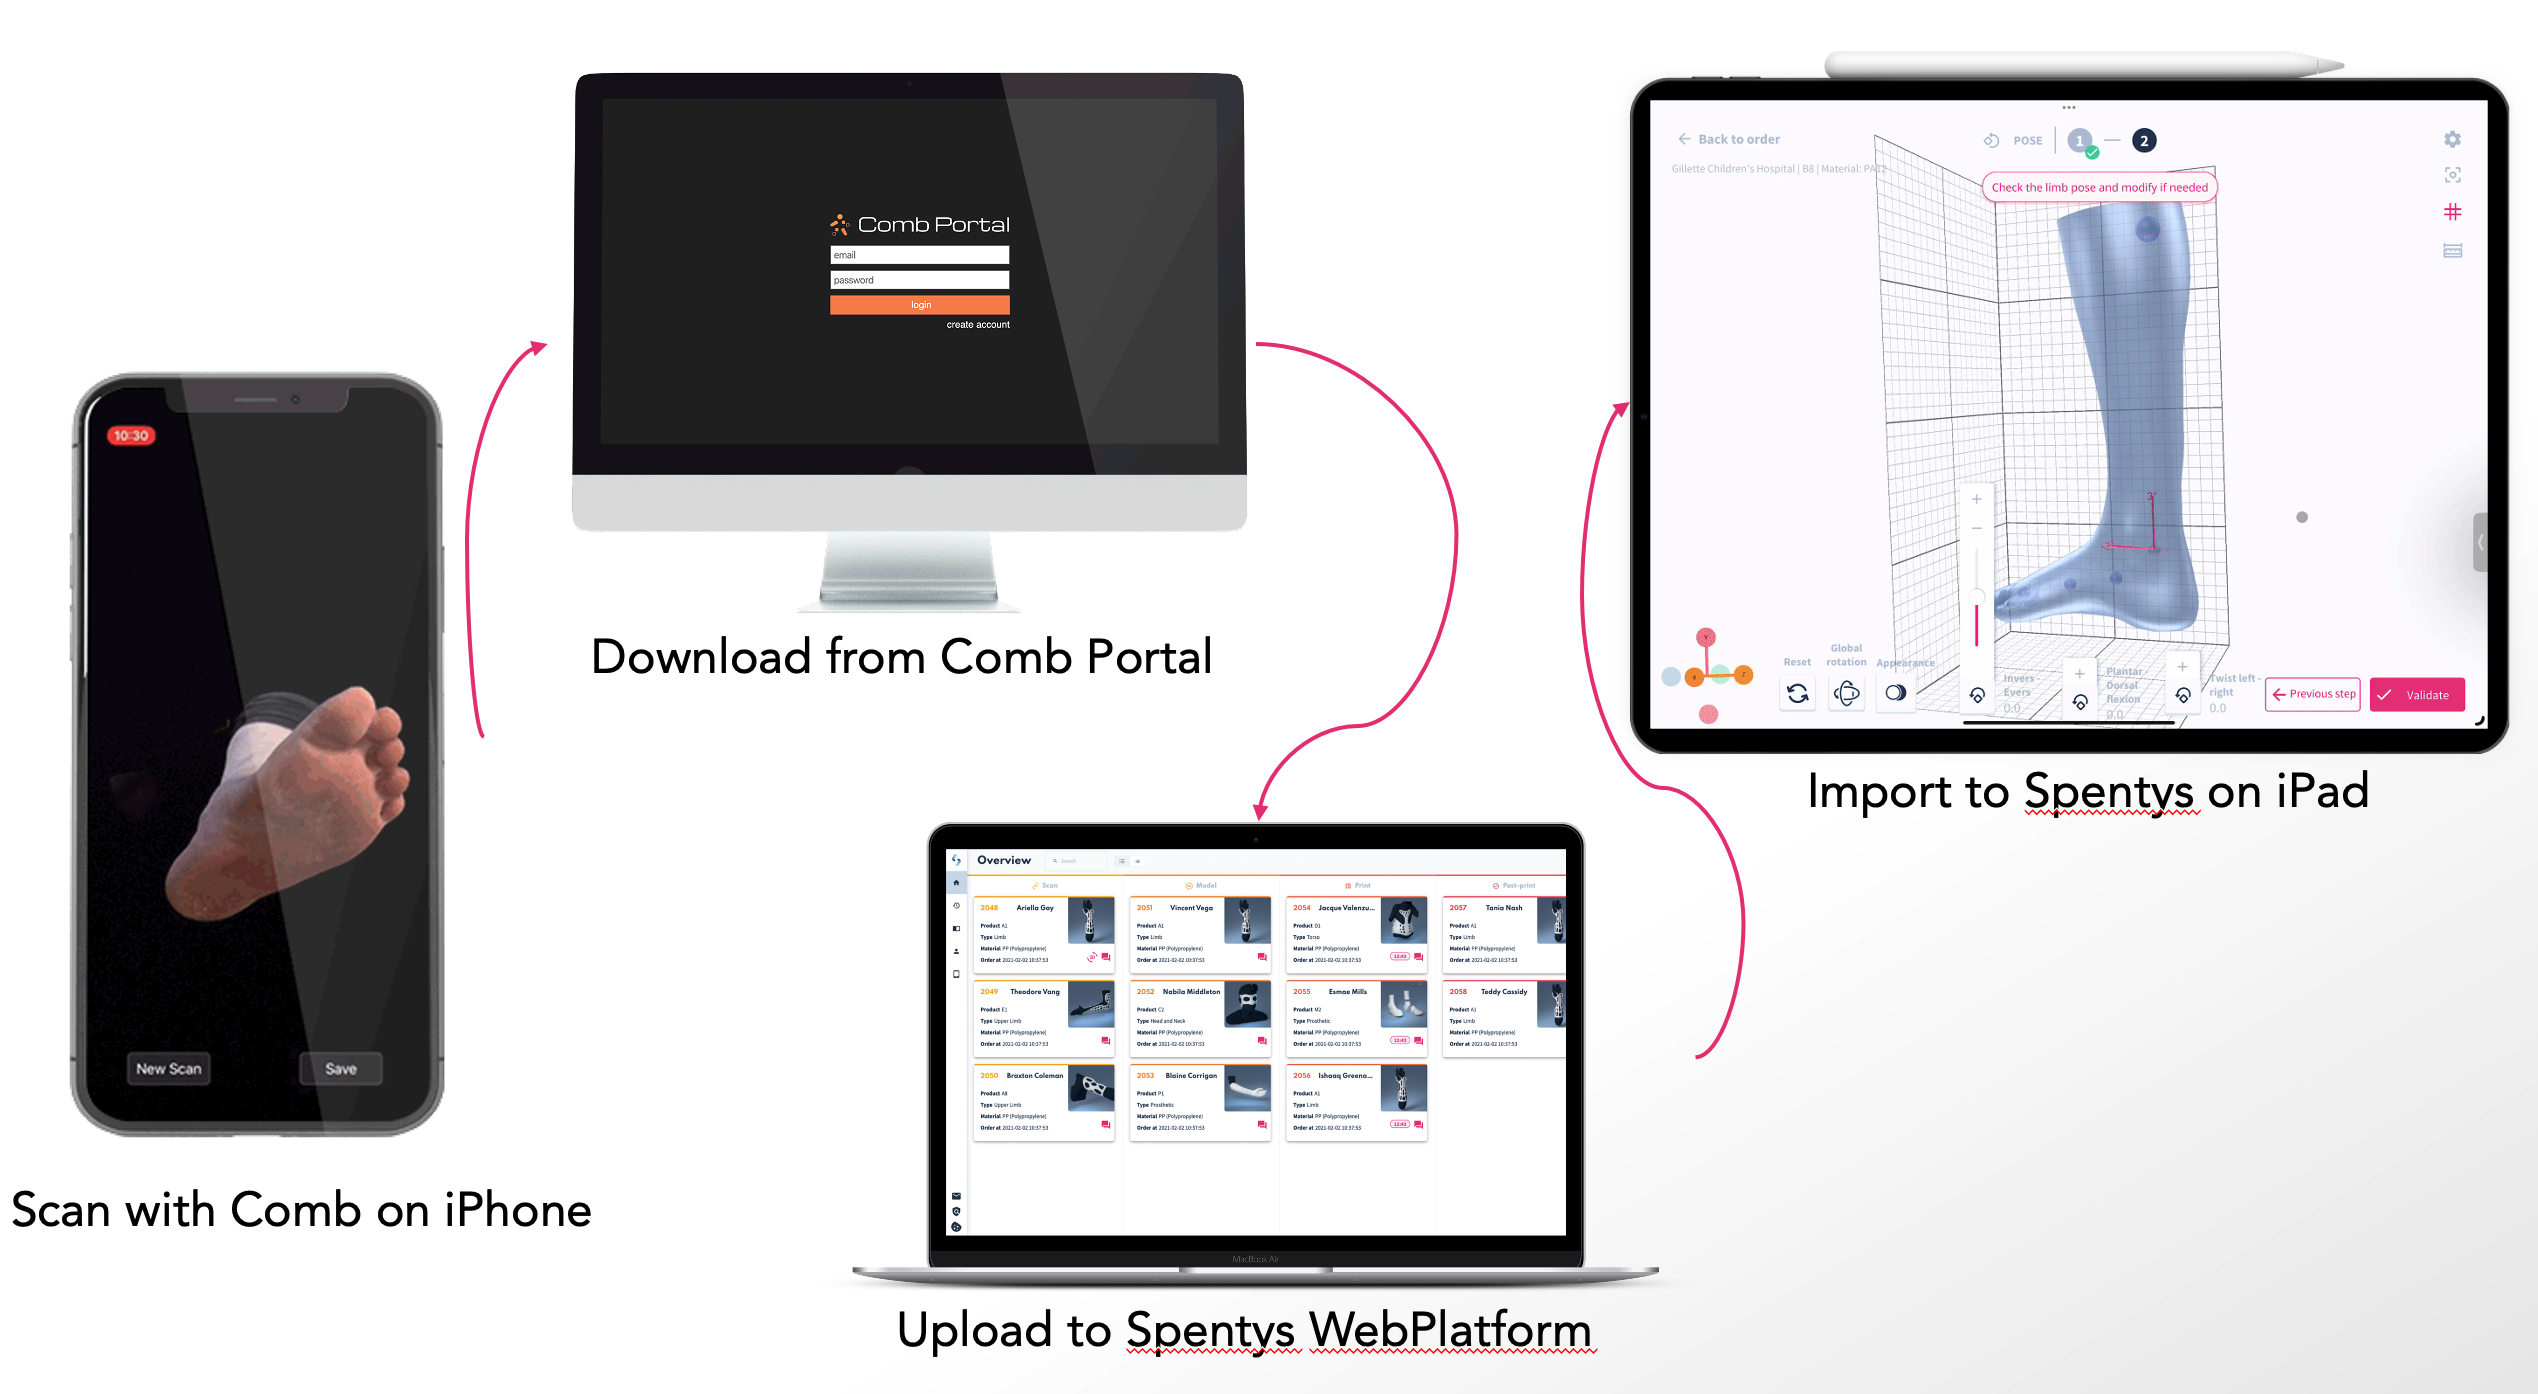
How to use it:
To leverage the Comb3D import feature, simply initiate a scan using the Comb app on your compatible iPhone device. After completing the scan, it's seamlessly saved and can be directly imported into Spentys software from the Comb app itself without the need for desktop intervention. This direct import capability streamlines your workflow, allowing you to quickly and easily incorporate accurate 3D patient scans into the Spentys software.
Updated Crop tool
Spentys' new crop tool allows you to cut scans at your desired angle. Our crop tool is used to cut out selected portions of a scan during the cleanup step to allow the clinician sculpt only a select part of the limb.
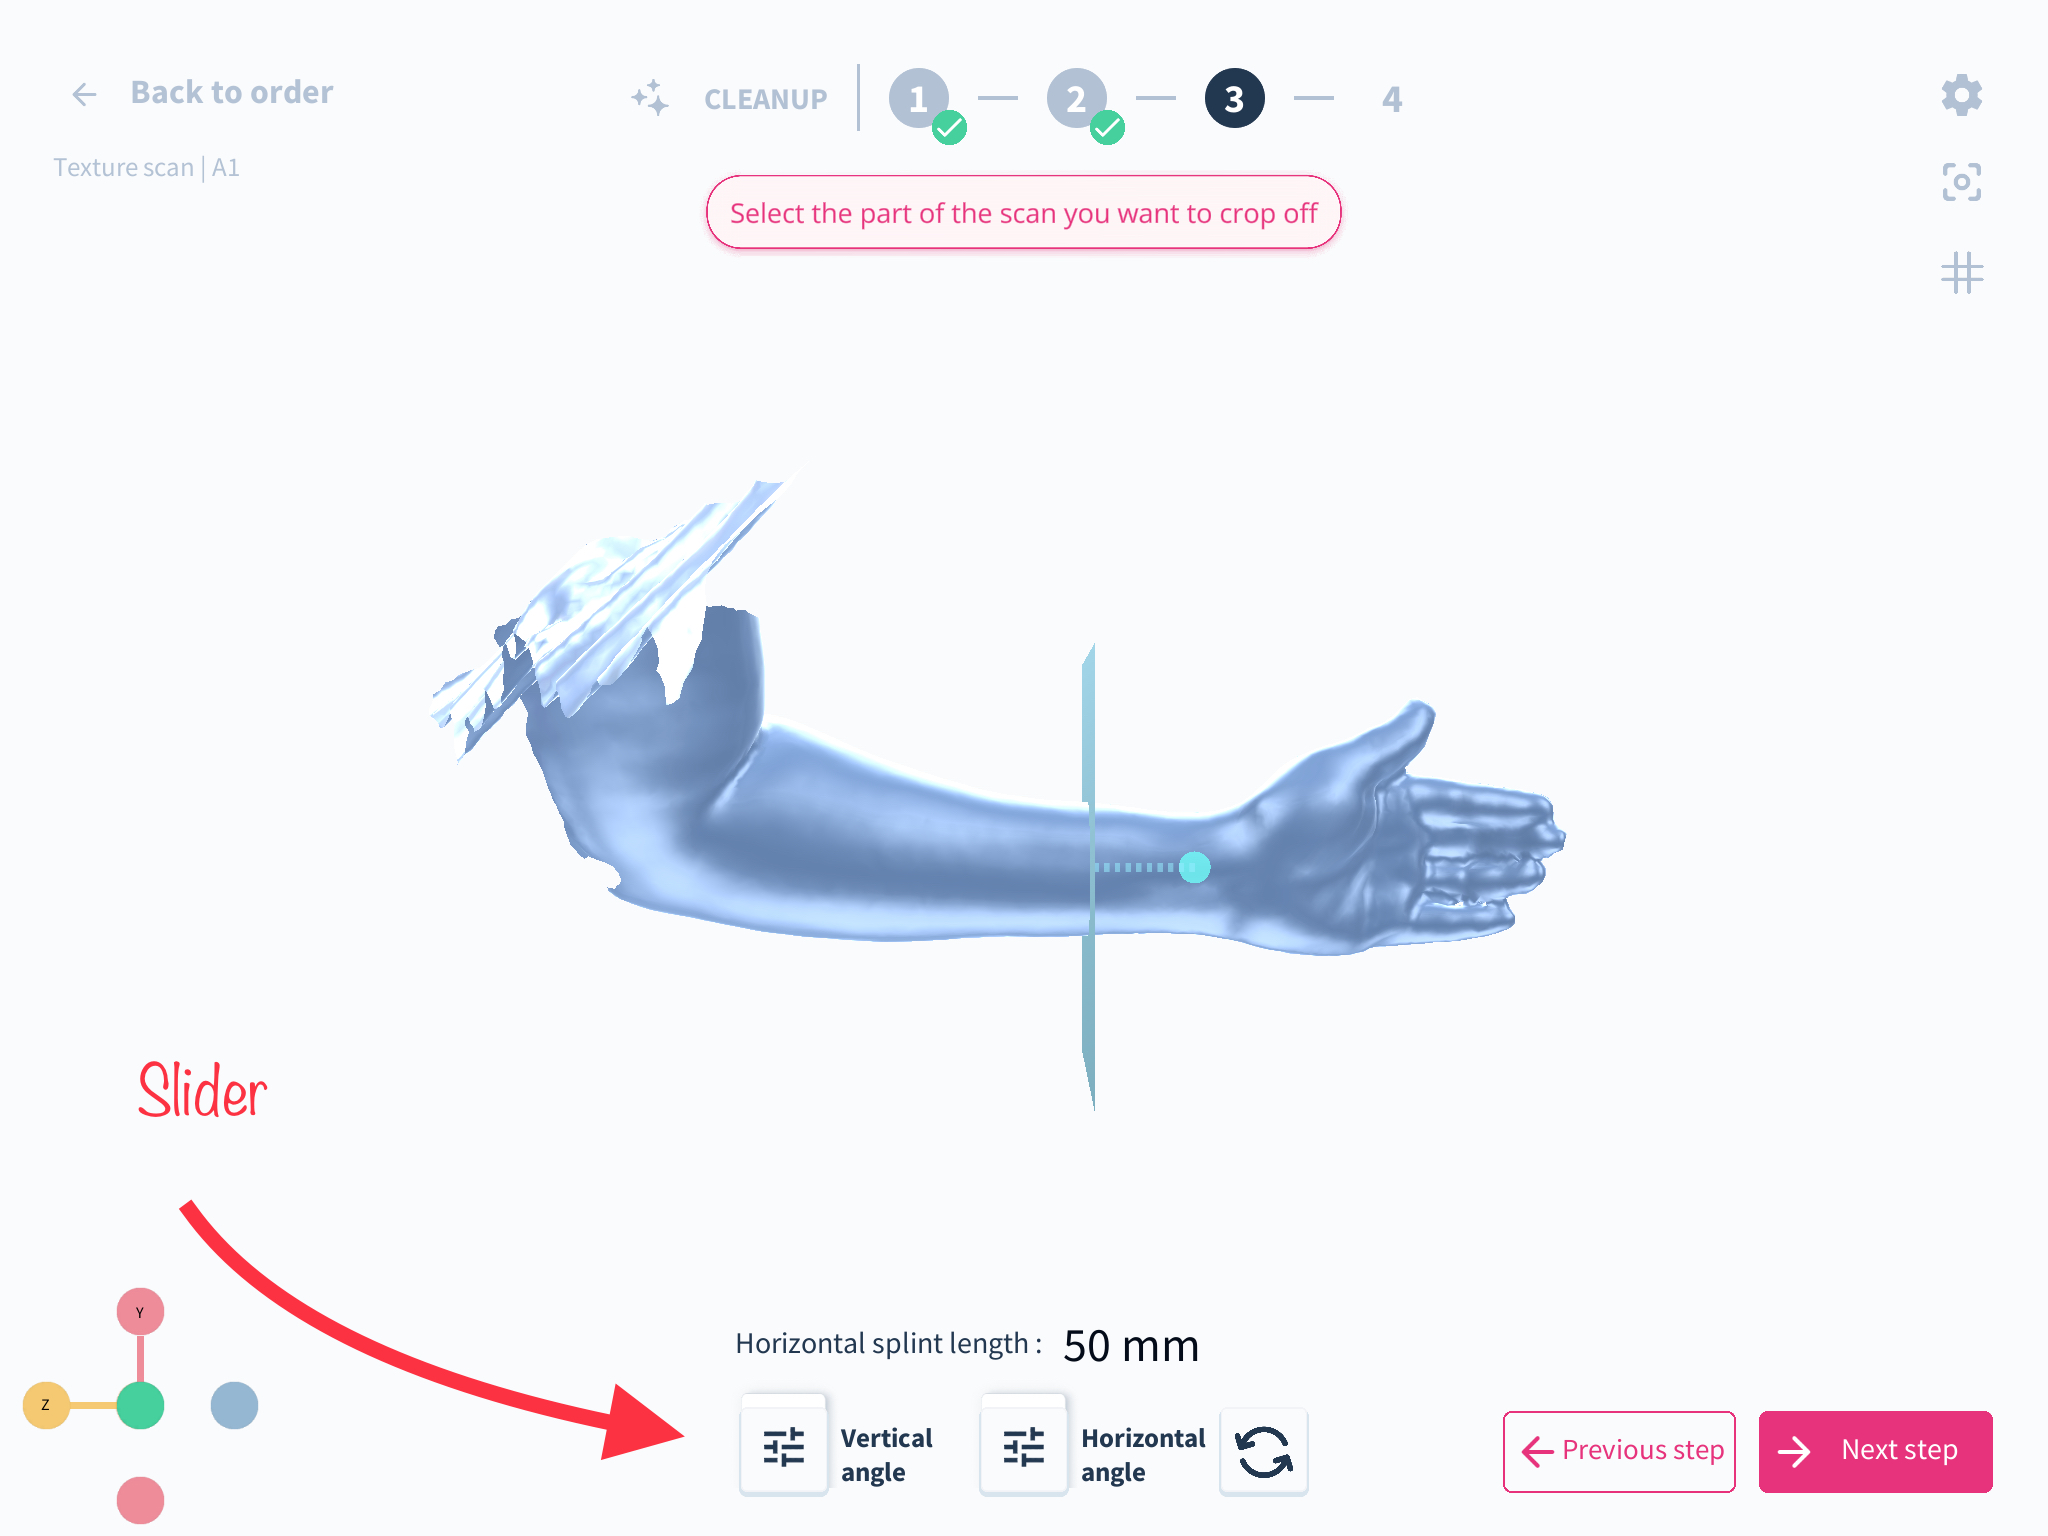
With the addition of angular sliders, you can now crop your scanned model either vertically or horizontally at different angles.
You will find this update most useful if you deal with complicated scans that were not positioned accurately or due to spasticity and contracture, the limb cannot be immobilised in its most functional state hence the landmark settings will be completely off and some manual manipulation will be required during the crop.
Closing Systems level UI improvements
What has changed?
The UI for closing systems now uses a dropdown menu instead of separate buttons.
How it affects you
This change streamlines the selection process for closing systems, making it more intuitive.
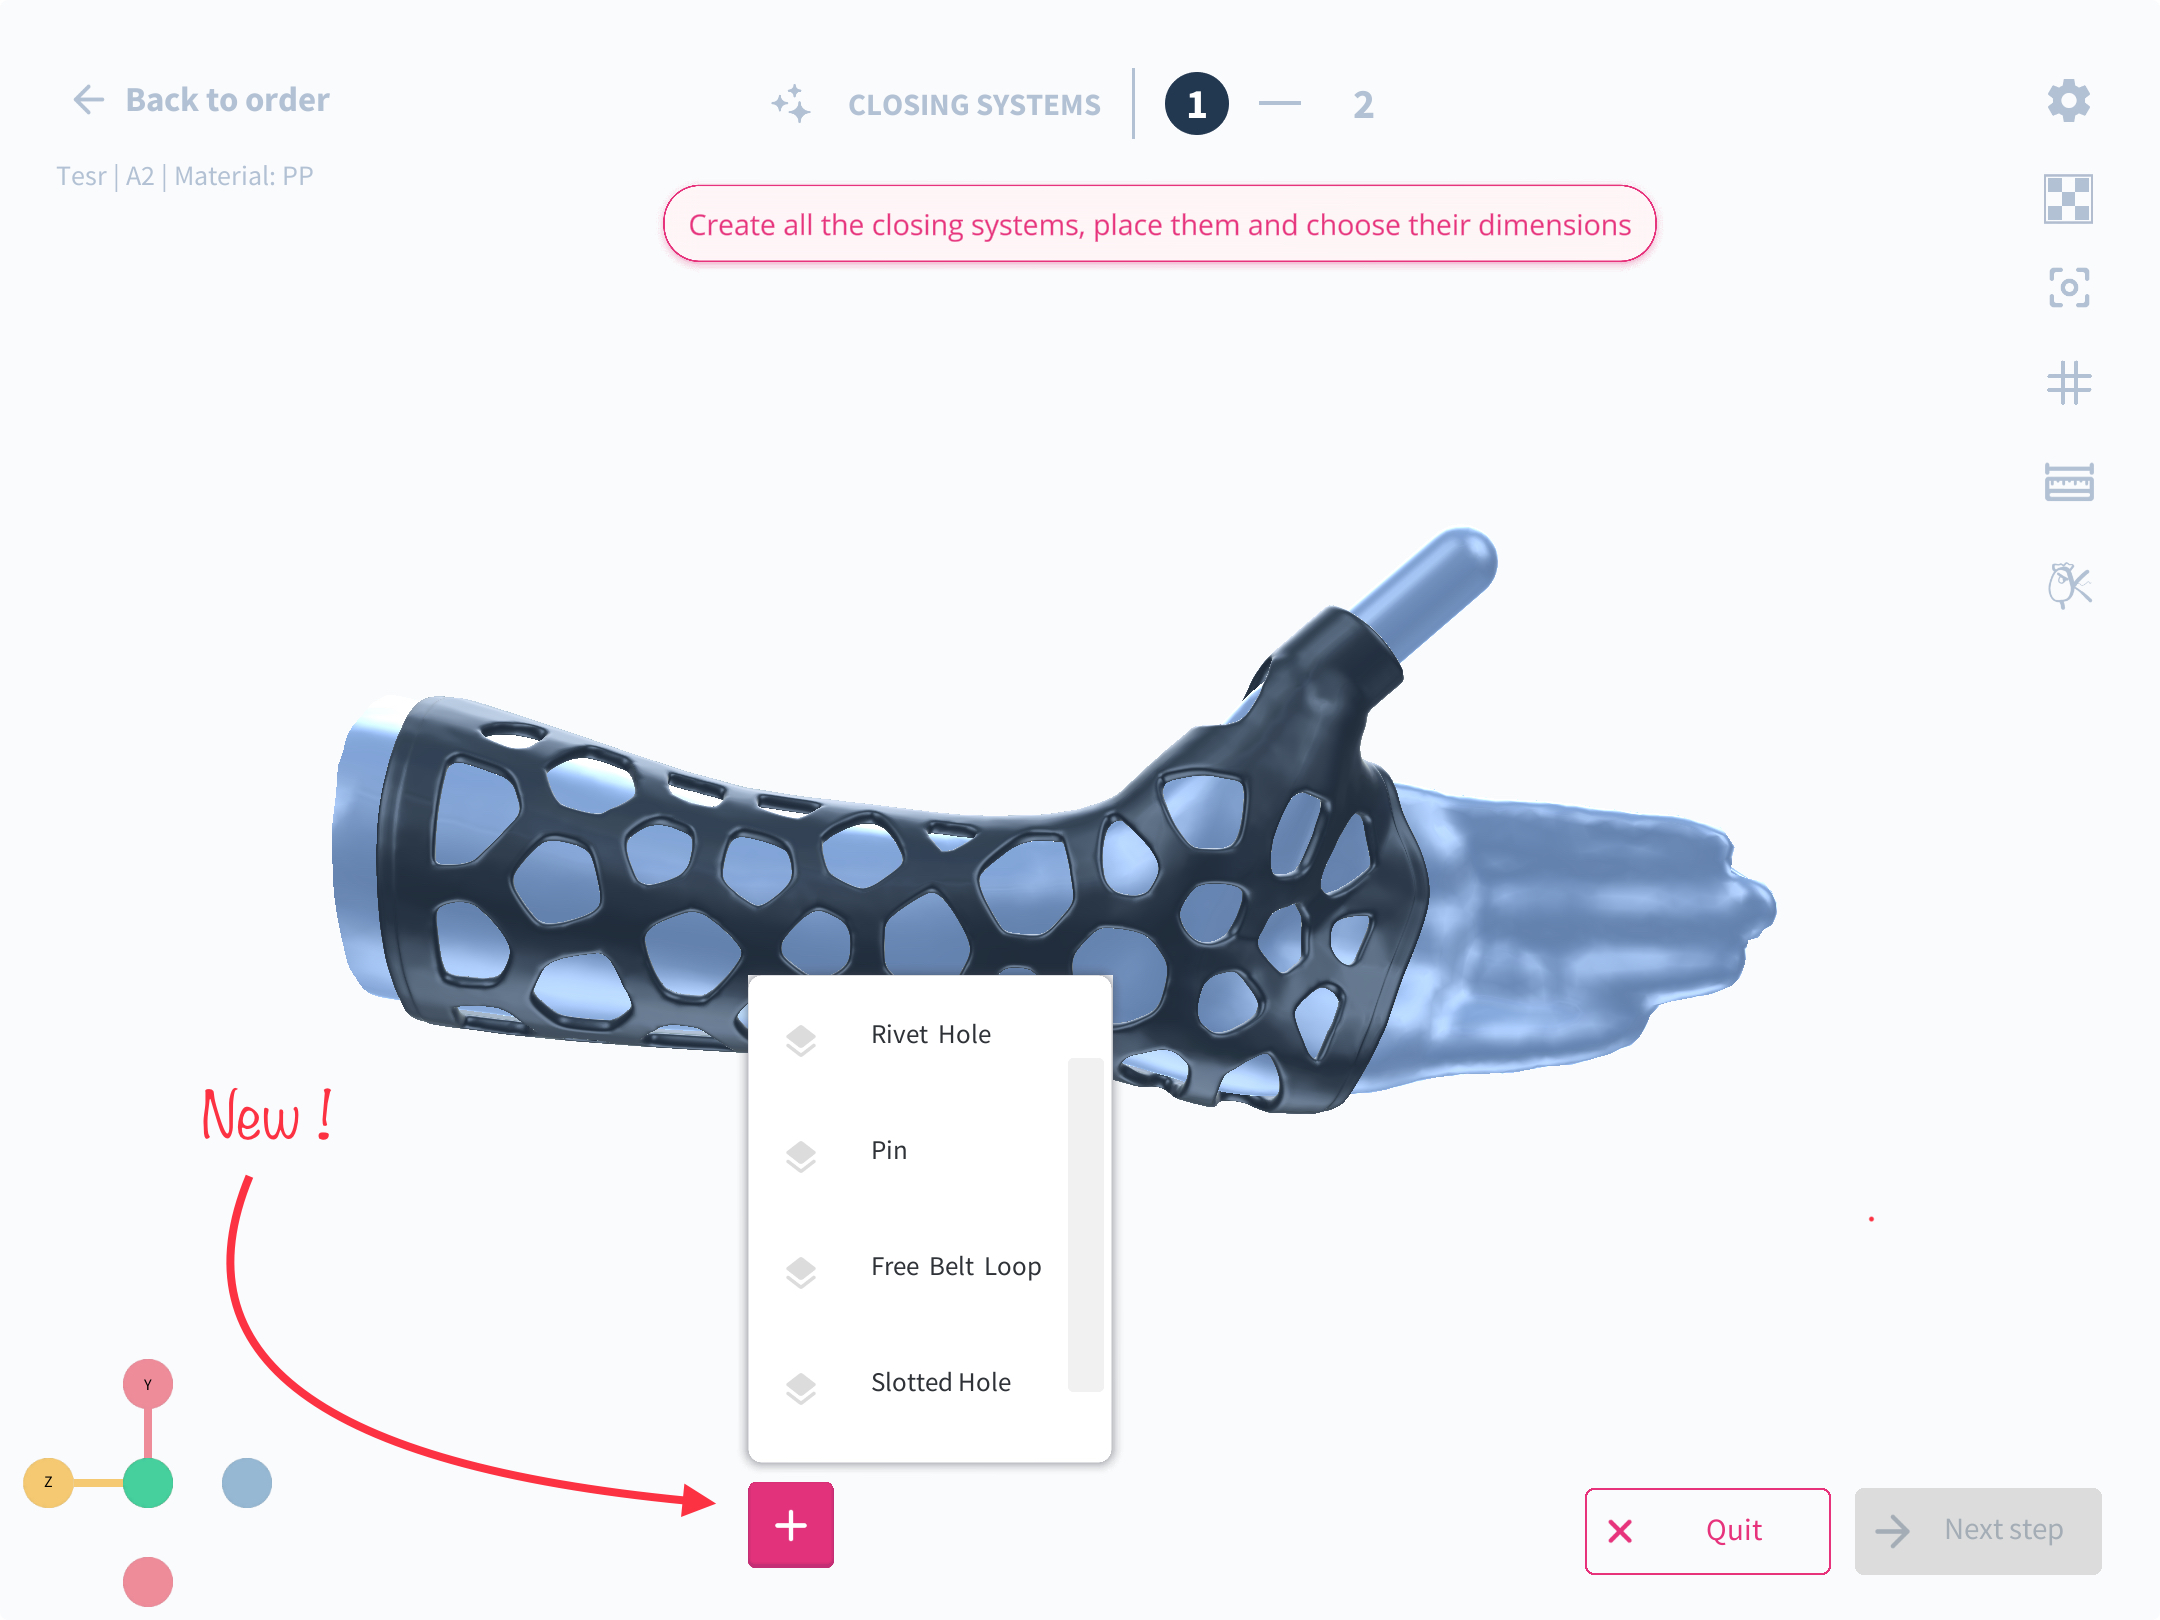
How to use it?
Click on the « + » icon to display the dropdown menu, then select the desired closing system.
Closing System Mushroom Bug Fix
What has changed: We have addressed and resolved a bug that impacted the dimension scaling of the Closing System Mushroom pin in relation to its hole, as illustrated in the image below.

How it affects you: This correction prevents any scaling discrepancies when you are adjusting the size of the headed pin, ensuring the dimensions remain proportionate and accurate.
How to use it: As you employ the Closing System Mushroom, feel free to scale up or adjust the size of the headed pin with the assurance that the welding hole will retain its original dimensions and not be scaled inappropriately.
Closing System Overlap Bug Fix
What has changed: We have successfully rectified a bug in the Closing System that previously permitted the creation of overlapping items.
How it affects you: This fix enhances your workflow by ensuring a smoother operation within the Closing System, as it eliminates the possibility of items overlapping, which could have caused complications or inaccuracies.
How to use it: You can now confidently work within the Closing System, knowing that the placement and movement of items are constrained by the distance to boundaries, preventing any unintended overlapping.
Cleanup Level Manual Alignment and UI Simplification
What has changed: We have reintegrated the manual alignment step into the Cleanup Level, along with a simplified User Interface (UI). This decision came from the realization that relying solely on landmark placements might not suffice for aligning certain scans accurately. However, this reintroduced step is less cumbersome and functions as an effortless additional step.
How it affects you: The reintroduction of manual alignment, in combination with a streamlined UI, significantly enhances the alignment quality of your scans. This, in turn, facilitates the more precise modeling of devices.
How to use it: There is no need for any specific action on your part. The manual alignment step has been seamlessly integrated into the workflow and automatically follows the cleanup step.

Change from "Alveoli" to "Holes"
What Changed: We've replaced the term "alveoli" with "holes" in our descriptions to enhance clarity. Additionally, we've introduced the option to select designs without any holes.
How It Affects You:This change offers you more flexibility and control over your design preferences, allowing for a more customized experience.
How to Use It:For details on how to make your selection, please refer to the options shown in the images provided below.
AutoForma Standard Upgrade
What has changed:
AutoForma has been significantly enhanced, allowing users to customize the boundaries of their 3D model more extensively, including adjustments to the alveoli pattern and border thickness.
How it affects you:
This upgrade offers unprecedented control over the design process, allowing for more precise tailoring of the product to specific needs and aesthetics.

How to use it:
Access the enhanced features through the AutoForma settings in your design interface, where you can easily adjust model boundaries, alveoli patterns, and border thickness as part of your design workflow.
Advanced Pose for Forearm Feature Reintroduced
What we’ve changed
We have reintroduced the Advanced Pose for Forearm feature, which now allows pose controls on every single finger. However, it requires an internet connection to work. Additionally, the feature now fits a template model on the scan, which enables the generated pose model to be fit to the scan, even if all fingers are welded together in the process of scanning.
How it affects you
This update will provide you with enhanced pose controls of all phalangeal joints, allowing you to manipulate every finger and achieve the desired flexion or extension. The feature’s ability to fit a template model on the scan is beneficial when the scan has all fingers welded together, as it can now approximate the circumference of each finger.
How to use it
To utilize the Advanced Pose for Forearm feature, make sure that your device is connected to the internet. After completing the cleanup stage, proceed to the pose stage by selecting any upper limb product. From there, choose "Advanced mode," and select all of the landmarks as displayed in the image located directly below your scan. Once the feature has finished computing, you can adjust the extension-flexion of each finger joint. Even if all fingers are fused together, the feature will fit a template model on the scan. Please note that the circumference of each finger will be an estimation.

Autoforma UI Restyling
What has changed: We have given the autoforma User Interface (UI) a makeover to make room for new tools and to enhance the user experience through better interaction. Please note that the subtle differences in slider options and drop down menus are now product specific.
How it affects you: The revamped UI offers a more streamlined and uncluttered workspace, with improved organization of tools. This makes your tasks smoother and potentially quicker as you can find and use the tools you need with greater ease.
How to use it: Simply navigate through the refreshed and tidier UI to effortlessly select and configure the tools you need for your work. The new layout is designed to be intuitive, allowing for a more efficient and enjoyable user experience.
Addition of 2FA on the web platform
We have included a two-factor authentication process to enable users to secure their accounts and protect patient data.

Assess photos and notes on order details page
What we’ve changed
In this update, we have made it possible for photos and notes attached to an order to be visible directly on the order detail page. This improvement will save you time and effort by eliminating the need to access multiple pages or systems to view this information.
How it affects you
As a user of our system, you will now be able to easily access all relevant information about an order on a single page. The addition of photos and notes to the order detail page will make it easier for you to review and manage orders, improving your productivity and efficiency.
How to use it
To access the photos and notes attached to an order, simply navigate to the order detail page. Once there, you will be able to view any photos or notes that have been added to the order, allowing you to quickly and easily access all relevant information about the order in one place.
Addition of Mushroom Pin as Closing System in freeForma and autoForma
What we’ve changed
We have added a new tool to the Closing Systems level in freeForma and autoForma.This tool guides users in the creation Mushroom Pins. The Mushroom Pin is a pin with a large head that can be used to fasten strings and elastics on the splint.
How it affects you
As a user of freeForma and autoForma, this update provides you with an additional closing system option. The Mushroom Pin is especially useful for fastening strings and elastics on the splint. This feature can improve the efficiency of your workflow and save you time in creating custom splints.
How to use it
If you select autoForma modelling tool,you will see the closing system tab just after the beltloop tab. You can add rivets or mushroom pins by adding each point at you desired point on the splint. once you are done, validate them by clicking validate. In freeforma, the same applies
A more tailored approach to designing AFOs
What has changed:
An extra step has been added to the design process for AFOs, capturing essential information such as the patient's height, weight, clinical profile, and activity level.
How it affects you:
This update allows for a more tailored approach to designing ankle-foot orthoses (AFOs), ensuring that each device is perfectly suited to the individual needs and characteristics of the patient. By integrating this personal health data into the design, you can achieve a higher level of customization and functionality.

How to use it:
In the AFO design interface, you'll find the new "AFO Patient" step. Here, input the relevant patient details to inform the design process. This information will be used to guide the customization of the AFO, ensuring it meets the specific needs of the patient, from fit to function.

Indy van Loon
Certified orthotist at Leuk Orthopedie


Bas Gulpers
Orthopedic technician

Lais Kriwat
CEO


Tihomir Vrbanec
Orthopedic Technician


Helpful resources for you
We've created a wealth of information to help you in your digitalization journey including helpful guides, downloadable templates, and links to further reading materials.


Clinical trials
At Spentys, we are dedicated to scientific research and ensuring that our solutions are clinically viable and make sense from a healthcare perspective.
Whitepapers
Spentys is continuously investing time in developing knowledge articles for O&P professionals. Discover all the expert guides we developed until now.
Webinars
We bring together international thought leaders and the new digital generation to discuss innovation and how it will affect best practices in the industry.
Optimize the way you design and deliver custom-made orthoses.
You can start reducing the time spent designing your custom-made orthoses still today!
